I discovered this little secret, and now I can’t imagine my kitchen without it. This amazing cured egg yolk recipe transforms humble yolks into a vibrant, savory ingredient, glistening with rich color and deep umami. It’s perfect for busy families, adding gourmet flair to weeknight dinners and healthy recipes for families without any fuss. This age-old trick is truly a secret weapon in my kitchen – everyone loves the sophisticated depth it brings. Get ready to discover a budget-friendly way to add incredible umami and elevate everything from pasta to salads!
Ingredient List with Smart Choices
Here’s what you’ll need for this flavorful cured egg yolk recipe. Choosing fresh ingredients makes all the difference for a healthy, vibrant dish.
- 6 large egg yolks: Choose fresh, quality eggs for best color and richness.
- 250 g (1 cup) fine sea salt: The key curing agent, for drawing out moisture. (Fine table salt works if sea salt isn’t on hand.)
- 125 g (1/2 cup) granulated sugar: Balances saltiness and helps create a tender texture. (A lighter brown sugar can also be used for a slightly different note.)
- 10 g (2 teaspoons) smoked paprika: Adds a savory, smoky flavor and appealing color.
- Zest of 1 medium orange: Provides a bright, subtle citrus aroma.
- 30 g (1/4 cup) shelled unsalted pistachios: For the garnish, adding crunch and vibrant color.
- 5 g (1 teaspoon) ground sumac: Gives the crumble a lovely tangy finish.
- 5 ml (1 teaspoon) olive oil: For lightly greasing the baking sheet.
This cured egg yolk recipe is naturally gluten-free and dairy-free, a great option for healthy eating goals and easy dinner ideas.
Easy Step-by-Step Cooking Directions
Making this cured egg yolk recipe is simpler than you think! Follow these steps for perfect, firm yolks every time.
- Create the Curing Mixture: In a medium bowl, whisk together 250 g (1 cup) fine sea salt, 125 g (1/2 cup) granulated sugar, 10 g (2 teaspoons) smoked paprika, and the zest of 1 medium orange until well combined. The mixture should smell wonderfully aromatic.
- Prepare the Yolk Beds: Spread half of the curing mixture evenly in a shallow, non-reactive dish, like a glass baking pan. Use the back of a spoon to make six small indentations, ensuring they are spaced far enough apart for each yolk to rest.
- Nest the Yolks: Carefully separate the 6 egg yolks from their whites, making sure no white remains attached. Gently place one yolk into each indentation. This step is crucial for perfect curing.
- Cover and Cure: Carefully spoon the remaining curing mixture over the yolks, ensuring they are completely submerged. The yolks must not be exposed to air. Cover the container tightly with a lid or plastic wrap. You’ll feel a slight resistance as the salt begins to firm them up.
- Refrigerate for Curing: Refrigerate for 5 to 7 days. Check the yolks on day 5; they should feel firm and somewhat translucent, like a soft, semi-hard cheese, when gently pressed. If they feel too soft after 7 days, they might need another day or two, depending on your fridge’s humidity.
- Rinse and Dry Thoroughly: After curing, carefully retrieve the firm yolks. Gently rinse each yolk under a very slow stream of cold water to remove any curing mixture. Pat them extremely dry with paper towels, handling with care to avoid breakage. They will feel slightly tacky.
- Gentle Bake for Firmness: Preheat your oven to 75°C (170°F). Lightly brush a standard baking sheet with 5 ml (1 teaspoon) olive oil or line it with parchment paper. Arrange the dried cured yolks on the sheet, ensuring they don’t touch.
- Bake to Perfection: Bake for 1.5 to 2 hours, or until the yolks are firm throughout, with a consistency similar to hard cheese but still slightly pliable. They should not be brittle or crumbly. The color will deepen to a rich orange-red.
- Cool Completely: Turn off the oven and prop the door open slightly. Allow the cured yolks to cool completely inside the oven. This helps them dry out further and prevents condensation, giving you that ideal texture.
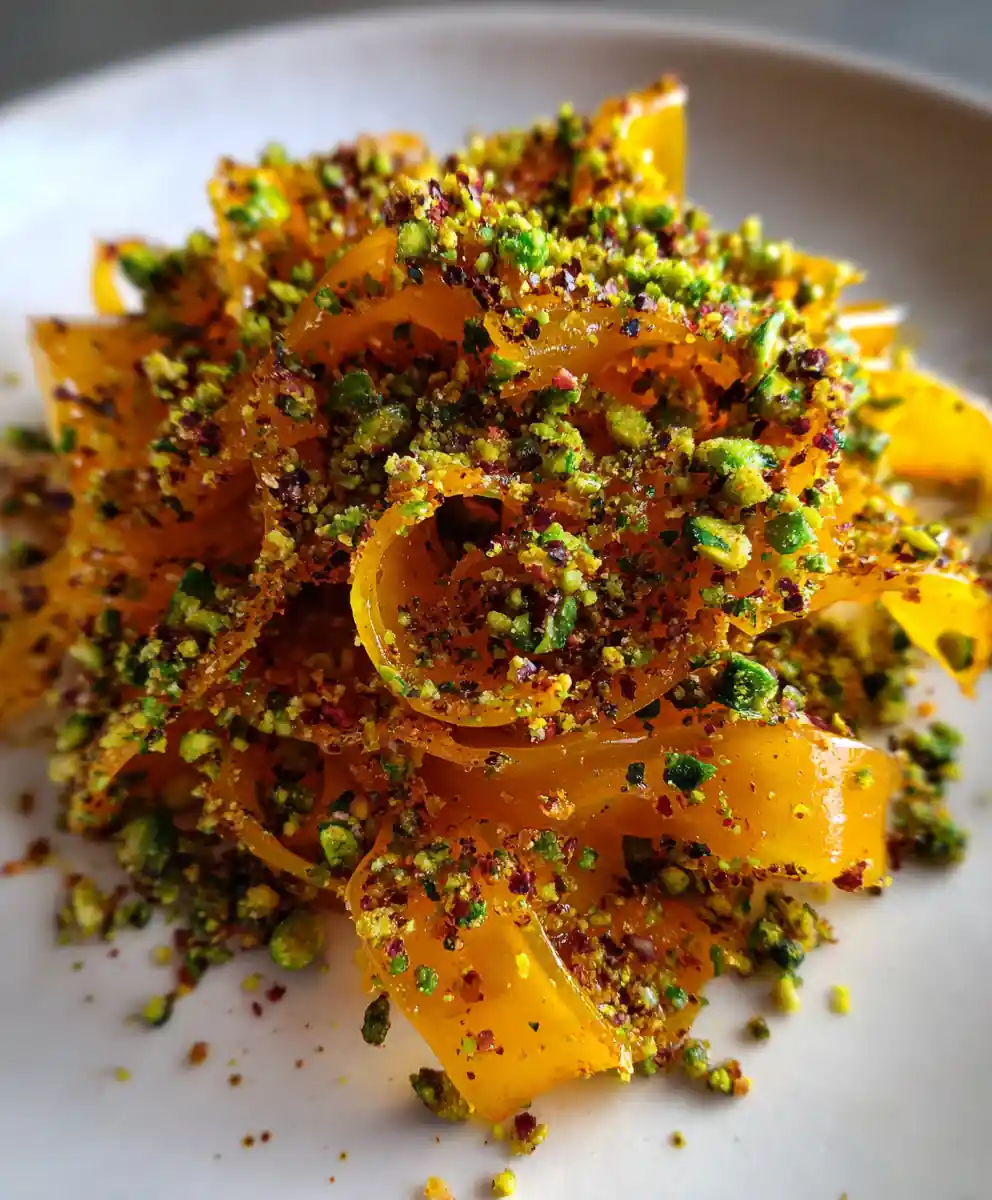
- Prepare the Pistachio-Sumac Crumble: While the yolks cool, finely chop the 30 g (1/4 cup) shelled unsalted pistachios. In a small bowl, combine the chopped pistachios with 5 g (1 teaspoon) ground sumac. The crumble should look vibrant green and red.
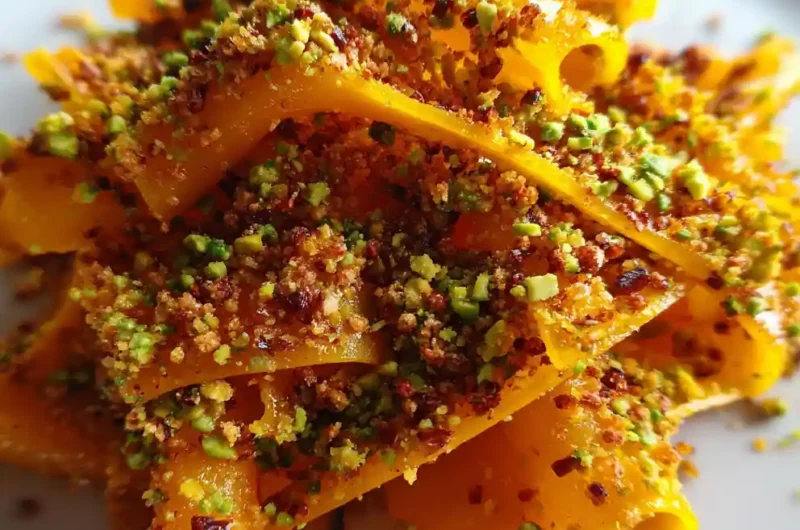
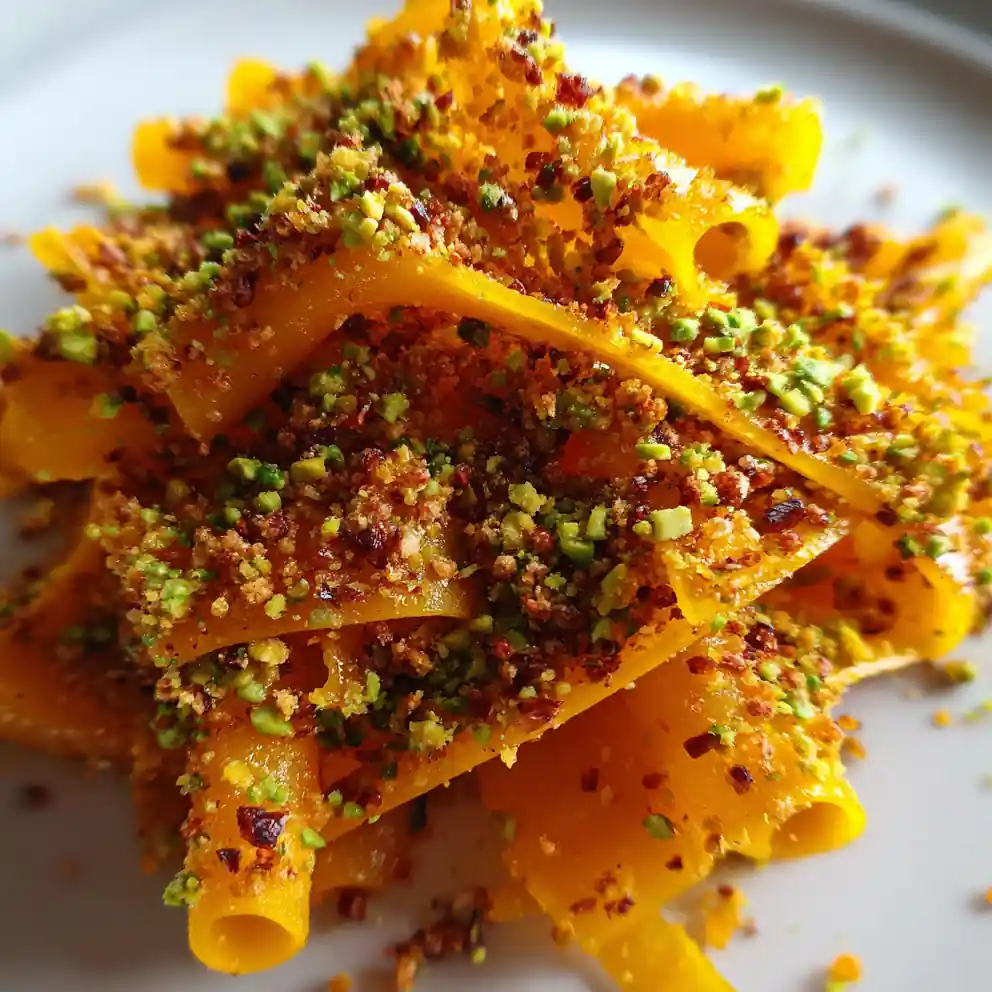
- Serve and Garnish: Grate a cooled cured egg yolk using a fine microplane onto a clean, light-colored plate, or slice it thinly. Sprinkle the vibrant pistachio-sumac crumble generously over and around the yolk. This makes for an impressive, healthy addition to any meal.
This is my go-to technique for ensuring uniform drying. It’s a fantastic component for budget meal prep and adds amazing flavor to high-protein snacks.
Ideal Uses and Serving Suggestions
Our cured egg yolk recipe adds a fantastic, savory depth to so many dishes, whether you’re planning weeknight dinners or a special brunch. It’s versatile enough for any occasion, transforming simple meals into something special.
Occasions: weeknight dinners, kid lunches, gatherings, holidays
Perfect for grating over quick dinner ideas like pasta or risotto, this cured egg yolk recipe adds a gourmet touch without extra fuss. It also elevates simple avocado toast for a fancy breakfast or brunch, or adds unique savory flair to charcuterie boards.
Pairings: sides, sauces, drinks that complement cured egg yolk recipe
Grate this rich cured egg yolk recipe over roasted vegetables, vibrant salads, or hearty soups. Shave it over ramen or stir-fries for an extra layer of umami depth. It pairs wonderfully with simple, fresh flavors, allowing its distinctive richness to shine through.
Guidance for leftovers, storage, and reheating
Store cured egg yolks in an airtight container in the refrigerator for up to 2-3 weeks. They can also be frozen whole; just grate them directly from frozen or thaw before use.
I often make a double batch of this cured egg yolk recipe on Sundays so I have them ready for quick weeknight pasta dishes; it saves so much time during busy evenings.
Everyday Benefits of Cooking with Cured Egg Yolk
Adding this cured egg yolk recipe to your kitchen repertoire brings a host of practical advantages. It’s a simple, yet powerful, way to elevate your home cooking with minimal effort.
Showcase practical wins: saves time, budget-friendly, nourishing
This cured egg yolk recipe is a surprisingly budget-friendly way to add gourmet flavor to everyday meals, stretching your ingredients further. It turns simple ingredients into something special, enhancing the taste of your home cooking effortlessly. It also adds a nourishing boost of protein and healthy fats, making meals more satisfying.
Tie cured egg yolk recipe to balanced lifestyle goals (healthy eating, meal prep, family-friendly)
It supports healthy eating by making nutritious dishes more appealing and flavorful, encouraging everyone to enjoy them. Ideal for budget meal prep; make a batch of these cured yolks and have a potent flavor enhancer ready for days. It transforms family-friendly meals into something memorable without requiring extensive effort or exotic ingredients.
Naturally include terms like quick dinner ideas, healthy recipes for families, budget meal prep, nutritious snacks
This cured egg yolk recipe helps create quick dinner ideas, makes healthy recipes for families exciting, and is perfect for budget meal prep or elevating nutritious snacks.
Tips, Variations, and Dietary Adjustments
Achieving perfectly cured egg yolks is simple with a few helpful tips and knowing how to adapt them to suit your taste and dietary needs.
Technique upgrades to improve results
- Use fresh, high-quality, large egg yolks for the absolute best results; their rich color and flavor are key.
- Handle yolks gently to avoid breaking them during separation and placement in the curing mixture.
- Ensure the yolks are completely submerged in the salt-sugar mixture for proper and even curing.
Flavor/spice tweaks for different cuisines
- For a subtle smoky flavor, add a teaspoon of smoked paprika or a pinch of chili flakes to the curing mix.
- Infuse with a teaspoon of garlic powder or onion powder for an extra savory punch, perfect for various dishes.
Adjustments for common diets (low-carb, plant-based, kid-safe)
This cured egg yolk recipe is naturally low-carb and gluten-free, fitting easily into many dietary plans. Its savory umami flavor is generally kid-safe and can encourage children to try new, nutritious foods.
Frequently Asked Questions
“Is cured egg yolk safe to eat?”
Yes, absolutely! The curing process with salt and sugar safely preserves the yolk, much like how various meats and fish are cured. It’s a traditional method that reduces moisture, making cured egg yolk a delicious and safe addition to your meals. Enjoy it grated over your favorite dishes.
“How long does cured egg yolk last?”
When stored correctly in an airtight container, homemade cured egg yolks keep well in the refrigerator for up to 2-3 weeks. For longer preservation, you can freeze them individually. They’re great for meal prep, ready whenever you want to add a flavor boost.
“What can I do with leftover egg whites?”
Don’t let those egg whites go to waste! They are perfect for making meringues, adding to frittatas, or whipping up a high-protein omelet. You can even freeze them in an airtight container for future baking or cooking projects. They’re a great healthy component for many recipes.
“Can I make cured egg yolk without sugar?”
While possible, the sugar in this cured egg yolk recipe isn’t just for sweetness; it helps balance the intense saltiness and contributes to the yolks’ lovely texture. For the best flavor and consistency, I always recommend including at least a small amount of sugar. It’s naturally low-carb with sugar anyway.
“How do I know when my cured egg yolks are ready?”
Your cured egg yolks are ready when they feel firm and somewhat rubbery to the touch, similar to a soft, hard cheese. The curing time for this cured egg yolk recipe, typically 4-7 days, allows for varying degrees of firmness. I usually check them daily after day 4 to get my preferred consistency for grating.
“What’s the best way to grate cured egg yolks?”
For fine, fluffy shavings of this savory delight that melt beautifully into warm food, a microplane is your best friend. Alternatively, the smallest holes on a box grater work perfectly. I find grating them directly over a dish really maximizes the flavor distribution and visual appeal.
Conclusion
Embrace the simple magic of homemade cured egg yolk to elevate your healthy cooking with unmatched flavor. Try this cured egg yolk recipe this week; save this family-friendly idea on Pinterest!
Print
cured egg yolk recipe
- Total Time: 145 minutes
- Yield: 6 cured egg yolks 1x
- Diet: Gluten-Free, Dairy-Free
Description
This amazing cured egg yolk recipe transforms humble yolks into a vibrant, savory ingredient, glistening with rich color and deep umami. It’s a budget-friendly secret weapon to add sophisticated depth and gourmet flair to various dishes like pasta and salads.
Ingredients
- 6 large egg yolks
- 250 g (1 cup) fine sea salt
- 125 g (0.5 cup) granulated sugar
- 10 g (2 teaspoons) smoked paprika
- Zest of 1 medium orange
- 30 g (0.25 cup) shelled unsalted pistachios, for garnish
- 5 g (1 teaspoon) ground sumac, for crumble
- 5 ml (1 teaspoon) olive oil, for lightly greasing the baking sheet
Instructions
- Create Curing Mixture: In a medium bowl, whisk together 250 g (1 cup) fine sea salt, 125 g (0.5 cup) granulated sugar, 10 g (2 teaspoons) smoked paprika, and the zest of 1 medium orange until well combined. The mixture should smell wonderfully aromatic.
- Prepare Yolk Beds: Spread half of the curing mixture evenly in a shallow, non-reactive dish, like a glass baking pan. Use the back of a spoon to make six small indentations, ensuring they are spaced far enough apart for each yolk to rest.
- Nest the Yolks: Carefully separate the 6 egg yolks from their whites, making sure no white remains attached. Gently place one yolk into each indentation. This step is crucial for perfect curing.
- Cover and Cure: Carefully spoon the remaining curing mixture over the yolks, ensuring they are completely submerged. The yolks must not be exposed to air. Cover the container tightly with a lid or plastic wrap. You’ll feel a slight resistance as the salt begins to firm them up.
- Refrigerate for Curing: Refrigerate for 5 to 7 days. Check the yolks on day 5; they should feel firm and somewhat translucent, like a soft, semi-hard cheese, when gently pressed. (If they feel too soft after 7 days, they might need another day or two, depending on your fridge’s humidity.)
- Rinse and Dry Thoroughly: After curing, carefully retrieve the firm yolks. Gently rinse each yolk under a very slow stream of cold water to remove any curing mixture. Pat them extremely dry with paper towels, handling with care to avoid breakage. They will feel slightly tacky.
- Gentle Bake for Firmness: Preheat your oven to 75°C (170°F). Lightly brush a standard baking sheet with 5 ml (1 teaspoon) olive oil or line it with parchment paper. Arrange the dried cured yolks on the sheet, ensuring they don’t touch.
- Bake to Perfection: Bake for 1.5 to 2 hours, or until the yolks are firm throughout, with a consistency similar to hard cheese but still slightly pliable. They should not be brittle or crumbly. The color will deepen to a rich orange-red.
- Cool Completely: Turn off the oven and prop the door open slightly. Allow the cured yolks to cool completely inside the oven. This helps them dry out further and prevents condensation, giving you that ideal texture.
- Prepare Pistachio-Sumac Crumble: While the yolks cool, finely chop the 30 g (0.25 cup) shelled unsalted pistachios. In a small bowl, combine the chopped pistachios with 5 g (1 teaspoon) ground sumac. The crumble should look vibrant green and red.
- Serve and Garnish: Grate a cooled cured egg yolk using a fine microplane onto a clean, light-colored plate, or slice it thinly. Sprinkle the vibrant pistachio-sumac crumble generously over and around the yolk. This makes for an impressive, healthy addition to any meal.
Notes
The yolks should feel firm and somewhat translucent after curing; if too soft, extend curing time. Cooling completely in the oven helps dry them out further and prevents condensation.
- Prep Time: 25 minutes
- Cook Time: 120 minutes
- Category: Condiment
- Method: Curing, Baking
- Cuisine: General
Nutrition
- Serving Size: 1 cured egg yolk
- Calories: 70 calories
- Sugar: 1 g
- Sodium: 150 mg
- Fat: 6 g
- Saturated Fat: 2.5 g
- Unsaturated Fat: 3 g
- Trans Fat: 0 g
- Carbohydrates: 2 g
- Fiber: 0 g
- Protein: 3 g
- Cholesterol: 190 mg
Keywords: cured egg yolk, umami, healthy, gluten-free, dairy-free, budget-friendly, gourmet, easy, savory, condiment
FREE PRINTABLE RECIPE
Get the Printable Recipe PDF (Free)
Enter your email and we’ll send you the ingredients + step-by-step instructions as a clean PDF you can save to your phone.
- ✅ Printable PDF (ingredients + steps)
- ✅ Save it to your phone (no long scrolling)
- ✅ Includes cook time + servings
- ✅ Easy to follow
FAQ
Where’s the full recipe?
It’s delivered as a printable PDF so you can save it and cook without scrolling.
I didn’t get the email.
Check Spam/Promotions and search your inbox for your site name. Then click Confirm to receive the PDF.