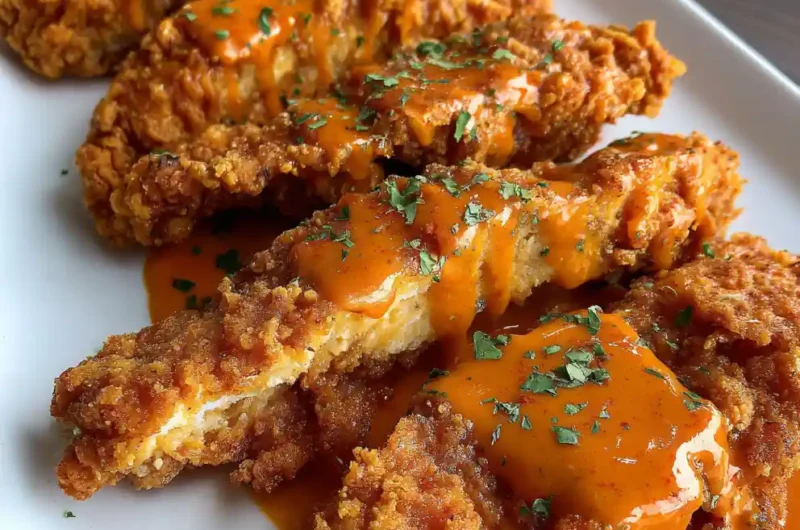
If you’re a fan of Raising Cane’s, you know there’s nothing quite like their perfectly crispy chicken fingers and signature sauce. But what if you could recreate that magic in your own kitchen? This recipe delivers an incredibly close copycat version, allowing you to enjoy that iconic flavor whenever the craving strikes. We’ll break down each step, from tenderizing the chicken to crafting that unbelievably addictive sauce. Get ready to experience Raising Cane’s-style goodness without leaving your house!

What You’ll Need: The Ingredient Breakdown
- 500g (1.1lb) Boneless, Skinless Chicken Breast: The star of the show! We’re using chicken breast cut into roughly 6-inch strips. This cut ensures even cooking and that classic finger shape. Opt for high-quality chicken for the best flavor and texture.
- 240ml (1 cup) Buttermilk (or Milk + Egg): Buttermilk is key to tenderizing the chicken. The lactic acid breaks down the proteins, resulting in incredibly juicy and tender fingers. If you don’t have buttermilk, a mixture of 240ml milk and 1 beaten large egg works as a fantastic substitute.
- 120g (1 cup) All-Purpose Flour: This forms the base of our coating, providing structure and helping the seasonings adhere.
- 60g (½ cup) Cornstarch: The secret weapon for extra crispiness! Cornstarch creates a lighter, more delicate coating than flour alone.
- 1 tsp (5ml) Paprika: Adds a subtle smoky flavor and beautiful color to the chicken. We recommend using sweet paprika for a classic Cane’s flavor profile.
- 1 tsp (5ml) Garlic Powder: Aromatic and essential for that savory flavor.
- 1 tsp (5ml) Onion Powder: Adds depth and complexity to the seasoning blend.
- 1 tsp (5ml) Salt: Enhances all the other flavors and seasons the chicken properly.
- ½ tsp (2.5ml) Black Pepper: Provides a subtle heat and balances the other seasonings.
- ¼ tsp (1.25ml) Cayenne Pepper: A touch of cayenne adds a very mild kick. Feel free to adjust the amount to your spice preference.
- 2L (8 cups) Vegetable Oil (High-Smoke Point): Crucial for frying! Choose an oil with a high smoke point, like vegetable, canola, or peanut oil, to prevent burning and ensure a crispy result.
- 120ml (½ cup) Mayonnaise: The foundation of our signature sauce. Use a good quality mayonnaise for the best flavor.
- 60ml (¼ cup) Ketchup: Adds a tangy sweetness to the sauce.
- 1 Tbsp (15ml) Fresh Lemon Juice: Brightens the sauce and balances the richness of the mayonnaise. Freshly squeezed is always best!
- 1 tsp (5ml) Garlic Powder: Reinforces the garlic flavor in the sauce.
- ½ tsp (2.5ml) Paprika: Contributes to the sauce’s color and subtle smoky flavor.
- Pinch of Salt: Balances the sweetness and acidity of the sauce.
- Pinch of Sugar: Enhances the overall flavor and adds a touch of sweetness.
- Fresh Parsley (Chopped): For garnish, adding a pop of color and freshness.
- Lemon Wedges: Another garnish option, providing a visual appeal and a hint of citrus.
Ingredient Substitutions
Don’t have everything on hand? Here are a few simple substitutions:
- Buttermilk: As mentioned earlier, use 240ml milk + 1 beaten egg.
- Vegetable Oil: Canola or peanut oil are excellent alternatives.
- Fresh Lemon Juice: Bottled lemon juice can be used in a pinch, but fresh is preferred.
Detailed Instructions: Achieving Golden Perfection
- Prepare the Chicken Strips: Begin by meticulously patting the chicken strips dry with paper towels. This is crucial! Excess moisture prevents the coating from adhering properly, resulting in soggy fingers. Lay them out in a single layer to ensure even drying.
- Buttermilk Marinade: In a shallow bowl, whisk together the buttermilk (or milk and beaten egg). This marinade tenderizes the chicken, creating a more succulent final product. Submerge the chicken strips, ensuring they are fully coated, and refrigerate for at least 15 minutes. This allows the buttermilk to work its magic.
- Craft the Coating: In a separate bowl, combine the flour, cornstarch, paprika, garlic powder, onion powder, salt, black pepper, and cayenne pepper. Whisk thoroughly until the mixture is uniform in color and distribution. The cornstarch is key for achieving that signature crispy texture.
- Coat the Chicken: Remove the chicken strips from the buttermilk marinade, allowing any excess to drip off. This prevents clumping in the flour mixture. Toss each strip in the flour mixture, pressing lightly to ensure the coating adheres evenly. Place the coated strips on a wire rack and let them rest for 5 minutes. This resting period allows the coating to set, preventing it from falling off during frying.
- Heat the Oil: Pour the vegetable oil into a deep-walled pot, ensuring a depth of at least 5 cm (2 inches). Heat the oil to 180°C (350°F) using a thermometer. Maintaining the correct oil temperature is vital for achieving perfectly cooked, crispy chicken fingers. Too low, and they’ll be greasy; too high, and they’ll burn.
- Fry in Batches: Carefully lower the chicken strips into the hot oil, working in batches to avoid overcrowding the pot. Overcrowding lowers the oil temperature, leading to soggy results. Fry for 3-4 minutes, turning once halfway through, until the chicken is a deep golden brown and cooked through.
- Drain and Season: Remove the fried chicken strips with a slotted spoon and place them on a wire rack set over a baking sheet. This allows excess oil to drain, ensuring a crispier final product. Sprinkle lightly with salt while still hot. Let them rest for 2 minutes before serving.
- Prepare the Sauce: While the chicken is frying, whisk together the mayonnaise, ketchup, lemon juice, garlic powder, paprika, a pinch of salt, and a pinch of sugar in a small bowl. The lemon juice brightens the sauce, balancing the richness of the mayonnaise. Refrigerate for at least 10 minutes to allow the flavors to meld.
- Plate and Garnish: Arrange the hot chicken fingers on a white rectangular plate in a fan shape. Create a small pool of sauce in the center, drizzle a thin line of sauce around the edge, scatter chopped parsley over the top, and place a lemon wedge at one corner for visual appeal.
- Serve Immediately: Serve the chicken fingers and sauce immediately while the fingers are still crisp and the sauce is chilled.
The Science of the Perfect Fry
The key to truly exceptional fried chicken lies in understanding the science behind the process. The buttermilk marinade tenderizes the chicken by breaking down proteins. The combination of flour and cornstarch creates a coating that’s both flavorful and incredibly crispy. Cornstarch inhibits gluten development, resulting in a lighter, more delicate crust. Maintaining the correct oil temperature is paramount – 180°C (350°F) allows the chicken to cook through without becoming overly greasy. Frying in batches prevents the oil temperature from dropping too drastically.
Why This Recipe Works: A Raising Cane’s Deconstruction
This recipe isn’t just about mimicking a popular fast-food chain; it’s about understanding why their chicken fingers are so addictive. Raising Cane’s focuses on simplicity and quality. They use high-quality chicken, a straightforward marinade, and a perfectly seasoned coating. Their sauce is equally simple, relying on a balance of sweet, tangy, and savory flavors. This recipe deconstructs those elements, allowing you to recreate the experience at home with readily available ingredients.

Tips for Extra Crispy Chicken Fingers
- Double Dredge: For an even thicker and crispier coating, repeat the dredging process – dip the chicken in the buttermilk, then the flour mixture, then back in the buttermilk, and finally back in the flour mixture.
- Chill the Coated Chicken: After coating, chill the chicken strips in the refrigerator for another 15-30 minutes. This helps the coating adhere even better during frying.
- Don’t Overcrowd the Pot: Seriously, this is crucial. Fry in small batches to maintain the oil temperature.
Variations and Additions
While this recipe aims for authenticity, feel free to experiment! Try adding a pinch of smoked paprika to the coating for a deeper smoky flavor. You can also adjust the amount of cayenne pepper to control the level of heat. For a spicier sauce, add a dash of hot sauce or a pinch of cayenne pepper. Consider serving with coleslaw and Texas toast for a complete Raising Cane’s-inspired meal.
Frequently Asked Questions (FAQ)
- Can I use chicken thighs instead of chicken breast?
- While chicken breast is traditional, you can use boneless, skinless chicken thighs. They will be more flavorful but may require a slightly longer cooking time.
- Can I bake these instead of frying?
- Baking will not achieve the same crispy texture as frying. However, you can bake them at 200°C (400°F) for 20-25 minutes, flipping halfway through.
- Can I make the sauce ahead of time?
- Yes, the sauce can be made up to 3 days in advance and stored in the refrigerator.
Enjoy these incredibly delicious, Raising Cane’s-style chicken fingers! They’re perfect for a quick weeknight dinner, a game-day snack, or any time you’re craving a crispy, flavorful treat. Don’t forget to save this recipe to Pinterest for later!
Print
Raising Cane’S Style Chicken Fingers & Sauce
- Total Time: 30 minutes
- Yield: 4 servings 1x
- Diet: General
Description
Recreate the iconic flavor of Raising Cane’s chicken fingers at home with this copycat recipe. Enjoy perfectly crispy, tender chicken paired with a signature sauce.
Ingredients
- 500g Chicken Breast, cut into strips
- 240ml Buttermilk (or Milk + Egg)
- 120g All-Purpose Flour
- 60g Cornstarch
- 1 tsp Paprika
- 1 tsp Garlic Powder
- 1 tsp Onion Powder
- 1 tsp Salt
- 0.5 tsp Black Pepper
- 0.25 tsp Cayenne Pepper
- 2L Vegetable Oil
- 120ml Mayonnaise
- 60ml Ketchup
- 1 Tbsp Lemon Juice
- 1 tsp Garlic Powder
- 0.5 tsp Paprika
- Pinch of Salt
- Pinch of Sugar
- Parsley, chopped (for garnish)
- Lemon Wedges (for garnish)
Instructions
- Prepare Chicken: Pat chicken strips dry.
- Marinate Chicken: Soak chicken in buttermilk for 15+ minutes.
- Make Coating: Combine flour, cornstarch, and spices.
- Coat Chicken: Dredge chicken in flour mixture, rest for 5 minutes.
- Heat Oil: Heat oil to 180°C (350°F).
- Fry Chicken: Fry in batches for 3-4 minutes, until golden brown.
- Drain & Season: Drain on a rack, sprinkle with salt.
- Make Sauce: Whisk together sauce ingredients, chill for 10 minutes.
- Plate & Garnish: Arrange fingers, add sauce, garnish.
- Serve Immediately: Enjoy while hot and crispy.
Notes
For extra crispiness, consider double-dredging the chicken or chilling the coated chicken before frying.
- Prep Time: 20 minutes
- Cook Time: 10 minutes
- Category: Main Course
- Method: Frying
- Cuisine: American
Nutrition
- Serving Size: 4
- Calories: 350 kcal
- Sugar: 5 g
- Sodium: 700 mg
- Fat: 20 g
- Saturated Fat: 3 g
- Unsaturated Fat: 15 g
- Trans Fat: 0 g
- Carbohydrates: 25 g
- Fiber: 2 g
- Protein: 30 g
- Cholesterol: 80 mg
Keywords: chicken fingers,raising cane’s,copycat,fried chicken,crispy,sauce,easy,homemade