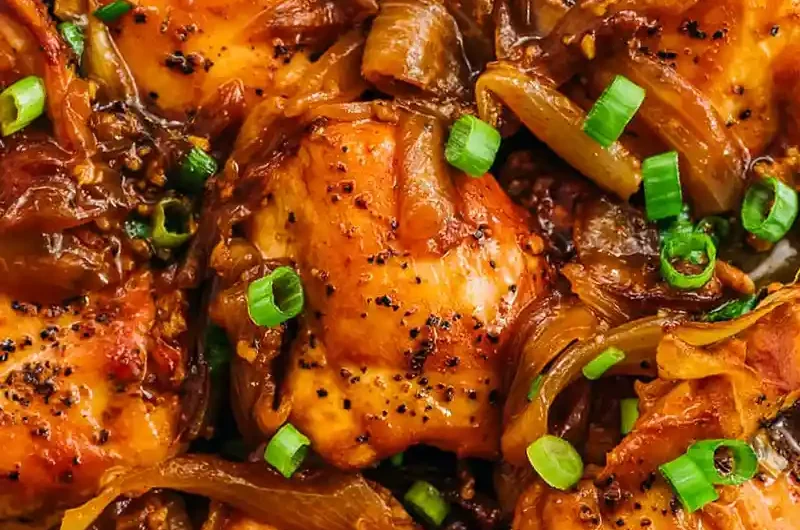
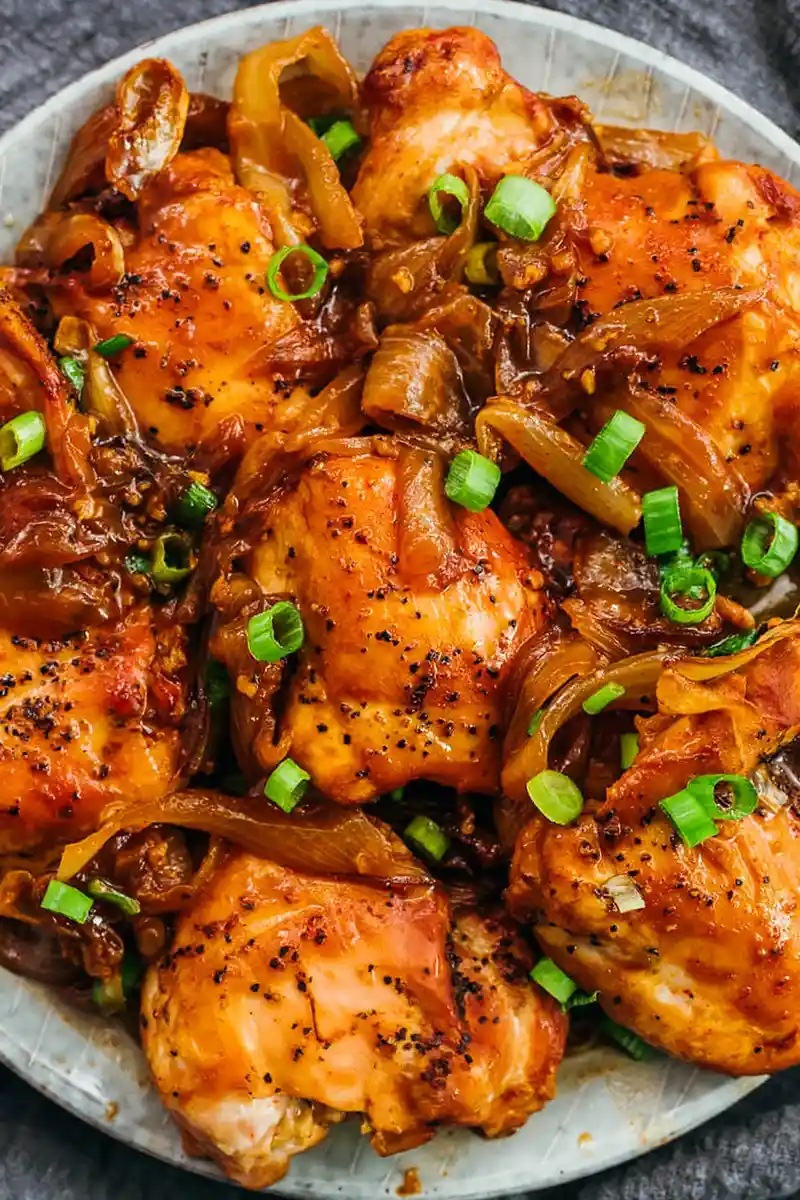
This oven-baked Filipino Chicken Adobo is a practical meal that requires no searing. It features tender chicken thighs simmered in a tangy soy-based sauce.
List of ingredients
- 2 pounds boneless skinless chicken thighs – use about 7 thighs for this quantity.
- 1/4 cup low-sodium soy sauce – prevents the dish from becoming overly salty.
- 2 tablespoons white vinegar – provides the essential tangy flavor profile.
- 1 small onion, sliced – adds sweetness and texture to the sauce.
- 5 cloves garlic, minced – provides a strong aromatic base.
- 3 bay leaves – adds a subtle herbal depth to the braising liquid.
- 1 scallion (green onion), sliced – used for fresh garnish at the end.
- 1/2 teaspoon ground black pepper – for basic seasoning.
- 1/4 teaspoon ground cayenne – adds a mild heat to the savory sauce.
step-by-step instructions
- Prepare the oven and pot: Position the oven rack in the center and preheat to 400 F. In a dutch oven or oven-safe pot, stir together the soy sauce, vinegar, minced garlic, and cayenne until combined. Stir in the sliced onions and bay leaves.
- Prepare the chicken: Pat the chicken thighs dry with paper towels to remove excess moisture. Trim away any excess fat using kitchen shears. Season the meat with ground black pepper.
- Arrange in the pot: Place the chicken thighs in a single layer in the pot. Nest them snugly alongside the onions and sauce, ensuring the smooth sides of the thighs face down.
- First bake: Bake uncovered at 400 F for 30 minutes.
- Flip and finish: Flip the chicken thighs over. Bake uncovered for another 30 minutes or until the tops are nicely browned.
- Serve: Transfer the chicken and onions to serving plates. Remove the bay leaves if desired. Spoon the sauce over the chicken and garnish with sliced scallions.
Meat Selection and Preparation
Using Boneless Skinless Chicken Thighs
Chicken thighs are recommended because they contain more fat than breasts. This allows them to withstand the hour of baking without drying out. They remain juicy and tender even at high temperatures.
Trimming Excess Fat
Use kitchen shears to remove large clumps of excess fat from the thighs. While some fat is necessary for flavor, too much can lead to a greasy sauce. Trimming ensures a cleaner finish to the final dish.
Importance of Patting Meat Dry
Always pat the chicken dry with paper towels before seasoning. Removing surface moisture allows the meat to brown more effectively in the oven. This prevents the chicken from steaming instead of roasting.
Handling Frozen Chicken
If using frozen thighs, defrost them completely in the refrigerator overnight. Cooking frozen meat can lead to uneven heat distribution. It may also result in an overly watery sauce.
Sauce Optimization and Substitutions
Low-Sodium Soy Sauce Selection
Low-sodium soy sauce is preferred to keep the salt levels balanced. Regular soy sauce can often overpower the other flavors. It may make the finished sauce too salty to enjoy.
Substituting with Coconut Aminos
For those on a paleo or gluten-free diet, coconut aminos are a viable substitute. They provide a similar salty and savory profile. Note that coconut aminos are slightly sweeter than soy sauce.
Vinegar Variations
White vinegar is the traditional choice for a sharp, clean tang. Apple cider vinegar can be used as a milder alternative. It adds a slight fruity undertone to the savory sauce.
Adjusting the Heat Level
The cayenne pepper provides a subtle warmth. For those who prefer a spicier dish, increase the cayenne to 1/2 teaspoon. For a very mild version, you can omit it entirely.
Equipment and Cooking Vessel Advice
Using a Dutch Oven
A 6-quart dutch oven is ideal for this recipe. The heavy walls provide consistent heat distribution. It prevents hot spots that could burn the sauce during the hour of baking.
Alternative Oven-Safe Pots
Any high-sided baking dish or oven-safe pot can work. Ensure the dish is large enough to hold the chicken in a single layer. A snug fit is acceptable as the meat shrinks during cooking.
Avoiding Pot Greasing
There is no need to grease the pot before adding the sauce and chicken. The fat from the chicken thighs provides enough lubrication. This keeps the process simple and reduces extra calories.
Advanced Sauce Consistency Techniques
Simmering for a Thicker Glaze
If the sauce is too thin after baking, transfer the chicken and onions to plates. Tent them with foil to maintain heat. Place the pot on the stovetop over medium heat.
Controlling Reduction Time
Simmer the liquid for no more than 5 minutes. Over-reducing can cause the sauce to become too salty or burn. Stop as soon as the sauce reaches a syrupy consistency.
Managing Sauce Distribution
Always spoon the concentrated sauce over the chicken just before serving. This ensures every piece of meat is well-coated. It maximizes the flavor impact of the reduction.
Serving Suggestions and Pairings
Cauliflower Rice for Low-Carb Diets
Fried cauliflower rice is an excellent low-carb accompaniment. It absorbs the tangy sauce without adding significant calories. Sauté it with a bit of oil and salt before serving.
Roasted Vegetable Pairings
Roasted broccoli or carrots complement the bold flavors of the adobo. These vegetables add nutritional balance and color to the plate. Roast them at 400 F alongside the chicken.
Creamed Spinach Integration
Creamed spinach provides a rich, creamy contrast to the acidic sauce. The creaminess helps balance the sharpness of the vinegar. This pairing makes the meal feel more substantial.
Plain Grain Options
While this recipe is keto-friendly, it can be served with plain steamed white rice. The rice acts as a neutral base for the strong sauce. This is a traditional way to enjoy the dish.
Storage and Reheating Guidelines
Refrigerator Storage Limits
Store leftovers in an airtight container in the refrigerator. The chicken and sauce will remain fresh for up to 2 days. Ensure the container is completely sealed to prevent odors.
Microwave Reheating Method
Reheat portions in the microwave on medium power. Adding a teaspoon of water can help loosen the sauce. Heat in short intervals to avoid overcooking the meat.
Stovetop Reheating Option
For better texture, reheat the chicken in a small pan over low heat. Add a splash of water or broth to the pan. Cover with a lid to steam the meat back to tenderness.
Preparation and Make-Ahead Strategy
Pre-Mixing the Sauce
The soy sauce, vinegar, garlic, and cayenne mixture can be prepared in advance. Store the mixture in a jar in the refrigerator. Pour it directly into the pot when ready to bake.
Marinating the Chicken
While the recipe does not require marinating, you can soak the chicken in the sauce for 2 hours. This can deepen the flavor penetration into the meat. Store the marinated chicken in the fridge.
Meal Prep Planning
This dish is well-suited for weekly meal prep. The flavors often improve after a day of refrigeration. Divide the chicken and sauce into individual containers for easy lunches.
Troubleshooting Common Cooking Issues
Addressing Excess Saltiness
If the sauce tastes too salty, add a teaspoon of water or a small amount of extra vinegar. The acidity helps mask the salt. Stir well and simmer for one minute.
Improving Surface Browning
If the chicken is not browning after the first 30 minutes, check the oven temperature. Ensure the oven is fully preheated to 400 F. Avoid overcrowding the pan too much.
Preventing Sauce Burning
If the edges of the sauce begin to burn, add a tablespoon of water to the pot. Ensure the pot is placed in the center of the oven. Avoid placing it too close to the heating elements.
Frequently Asked Questions
Can I use chicken breasts instead of thighs?
Yes, halved chicken breasts can be used. However, breasts cook faster and can dry out more easily. Reduce the total baking time by 10-15 minutes if using breasts.
Is this recipe suitable for a keto diet?
Yes, this recipe is naturally low in carbohydrates. It contains minimal sugars and no flour thickeners. It fits well within the parameters of a ketogenic diet.
Can I make this in a pressure cooker?
Yes, a pressure cooker can be used to reduce the cooking time. Use the manual high-pressure setting for about 15-20 minutes. You will need to reduce the sauce on the sauté setting afterward.
Which soy sauce is best for this dish?
Low-sodium soy sauce is highly recommended. Standard soy sauce often contains too much salt for the small volume of liquid used. Coconut aminos are the best choice for gluten-free needs.
Do I need to remove the bay leaves before eating?
Yes, bay leaves are used for flavor infusion but are not meant to be eaten. They have a tough texture and a sharp edge. Remove them before serving the dish.
Can I add more vegetables to the pot?
You can add sliced carrots or bell peppers to the pot. These vegetables should be added at the beginning of the baking process. They will soften and absorb the sauce flavors.
Is white vinegar the only option?
While white vinegar is standard, you can use distilled white vinegar or apple cider vinegar. Avoid using balsamic or red wine vinegar. These would alter the authentic flavor profile too much.
} Print
Filipino Chicken Adobo
- Total Time: 75 minutes
- Yield: 3 servings 1x
- Diet: Low Carb
Description
This is a simple oven recipe for making Filipino chicken adobo; no searing needed. The chicken is remarkably tender, with juicy onions and a bold tangy sauce bursting with flavor.
Ingredients
- 2 pounds boneless skinless chicken thighs
- 1/4 cup low-sodium soy sauce
- 2 tablespoons white vinegar
- 1 small onion, sliced
- 5 cloves garlic, minced
- 3 bay leaves
- 1 scallion (green onion), sliced
- 1/2 teaspoon ground black pepper
- 1/4 teaspoon ground cayenne
Instructions
- Prepare: Position oven rack in center of oven, and preheat to 400 F. In dutch oven or oven-safe pot, stir together soy sauce, vinegar, garlic, and cayenne until well-mixed. Stir in onions and bay leaves.
- Add Chicken: Pat chicken thighs dry with paper towels, and trim any excess fat. Season with black pepper. Place chicken thighs in single layer in pot, nestling them snugly alongside onions and sauce, with smooth sides of thighs facing down.
- Bake: Bake uncovered at 400 F for 30 minutes, flip chicken thighs, then bake uncovered for another 30 minutes or until chicken is nicely browned on top.
- Serve: Transfer chicken and onions to serving plates, removing bay leaves if desired. Spoon sauce over chicken, and top with scallions.
Notes
Use fresh chicken or defrost overnight. Low-sodium soy sauce is recommended; coconut aminos can be used as a substitute for paleo or gluten-free diets. If the sauce is not thick enough, simmer the remaining liquid on the stovetop over medium heat for up to 5 minutes before serving. Pairs well with cauliflower rice, creamed spinach, or roasted vegetables.
- Prep Time: 15 minutes
- Cook Time: 60 minutes
- Category: Main Course
- Method: Baking
- Cuisine: Asian
Nutrition
- Serving Size: 1 serving
- Calories: 390 kcal
- Sugar: 3 g
- Sodium: 1050 mg
- Fat: 19 g
- Saturated Fat: 0 g
- Unsaturated Fat: 19 g
- Trans Fat: 0 g
- Carbohydrates: 6.5 g
- Fiber: 1 g
- Protein: 49 g
- Cholesterol: 243 mg
Keywords: Filipino chicken adobo, low carb, chicken thighs, oven-baked chicken, Asian cuisine