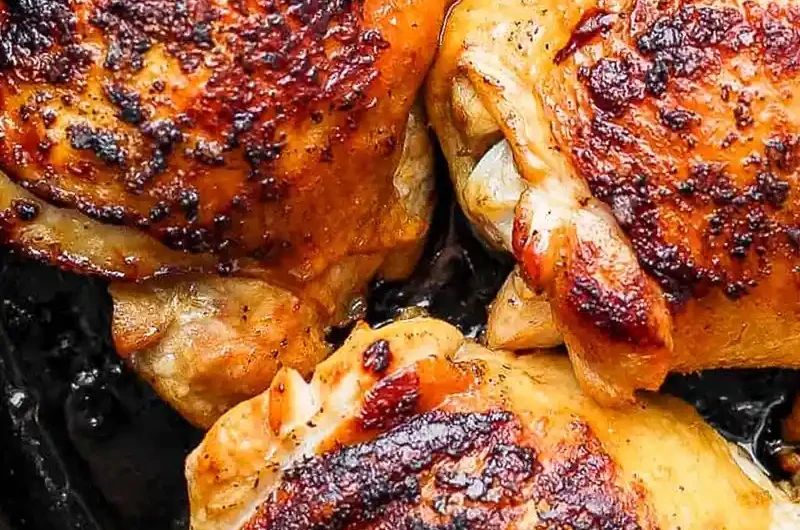
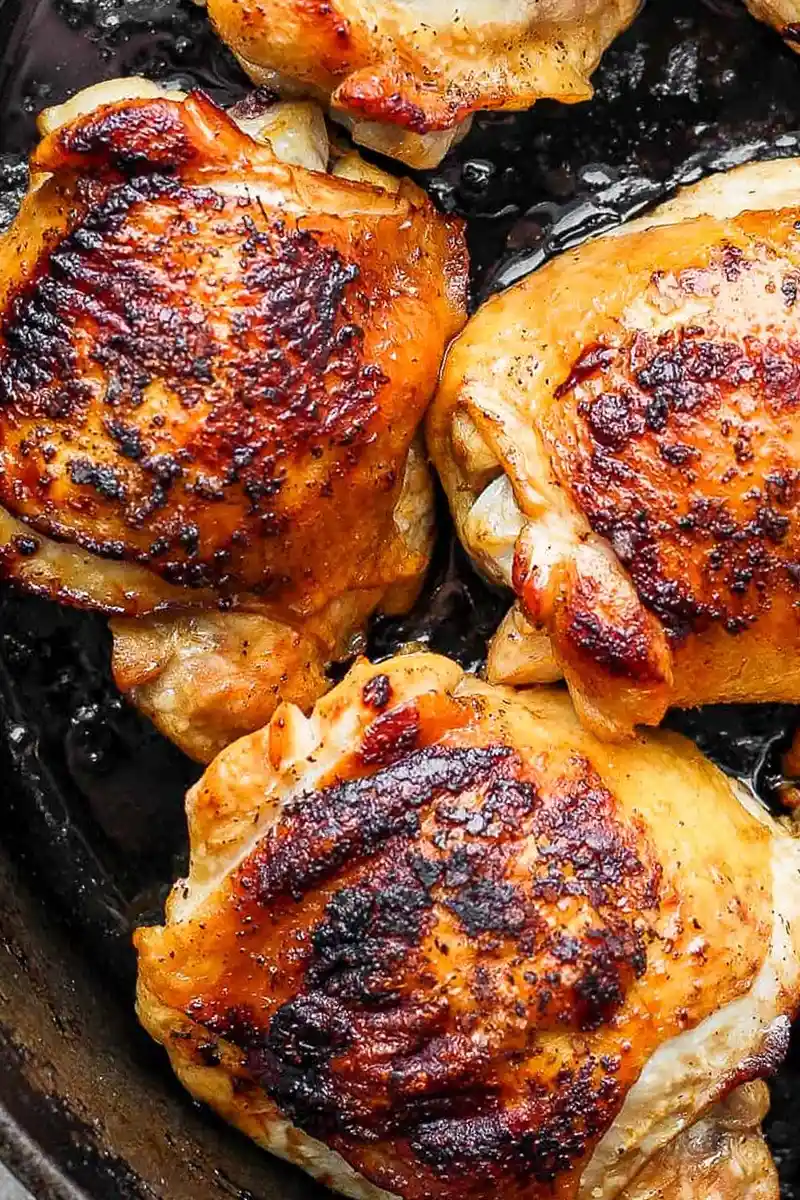
This recipe delivers juicy bone-in chicken thighs with perfectly crisp skin using a combination of stove-top searing and oven roasting. It is a fast, reliable method that requires minimal ingredients and takes only 30 minutes from start to finish.
List of ingredients
- 6 bone-in, skin-on chicken thighs – ensure they are fully thawed for even cooking.
- 1 tablespoon kosher salt – used to season the meat and draw out moisture from the skin.
- ½ tablespoon ground black pepper – provides a basic savory heat.
- ½ tablespoon olive oil – or avocado oil, to prevent sticking and facilitate the sear.
step-by-step instructions
- Prepare the chicken and oven: Place the 6 bone-in, skin-on chicken thighs on a plate. Pat the skin and meat dry with clean paper towels to ensure maximum crispiness. Sprinkle approximately ¼ teaspoon of kosher salt and a pinch of pepper on both sides of each thigh. Preheat your oven to 400°F.
- Sear the chicken: Place a 12-inch cast iron skillet on the stove-top over medium-high heat. Add ½ tablespoon of olive oil, coating the bottom lightly. Once the pan is hot and sizzling, place the chicken thighs skin-side down and sear for 3-5 minutes until the skin is deeply browned.
- Finish in the oven: Flip the chicken thighs over so the skin side is up. Move the skillet to the middle rack of the preheated oven, leaving it uncovered. Cook for 15-20 minutes or until the internal temperature reaches 165°F.
- Rest and serve: Remove the skillet from the oven. Let the chicken rest for 5-10 minutes to allow the juices to redistribute before serving.
Optimizing Your Cooking Process
Ensuring Bone-Dry Skin for Maximum Crunch
Moisture is the enemy of crispiness when searing meat. Use paper towels to pat the chicken thighs completely dry on all sides before adding any oil or seasoning. This prevents the chicken from steaming in the pan and allows the skin to brown quickly.
Achieving the Perfect Pan Temperature
The cast iron skillet must be sufficiently hot before the chicken is added to prevent sticking. You can test the heat by flicking a small drop of water onto the surface; it should sizzle and evaporate instantly. If the oil begins to smoke excessively, lower the heat slightly to avoid burning the skin.
Using a Meat Thermometer for Accuracy
The only way to ensure chicken is cooked safely without drying it out is by using an instant-read thermometer. Insert the probe into the thickest part of the thigh, avoiding the bone. Remove the pan from the oven when the temperature hits 162-163°F, as carry-over cooking will bring it to the target 165°F during resting.
Proper Oven Rack Placement
Positioning the skillet on the middle rack ensures that the heat is distributed evenly around the meat. If the rack is too high, the skin may burn before the interior is cooked. If it is too low, the bottom of the chicken may overcook while the top remains pale.
Selecting the Right Searing Oil
Olive oil works well for most applications, but avocado oil is a superior choice for high-heat searing due to its higher smoke point. High-smoke-point oils prevent the fat from breaking down and tasting bitter at medium-high temperatures. Use just enough to coat the pan to avoid greasy skin.
Flavor Customization and Variations
Adding Greek Flavors with Lemon and Oregano
Marinate the chicken thighs in a mixture of lemon juice, olive oil, dried oregano, and minced garlic before cooking. This adds a bright, acidic profile that cuts through the richness of the chicken skin. Adjust the salt amount if your marinade contains salty ingredients like feta or olives.
Creating a Zesty Mexican-Style Profile
Rub the chicken with a blend of cumin, smoked paprika, chili powder, and lime zest. For a more intense flavor, you can use a cilantro-lime marinade for several hours before searing. This variation pairs exceptionally well with corn tortillas or black beans.
Implementing Cuban Citrus Notes
Use a mojo-style marinade consisting of orange juice, lime juice, plenty of garlic, and cumin. The citrus enzymes help tenderize the meat while providing a tangy, sweet contrast to the savory sear. Ensure you pat the skin dry after marinating to maintain the crisp texture.
Applying Classic Italian Herb Blends
Season the thighs with a mix of dried basil, parsley, rosemary, and thyme. You can also brush a small amount of balsamic glaze over the chicken during the last five minutes of oven roasting. This creates a sweet and savory caramelized crust.
Customizing with Garlic and Onion Powder
For a more savory, all-purpose flavor, mix garlic powder and onion powder into your salt and pepper rub. These powders adhere well to the skin and provide a deep, umami taste without the risk of burning fresh garlic in the hot pan. Apply the rub generously on both sides.
Ideal Side Dish Pairings
Roasted Root Vegetables
Toss halved baby potatoes and carrots in olive oil, salt, and rosemary. Roast them on a separate sheet pan at 400°F for 25-30 minutes. The earthy sweetness of the vegetables balances the salty, crispy skin of the chicken.
Fresh Green Vegetable Sides
Steamed broccoli or sautéed garlic green beans provide a necessary nutritional balance and a pop of color. Sauté the beans in a small amount of butter and lemon juice to complement the richness of the thighs. These greens cook quickly and can be prepared while the chicken rests.
Grain-Based Accompaniments
Garlic butter rice or a fluffy quinoa pilaf serves as an excellent base for the chicken. The grains absorb the natural juices that release from the meat during the resting phase. Consider adding chopped parsley to the rice for a fresh finish.
Utilizing Leftovers in Salads
Slice cold roasted chicken thighs and place them atop a bed of mixed greens, cucumbers, and cherry tomatoes. Use a light vinaigrette to keep the meal refreshing. The contrast between the cold meat and fresh vegetables makes for a healthy lunch.
Incorporating Chicken into Wraps
Warm a flour tortilla and fill it with sliced chicken, avocado, shredded cabbage, and a dollop of Greek yogurt or sour cream. This is an efficient way to use meal-prepped chicken throughout the week. The bone-in thigh meat remains tender even when reheated.
Storage and Preservation
Proper Refrigeration Techniques
Place leftover chicken thighs in a shallow, airtight glass or plastic container. Ensure the chicken is cooled to room temperature before sealing the lid to prevent excess condensation. This helps maintain the texture of the meat and prevents spoilage.
Understanding Shelf Life
Cooked chicken thighs can be safely stored in the refrigerator for up to four days. Beyond this window, the quality of the meat degrades, and the risk of bacterial growth increases. Always smell the meat and check for sliminess before consuming leftovers.
Freezing for Long-Term Storage
Wrap individual thighs tightly in aluminum foil and then place them in a heavy-duty freezer bag. Squeeze out as much air as possible to prevent freezer burn. Properly frozen cooked chicken can last for two to three months.
Thawing Frozen Leftovers
The safest way to thaw frozen chicken is by placing it in the refrigerator overnight. Avoid thawing meat on the counter at room temperature, as this can encourage bacterial growth. Once thawed, reheat the chicken thoroughly until it reaches 165°F.
Reheating and Quality Control
Using the Oven for Best Texture
To restore the crispiness of the skin, reheat the chicken in the oven at 350°F for 10-15 minutes. Place the thighs on a wire rack over a baking sheet to allow air to circulate around the meat. This prevents the bottom from becoming soggy.
Utilizing an Air Fryer for Speed
An air fryer is an excellent tool for reheating chicken thighs quickly while maintaining the crunch. Heat at 375°F for 3-5 minutes until the skin sizzles. This method is faster than the oven and more effective than the microwave.
Microwave Reheating Considerations
While the microwave is the fastest option, it will make the skin soft and potentially rubbery. Use a medium power setting and heat in short intervals to avoid overcooking the meat. This method is best if the chicken is being shredded for a sandwich or wrap.
Avoiding Overcooking During Reheating
Do not reheat chicken multiple times, as each heating cycle dries out the proteins. Only heat the portion you intend to eat immediately. If the meat becomes too dry, a small drizzle of olive oil or a splash of chicken broth can help restore moisture.
Troubleshooting Cast Iron Cooking
Preventing Meat from Sticking
Sticking usually occurs if the pan is not hot enough or if the meat is added too early. Ensure the oil is shimmering and the pan is preheated for several minutes. Using a thin metal fish spatula allows you to slide under the skin without tearing it.
Managing Smoke in the Kitchen
Searing meat at high temperatures produces smoke as the fats render and the oil reaches its smoke point. Turn on your kitchen exhaust fan or open a window before starting the sear. If the smoke becomes excessive, lower the heat slightly.
Correcting Burnt Skin
If the skin browns too quickly before the meat is seared, lower the burner heat. You can also add a small knob of butter to the pan to help distribute heat more evenly. If the skin is already burnt, you can gently scrape off the charred bits before serving.
Handling Uneven Cooking Times
Chicken thighs vary in size and thickness, meaning some may cook faster than others. Arrange the largest thighs in the center of the pan where the heat is most intense. Use a thermometer to check each piece individually rather than relying on a timer.
Maintaining the Pan Seasoning
After cooking, avoid using harsh soaps or scrubbing pads that can strip the cast iron’s seasoning. Clean the pan with hot water and a brush, then dry it immediately on the stove. Apply a very thin layer of oil while the pan is still warm to protect the surface.
Frequently Asked Questions
Can you use frozen chicken thighs?
Yes, but they must be fully thawed before cooking. Frozen chicken will not sear properly, will stick to the pan, and will cook unevenly, likely leaving the center raw while the outside burns.
Can I use a nonstick pan instead of cast iron?
You can use any pan as long as it is oven-safe. However, cast iron is preferred because it retains heat better, which results in a superior, more consistent sear and crispier skin.
How long do these chicken thighs take to cook?
The total cook time is approximately 25 minutes, consisting of 3-5 minutes of searing and 15-20 minutes of oven roasting. This does not include the 5-10 minutes of resting time.
What is the safe internal temperature for chicken?
The USDA recommended internal temperature for cooked chicken is 165°F. Using a meat thermometer in the thickest part of the thigh is the only way to verify this temperature.
How do I stop the chicken from sticking to the pan?
Ensure the pan is preheated on medium-high, use a high-smoke-point oil like avocado oil, and do not try to flip the chicken until the skin has naturally released from the surface.
Print
Crispy Cast Iron Skillet Chicken Thighs
- Total Time: 30 minutes
- Yield: 6 servings 1x
- Diet: Whole30, Paleo, Dairy-Free, Gluten-Free
Description
Learn how to make the BEST cast iron chicken thighs with only 4 simple ingredients in 30 minutes! Perfect for a quick weeknight dinner or meal prep!
Ingredients
- 6 bone-in, skin-on chicken thighs
- 1 tablespoon kosher salt
- ½ tablespoon ground black pepper
- ½ tablespoon olive oil
Instructions
- Prep Chicken + Oven: Place 6 bone-in, skin-on chicken thighs on a plate. Pat dry with clean paper towel. Sprinkle about ¼ teaspoon kosher salt and pinch of pepper on both sides of each chicken thigh. Preheat oven to 400℉.
- Sear Chicken: Place a 12-inch cast iron skillet on the stove-top and bring to medium-high heat. Add ½ tablespoon olive oil to the pan, just enough to lightly coat the bottom. Once the pan is hot (it should sizzle if you flick some water on it) place the chicken thighs skin-side down in the pan and let sear 3-5 minutes or until the skin is nice and brown.
- Oven Finish: Flip the chicken thighs over and then move the skillet to the middle rack of the oven, uncovered. Let cook 15-20 minutes or until fully cooked (165℉ internal temperature).
- Rest + Serve: Let rest 5-10 minutes before serving.
Notes
Feel free to season your chicken with alternatives to salt and pepper. Serve with oven roasted broccolini and herbed potatoes. Store leftovers in an airtight container in the fridge for up to 5 days.
- Prep Time: 5 minutes
- Cook Time: 25 minutes
- Category: Chicken, Dinner/Entree
- Method: Oven, Stove Top
- Cuisine: American
Nutrition
- Serving Size: 1 chicken thigh
- Calories: 328 kcal
- Sugar: 0.003 g
- Sodium: 1274 mg
- Fat: 25 g
- Saturated Fat: 7 g
- Unsaturated Fat: 16 g
- Trans Fat: 0.1 g
- Carbohydrates: 1 g
- Fiber: 0.1 g
- Protein: 24 g
- Cholesterol: 142 mg
Keywords: cast iron chicken thighs, crispy chicken, easy weeknight dinner, meal prep, Whole30, Paleo