These oven-baked cheesy tacos are a practical solution for feeding a crowd without the mess of individual frying. By baking the shells upright, you achieve a consistent crunch and perfectly melted cheese across every taco.
List of ingredients
- 1 lb ground beef (or ground turkey/chicken) – lean 80/20 or 90/10 works best.
- 1 tbsp olive oil – used for sautéing aromatics.
- 1 small onion, diced – adds base flavor.
- 2 cloves garlic, minced – for aromatic depth.
- 1 packet taco seasoning (or homemade blend) – provides the primary spice profile.
- 0.5 cup tomato sauce or salsa – adds moisture and binding.
- salt and pepper (to taste) – for basic seasoning adjustment.
- 10 small taco shells (flour or corn, slightly warmed) – the vessel for the filling.
- 2 cups shredded cheddar cheese (or Mexican blend) – for the melty topping.
- 1 cup lettuce, shredded – provides a fresh, cool crunch.
- 0.5 cup tomatoes, diced – adds acidity and color.
- 0.5 cup red onion, diced – adds a sharp, fresh bite.
- 0.25 cup fresh cilantro, chopped – for a traditional herbal finish.
- optional toppings (sour cream, jalapeños, guacamole, hot sauce) – for personalized flavor.
step-by-step instructions
- Prepare Oven: Preheat oven to 375°F (190°C). Lightly grease a baking dish or line it with foil to prevent sticking.
- Sauté Aromatics: Heat olive oil in a skillet over medium heat. Add diced onion and minced garlic, sauté for 2-3 minutes until fragrant.
- Cook Filling: Add ground beef to the skillet, breaking it apart as it cooks. Stir in taco seasoning, tomato sauce, salt, and pepper. Simmer for 5 minutes until mixture thickens.
- Fill Shells: Fill each taco shell with the meat mixture. Sprinkle shredded cheese generously over each filled shell.
- Arrange: Arrange filled taco shells standing upright side by side in the prepared baking dish.
- Bake: Bake for 10-15 minutes until cheese is melted and bubbly and shells are lightly crispy.
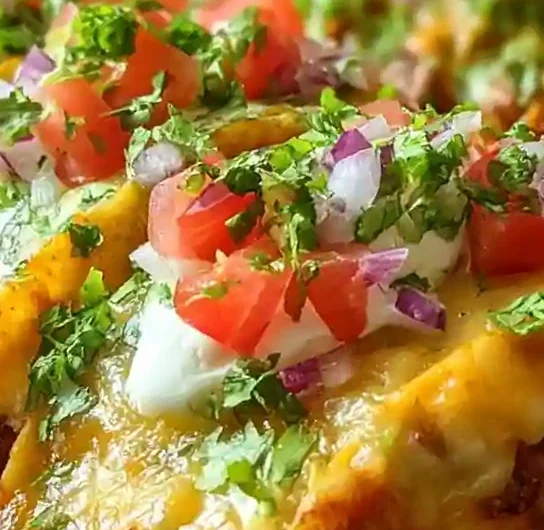
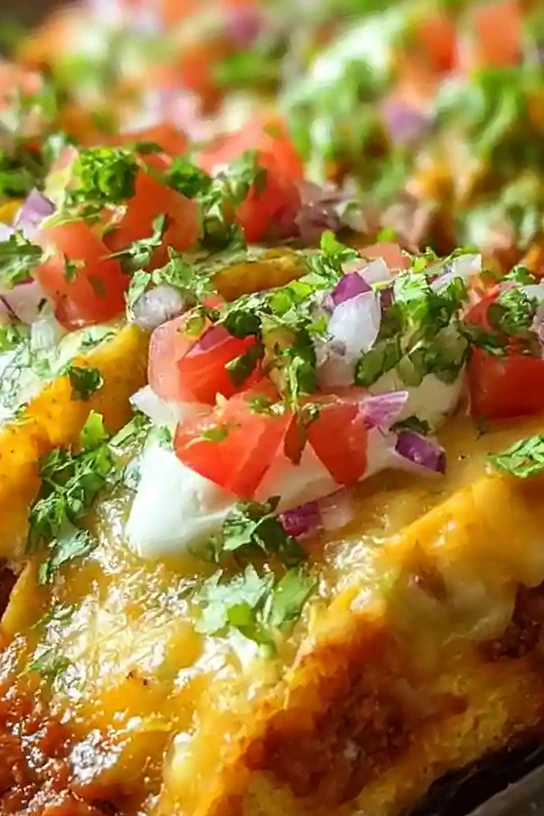
- Garnish: Remove from oven and top with fresh lettuce, diced tomatoes, red onion, and cilantro. Add optional toppings as desired.
Optimizing the Baking Process
Proper Shell Arrangement
Place the taco shells closely together in the baking dish so they lean against each other. This creates a structural support system that prevents them from tipping over as the cheese melts. If the dish is too large, use a smaller one or create a barrier with foil.
Temperature Management
Ensure the oven is fully preheated to 375°F before sliding the dish inside. This immediate heat causes the cheese to bubble quickly and the shells to crisp without overcooking the meat inside. If the oven is too cool, the shells may soften from the meat’s moisture.
Using Parchment or Foil
Lining your dish with aluminum foil or parchment paper makes cleanup significantly easier. It also prevents the cheese that drips down the sides from bonding permanently to the baking pan. A light spray of non-stick oil on the foil adds an extra layer of protection.
Filling Customizations and Protein Swaps
Lean Meat Alternatives
You can replace ground beef with ground turkey or ground chicken for a lighter version. Because these meats are leaner, they can dry out faster, so consider adding an extra tablespoon of tomato sauce or salsa to maintain moisture.
Plant-Based Protein Options
For a vegetarian version, substitute the meat with seasoned black beans, pinto beans, or plant-based crumbles. If using beans, lightly mash some of them with a fork to create a thicker texture that stays inside the shell better.
Adding Texture with Vegetables
Mix finely diced bell peppers, corn kernels, or minced carrots into the meat mixture. This increases the nutritional value and adds varied textures to each bite. Sauté these vegetables along with the onions and garlic for the best flavor integration.
Cheese Selection and Melting Tips
Best Melting Cheeses
Cheddar provides a sharp flavor and classic color, but Monterey Jack or Mozzarella offer a superior melt and stretch. A pre-mixed Mexican blend often combines these for a balance of flavor and texture.
Freshly Grated vs. Pre-Shredded
Grate your own cheese from a block for the smoothest melt. Pre-shredded cheeses are coated in cellulose or potato starch to prevent clumping, which can lead to a grainier texture and slower melting times.
Adding Spicy Cheese Varieties
Use Pepper Jack cheese if you want to infuse heat directly into the melty layer. For a more authentic touch, sprinkle a bit of crumbled Cotija or Queso Fresco on top after the tacos have finished baking.
Enhancing Fresh Toppings
The Classic Fresh Mix
Combining shredded iceberg lettuce, Roma tomatoes, and red onion provides a cooling contrast to the hot, savory beef. Ensure the vegetables are chopped into small, uniform pieces so they stay on the taco without falling off.
Spicy Garnish Options
Freshly sliced jalapeños or a drizzle of sriracha can elevate the heat level. For a smoky flavor, use chipotle peppers in adobo sauce mixed into your sour cream or guacamole.
Creamy Finishing Touches
Dollops of sour cream or thick guacamole add a rich creaminess that balances the acidity of the tomatoes and onions. For a healthier alternative, use plain Greek yogurt, which provides a similar tang and a boost of protein.
Storage and Preservation Methods
Refrigerating Leftovers
Place leftover tacos in an airtight container, ideally separating the baked shells from the fresh toppings. Store them in the refrigerator for up to three to four days. To prevent the shells from becoming soggy, avoid storing them with wet toppings already added.
Freezing Unbaked Tacos
Assemble the tacos with meat and cheese but do not bake them. Wrap the baking dish tightly in several layers of plastic wrap and aluminum foil, then freeze for up to two months. This is an excellent way to prepare make-ahead meals for busy weeks.
Maintaining Shell Integrity
If you are storing shells separately, keep them in a sealed bag in a cool, dry place. Exposure to humidity can make the shells soft and prone to cracking during the filling process.
Reheating Techniques for Maximum Crunch
The Oven Method
To restore the original crispness, reheat tacos in a 350°F oven for 8-10 minutes. This dries out any moisture that accumulated in the fridge and remelts the cheese effectively. Avoid overcrowding the pan during reheating.
Air Fryer Reheating
Place a few tacos in the air fryer basket at 350°F for 3-5 minutes. The circulating hot air is highly effective at crisping the corn or flour shells quickly. Be careful not to overcook, as the cheese can burn rapidly.
Avoiding the Microwave
Avoid using a microwave for reheating if possible, as it traps steam and makes the shells chewy or soggy. If you must use one, heat them for only 30-60 seconds on medium power and immediately transfer them to a toaster oven.
Troubleshooting Common Issues
Preventing Shell Breakage
If your shells crack frequently, warm them in the microwave for 10-15 seconds wrapped in a damp paper towel before filling. This slightly softens the shell, making it more flexible and less likely to shatter under the weight of the filling.
Fixing Soggy Shells
Sogginess usually occurs if the meat filling is too watery. Ensure you simmer the beef until the sauce has thickened and coats the meat heavily. If the meat is too greasy, drain the excess fat before adding the tomato sauce and seasoning.
Managing Overfilled Tacos
Filling the shells to the very brim can cause them to tip over or the cheese to overflow and burn. Leave about a quarter-inch of space at the top of the shell to allow the cheese to bubble without spilling over the sides.
Serving and Presentation Ideas
Platter Arrangement
Serve the tacos on a large wooden board or a ceramic platter with the shells slightly overlapping. Place bowls of fresh toppings around the edges of the platter to create a DIY taco station for your guests.
Complementary Side Dishes
Pair these tacos with Spanish rice or cilantro-lime quinoa to make the meal more filling. A side of refried beans or a corn salad with lime and cotija cheese also complements the flavor profile well.
Non-Alcoholic Beverage Pairings
Serve these tacos with a refreshing horchata, a tart limeade, or sparkling water infused with fresh cucumber and mint. These drinks help cleanse the palate between bites of rich, cheesy beef.
Frequently Asked Questions
Can I prepare these tacos ahead of time?
Yes, you can assemble the tacos with meat and cheese, cover them with foil, and refrigerate them for up to 24 hours. When you are ready to eat, bake them as directed, adding 2-5 minutes to the cooking time to account for the cold temperature.
What is the best cheese for oven-baked tacos?
A blend of Monterey Jack and Sharp Cheddar is ideal because it combines excellent melting capabilities with a bold flavor. Pepper Jack is a great alternative for those who prefer a spicy kick.
Can I use soft tortillas instead of hard shells?
Yes, but the method changes. Roll the filling into soft tortillas like enchiladas, place them seam-side down in the dish, and top with cheese. They will bake into a softer, more enchilada-style dish rather than a crispy taco.
How do I keep the shells from getting soggy?
The key is to ensure the meat filling is thick and not soupy. Drain excess grease after browning the beef and simmer the sauce until it is well-reduced. Always add fresh toppings like lettuce and tomato after baking.
Are these tacos kid-friendly?
Yes, they are generally very popular with children due to the melted cheese. You can make them more kid-friendly by using a mild taco seasoning and allowing children to add their own toppings at the table.
Can I freeze these tacos after they are baked?
It is not recommended to freeze them after baking, as the shells often lose their crunch and become tough upon reheating. For the best results, freeze them in their unbaked, assembled state.
What should I serve with oven-baked cheesy tacos?
Mexican rice, refried beans, and chips with salsa or guacamole are traditional and effective pairings. A light garden salad with a lime vinaigrette also adds a fresh balance to the meal.
Print
Crispy Oven-Baked Cheesy Tacos
- Total Time: 35 minutes
- Yield: 10 tacos 1x
- Diet: General
Description
Crispy taco shells filled with seasoned ground beef and melted cheese, baked until golden. A quick and easy dinner perfect for busy weeknights with customizable toppings.
Ingredients
- 1 lb ground beef (or ground turkey/chicken)
- 1 tbsp olive oil
- 1 small onion, diced
- 2 cloves garlic, minced
- 1 packet taco seasoning
- 0.5 cup tomato sauce or salsa
- salt and pepper to taste
- 10 small taco shells (flour or corn, slightly warmed)
- 2 cups shredded cheddar cheese (or Mexican blend)
- 1 cup lettuce, shredded
- 0.5 cup tomatoes, diced
- 0.5 cup red onion, diced
- 0.25 cup fresh cilantro, chopped
- optional toppings (sour cream, jalapeños, guacamole, hot sauce)
Instructions
- Step: Preheat oven to 375°F (190°C). Lightly grease a baking dish or line with foil.
- Step: Heat olive oil in a skillet over medium heat. Add diced onion and minced garlic, sauté for 2-3 minutes until fragrant.
- Step: Add ground beef to the skillet, breaking it apart as it cooks. Stir in taco seasoning, tomato sauce, salt, and pepper. Simmer for 5 minutes until mixture thickens.
- Step: Fill each taco shell with the meat mixture. Sprinkle shredded cheese generously over each filled shell.
- Step: Arrange filled taco shells standing upright side by side in the prepared baking dish.
- Step: Bake for 10-15 minutes until cheese is melted and bubbly and shells are lightly crispy.
- Step: Remove from oven and top with fresh lettuce, diced tomatoes, red onion, and cilantro. Add optional toppings as desired.
Notes
Warm taco shells slightly before filling to prevent cracking. Don’t overfill shells or they may tip over during baking. Can substitute with ground turkey, chicken, or black beans for variation. These tacos can be assembled ahead and refrigerated, then baked just before serving. Freeze assembled unbaked tacos for up to 2 months.
- Prep Time: 15 minutes
- Cook Time: 20 minutes
- Category: Main Course
- Method: Baking
- Cuisine: Mexican
Nutrition
- Serving Size: 1 taco
- Calories: 250 kcal
- Sugar: 4 g
- Sodium: 620 mg
- Fat: 14 g
- Saturated Fat: 7 g
- Unsaturated Fat: 7 g
- Trans Fat: 0 g
- Carbohydrates: 18 g
- Fiber: 2 g
- Protein: 15 g
- Cholesterol: 65 mg
Keywords: baked taco recipe, cheesy tacos, easy dinner, oven-baked tacos