On my busiest nights, I reach for simple yet impressive solutions, and this Cupcake Cones Recipe Fun Party Desserts is exactly that. Tired of messy cupcake wrappers and boring party treats? Transform ordinary cupcakes into a delightful, handheld experience that kids (and adults!) adore. This Cupcake Cones recipe is your answer for stress-free, fun party desserts. Perfect for busy parents and hosts, we’ll walk you through making these showstoppers, with plenty of tips for success. As a seasoned home cook, I promise this will be your new go-to party hack.
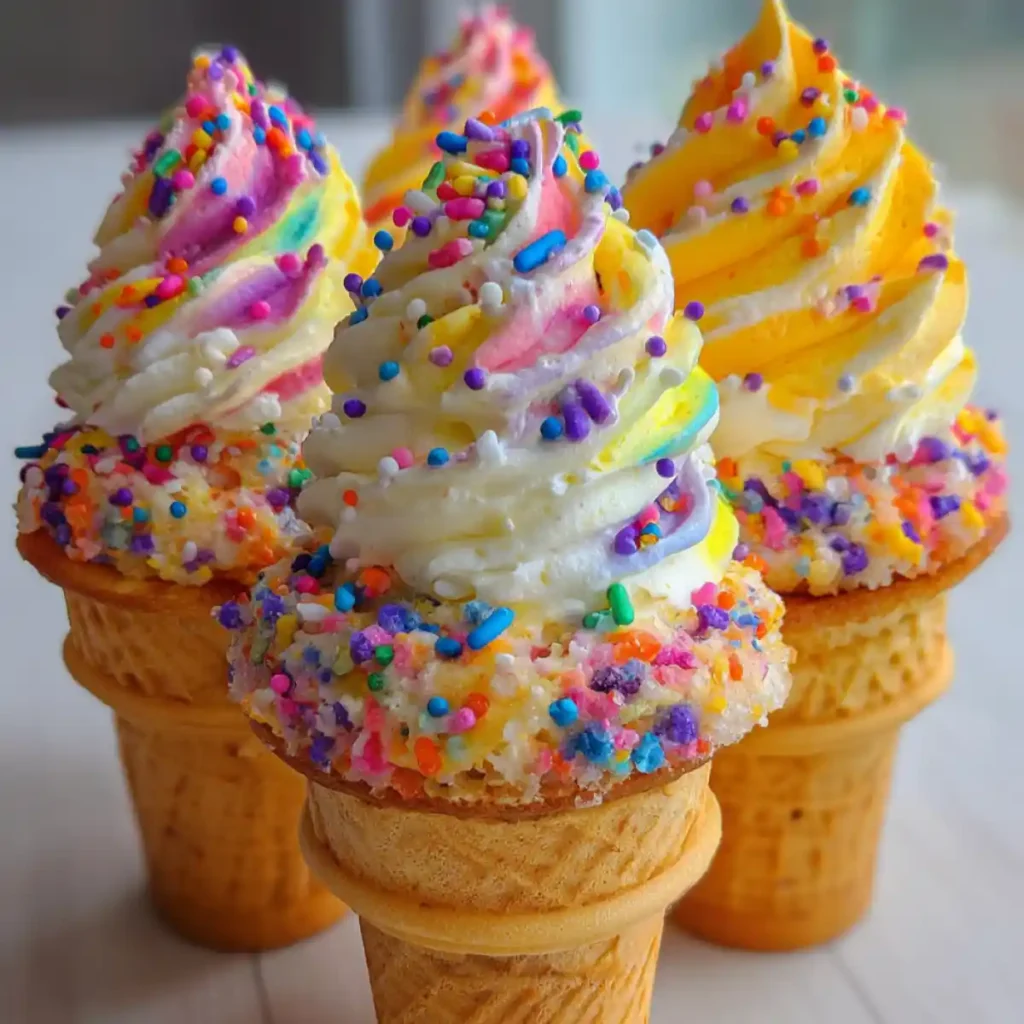
Table of Contents
Table of Contents
Ingredient Breakdown (with Measurements, Purpose) — Cupcake Cones Recipe Essentials
Gathering your ingredients for this delightful Cupcake Cones Recipe is the first step to creating these memorable fun party desserts. Here’s a look at what you’ll need:
Dry Ingredients:
- All-purpose flour: 1 ½ cups (180g) — The foundation for our cake. (For speed, you can swap for 1 standard box cake mix, ~15.25 oz/432g).
- Granulated sugar: 1 cup (200g) — For sweetness and tender crumb.
- Baking powder: 1 ½ tsp (7.5g) — Our leavening agent, ensuring fluffy cakes.
- Salt: ½ tsp (2.5g) — Balances flavors and enhances sweetness.
Wet Ingredients:
- Large eggs: 2 — Binds everything together and adds richness.
- Milk: ¾ cup (180ml) — Adds moisture for a soft texture.
- Vegetable oil or melted butter: ½ cup (120ml) — For moisture and a rich, tender crumb.
- Vanilla extract: 1 tsp (5ml) — Classic warm flavor boost.
Key Supplies:
- Flat-bottomed ice cream cones: 24 (sugar or cake cones) — The star of our Cupcake Cones Recipe! Choose sturdy ones that stand well.
- Cupcake liners: Optional, for baking stability if cones are wobbly.
- Muffin tin: To hold your cones upright.
Frosting & Decor:
- Your favorite frosting: 16 oz (450g) — Homemade buttercream or quality store-bought works perfectly.
- Colorful sprinkles, candy toppings: As desired — For that essential fun, festive look.
Optional Add-ins & Smart Swaps:
- Food coloring: A few drops for vibrant batter colors.
- Almond extract: ½ tsp (2.5ml) — For a different flavor profile.
- Mini chocolate chips: ¼ cup (40g) — Stir into batter for extra delight.
- Gluten-free cake mix/cones: For dietary needs, ensure all components are certified GF.
Notes on Quality/Seasonality:
Choose sturdy, flat-bottomed cones to prevent tipping during baking. Fresh eggs and good quality vanilla extract make a noticeable difference in flavor. Ensure your sprinkles are fresh for the best appearance and crunch; stale sprinkles just aren’t as fun!
Step-by-Step Preparation Instructions — Making Your Fun Cupcake Cones
- Prep Your Station (5 mins): Preheat your oven to 350°F (175°C). To hold your flat-bottomed ice cream cones upright, line a muffin tin with aluminum foil, or simply use an inverted muffin tin to balance them between the cups. This ingenious trick prevents them from toppling over during baking.
- Mix Your Batter (5-7 mins): In a large bowl, whisk together your dry ingredients (flour, sugar, baking powder, salt). In a separate bowl, whisk the wet ingredients (eggs, milk, vegetable oil, vanilla extract). Pour the wet mixture into the dry, mixing gently until just combined. Remember: Don’t overmix! Overmixing can lead to tough Cupcake Cones, and we want them tender.
- Fill the Cones (5-8 mins): Carefully spoon or pipe your prepared batter into each cone, filling them about two-thirds full. Avoid overfilling to prevent any spillage and to ensure your Cupcake Cones bake evenly and beautifully.
- Bake to Perfection (18-22 mins): Place the filled cones into your prepared muffin tin. Bake for 18-22 minutes, or until a toothpick inserted into the center of a cupcake comes out clean. The cake should look lightly golden and spring back when gently pressed.
- Cool Completely (30-45 mins): This is a crucial step! Transfer the baked Cupcake Cones to a wire rack and let them cool completely before even thinking about frosting. This prevents soggy cones and ensures your frosting doesn’t melt off.
- Frost & Decorate (10-15 mins): Once fully cooled, it’s time for the fun part! Frost your Cupcake Cones using a knife, an offset spatula, or a piping bag for those lovely swirls. Immediately add colorful sprinkles and any other fun decorations you have. Get creative with colors and designs for a true party dessert vibe that everyone will love!
When and How to Use It (Occasions, Storage) — Perfect Party Desserts
These Cupcake Cones are ideal for birthday parties, school events, summer BBQs, potlucks, or simply a fun weeknight dessert. They’re built-in portion control!
Arrange them on a platter, stand them in a cupcake caddy, or even wrap them individually for party favors. Pair with milk, juice, or a festive punch.
| Storage Location | Duration |
|---|---|
| Room Temperature | 1-2 days (frosted, airtight) |
| Refrigerator | Up to 3 days (frosted, airtight) |
| Freezer | Up to 1 month (unfrosted, wrapped tightly) |
Thaw at room temperature before frosting. Reheat in the microwave for a few seconds if desired, but best served at room temp. This Cupcake Cones Recipe offers so much flexibility for your party planning.

How It Supports Easy Party Planning
- Less Mess, More Fun: Handheld format means no plates, no forks, and significantly less cleanup, making party hosting a breeze.
- Make-Ahead Friendly: Bake the Cupcake Cones a day or two in advance, then frost and decorate closer to party time.
- Customizable for Themes: Easily adapt colors and toppings to match any party theme, adding a personalized touch effortlessly.
Tips, Adjustments, and Cautions for Your Cupcake Cones Recipe
- Technique Upgrades: For perfectly domed tops, consider using an ice cream scoop for filling. Use a piping bag for professional-looking frosting swirls.
- Seasoning Adjustments: Swap vanilla extract for lemon, almond, or peppermint in your batter and frosting for different flavor profiles.
- Texture Control: Ensure your batter isn’t overmixed; this can lead to tough Cupcake Cones. Cool completely before frosting to prevent your cones from becoming soft.
- Allergy or Dietary Notes: Use a certified gluten-free cake mix and gluten-free cones for those with sensitivities. Substitute dairy milk with non-dairy alternatives. Always double-check ingredient labels.
- Cautions: Make sure your cones are genuinely oven-safe. Always allow the cakes to cool fully inside the cones to prevent them from becoming soggy from trapped steam. I always make sure they’re completely cool to avoid issues.
FAQs about Cupcake Cones
What kind of cones should I use for Cupcake Cones?
Flat-bottomed ice cream cones (like sugar or cake cones) work best as they stand upright easily in a muffin tin during baking. Round-bottomed cones are too unstable.
Can I make Cupcake Cones ahead of time?
Yes! You can bake the Cupcake Cones up to 2-3 days in advance and store them unfrosted in an airtight container. Frost them closer to your event.
How do you keep the cones from getting soggy?
The key is to let the Cupcake Cones cool completely on a wire rack before frosting. This prevents steam from being trapped and making the cone soft.
What’s the best way to bake Cupcake Cones?
Use a muffin tin! Turn it upside down and place the cones between the cups, or stand them upright in the cups, using aluminum foil if needed to stabilize them.
Can kids help make this Cupcake Cones recipe?
Absolutely! Kids love mixing the batter and, especially, decorating the frosted Cupcake Cones with sprinkles and candies. It’s a great family activity.
How long do Cupcake Cones last?
Frosted Cupcake Cones last 2-3 days in the fridge in an airtight container. Unfrosted, they can last up to a month in the freezer.
Can I use homemade cake batter for Cupcake Cones?
Yes, any standard cake batter recipe that yields about 24 cupcakes will work perfectly for this Cupcake Cones recipe.
Say goodbye to ordinary party desserts and hello to the ultimate fun, handheld treat! This Cupcake Cones recipe delivers smiles with minimal fuss and maximum flavor. They’re easy to make, fun to eat, and a guaranteed hit for any celebration. Pin this Cupcake Cones recipe for your next joyful gathering!
Print
Cupcake Cones Fun Party Desserts
- Total Time: 38 minutes
- Yield: 24 servings
- Diet: Vegetarian
Description
Transform ordinary cupcakes into a delightful, handheld experience that kids (and adults!) adore. This easy Cupcake Cones recipe is perfect for stress-free fun party desserts.
Ingredients
- All-purpose flour: 1 ½ cups (180g)
- Granulated sugar: 1 cup (200g)
- Baking powder: 1 ½ tsp (7.5g)
- Salt: ½ tsp (2.5g)
- Large eggs: 2
- Milk: ¾ cup (180ml)
- Vegetable oil or melted butter: ½ cup (120ml)
- Vanilla extract: 1 tsp (5ml)
- Flat-bottomed ice cream cones: 24 (sugar or cake cones)
- Cupcake liners: Optional, for baking stability if cones are wobbly
- Muffin tin: To hold your cones upright
- Your favorite frosting: 16 oz (450g)
- Colorful sprinkles, candy toppings: As desired
- Food coloring: A few drops (optional)
- Almond extract: ½ tsp (2.5ml) (optional)
- Mini chocolate chips: ¼ cup (40g) (optional)
- Gluten-free cake mix/cones: (optional, for dietary needs)
Instructions
- Prep Your Station: Preheat your oven to 350°F (175°C). Line a muffin tin with aluminum foil or invert it to balance cones between cups, preventing toppling during baking.
- Mix Your Batter: In a large bowl, whisk together flour, sugar, baking powder, and salt. In a separate bowl, whisk eggs, milk, vegetable oil (or melted butter), and vanilla extract. Pour the wet mixture into the dry, mixing gently until just combined. Do not overmix.
- Fill the Cones: Carefully spoon or pipe batter into each cone, filling them about two-thirds full. Avoid overfilling to prevent spillage and ensure even baking.
- Bake to Perfection: Place the filled cones into your prepared muffin tin. Bake for 18-22 minutes, or until a toothpick inserted into the center of a cupcake comes out clean.
- Cool Completely: Transfer the baked Cupcake Cones to a wire rack and let them cool completely before frosting. This prevents soggy cones and ensures frosting doesn’t melt.
- Frost & Decorate: Once fully cooled, frost your Cupcake Cones using a knife, offset spatula, or piping bag. Immediately add colorful sprinkles and any other desired decorations for a festive look.
Notes
Choose sturdy, flat-bottomed cones to prevent tipping during baking. Fresh eggs and good quality vanilla extract make a noticeable difference in flavor. Ensure your sprinkles are fresh for the best appearance and crunch.
For speed, you can swap the dry ingredients (flour, sugar, baking powder, salt) for 1 standard box cake mix (~15.25 oz/432g).
For dietary needs, you can use gluten-free cake mix and cones, ensuring all components are certified GF.
Estimated nutritional data: Nutritional values are estimated due to lack of specific data in the original article. For precise information, consult a professional.
- Prep Time: 18 minutes
- Cook Time: 20 minutes
- Category: Desserts
- Method: Baked
- Cuisine: American
Nutrition
- Serving Size: 1 Cupcake Cone
- Calories: 280
- Sugar: 30g
- Sodium: 150mg
- Fat: 12g
- Saturated Fat: 5g
- Unsaturated Fat: 7g
- Trans Fat: 0g
- Carbohydrates: 40g
- Fiber: 1g
- Protein: 3g
- Cholesterol: 30mg
Keywords: Cupcake Cones, Party Desserts, Fun Desserts
FREE PRINTABLE RECIPE
Get the Printable Recipe PDF (Free)
Enter your email and we’ll send you the ingredients + step-by-step instructions as a clean PDF you can save to your phone.
- ✅ Printable PDF (ingredients + steps)
- ✅ Save it to your phone (no long scrolling)
- ✅ Includes cook time + servings
- ✅ Easy to follow
FAQ
Where’s the full recipe?
It’s delivered as a printable PDF so you can save it and cook without scrolling.
I didn’t get the email.
Check Spam/Promotions and search your inbox for your site name. Then click Confirm to receive the PDF.