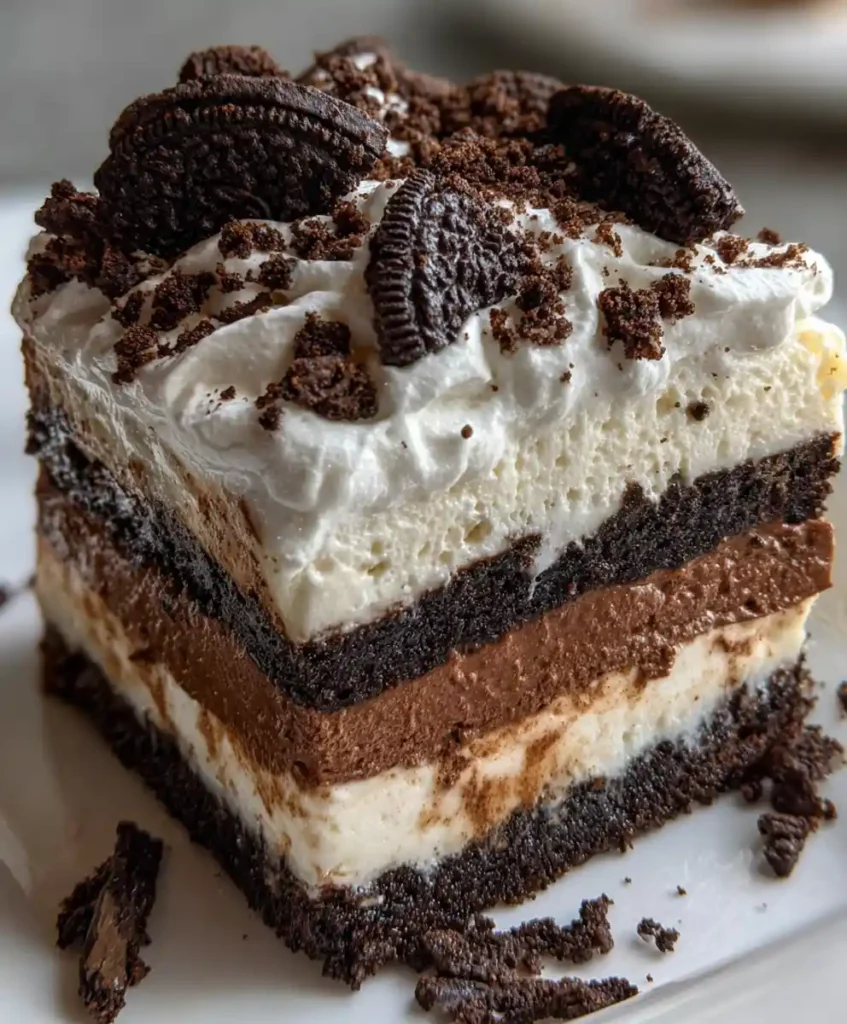
On my busiest nights, I reach for recipes that promise big smiles with minimal fuss – stick with me and I’ll show you how to do just that! Tired of complicated desserts that take hours to make but disappear in minutes? Imagine a show-stopping, no-bake Oreo Ice Cream Cake with Fudge Layers so easy, it’ll become your secret weapon for celebrations. Perfect for busy parents and anyone craving an impressive, yet simple, family-friendly treat. This guide covers everything from ingredients to assembly for your Oreo Ice Cream Cake with Fudge Layers, ensuring a dessert that tastes as good as it looks. A tried-and-true recipe that brings smiles and simplifies dessert duty every time.

Table of Contents
Table of Contents
Ingredient Breakdown (with Measurements, Purpose)
Gathering your ingredients is the first delightful step towards creating this incredible Oreo Ice Cream Cake with Fudge Layers. Here’s what you’ll need, along with a few notes on why each component is essential.
- Core Ingredients for Your Oreo Ice Cream Cake with Fudge Layers
- 1 (14.3 oz) package Oreo cookies (approx. 40-45 cookies): For the crunchy crust and delicious crumble.
- 6 tbsp unsalted butter, melted (approx. 85g): Binds the cookie crust together perfectly.
- 1.5 quarts vanilla ice cream, slightly softened (approx. 1.4 liters): The creamy, dreamy base that makes this cake so satisfying.
- 1 (12 oz) jar hot fudge sauce, cooled (approx. 340g): The rich, decadent layers that add incredible depth of flavor.
- 1 (8 oz) tub whipped topping, thawed (approx. 225g): For the fluffy, light top layer.
- Optional Add-ins & Smart Swaps
- Different ice cream flavors: Feel free to experiment with chocolate, mint chip, or cookie dough for variety.
- Alternate cookies: Chocolate chip, Nutter Butter, or even gluten-free Oreos work beautifully for the crust and topping.
- Homemade fudge sauce: For an extra personal touch and custom flavor.
- Garnish: Chocolate syrup drizzle, extra crushed Oreos, sprinkles, or fresh berries can elevate your presentation.
- Notes on Quality & Prep
- Choose a good quality ice cream for the best texture and flavor – premium brands truly make a difference in your final dessert.
- Ensure your hot fudge sauce is completely cooled before layering to prevent any premature melting of the ice cream layers.
- Whipped topping should be thawed gently in the refrigerator, not at room temperature, to maintain its texture.
- Real butter for the crust provides the best flavor and structure, ensuring a sturdy and delicious base.
Step-by-Step Preparation Instructions
Creating your no-bake Oreo Ice Cream Cake with Fudge Layers is a breeze when you follow these simple steps. Patience between freezing layers is your best friend here!
- Prep Your Pan (5 minutes): Line a 9×13 inch baking dish with parchment paper, leaving an overhang on the sides for easy lifting. I find this extra step makes serving your beautiful Oreo Ice Cream Cake a dream!
- Make the Oreo Crust (10 minutes): Crush 3/4 of the Oreos into fine crumbs (a food processor works best here, but a zip-top bag and rolling pin also do the trick). Mix with melted butter until well combined. Press firmly into the bottom of the prepared dish. Freeze for 15 minutes to set this crucial base.
- First Ice Cream Layer (5 minutes): Spread half of the slightly softened vanilla ice cream evenly over the chilled crust. Don’t let it get too soft, just spreadable. Return to freezer for 20-30 minutes, until firm.
- First Fudge Layer (5 minutes): Once the ice cream is firm, evenly spread half of the cooled fudge sauce over it. Make sure it’s truly cool to avoid melting. Freeze for another 15-20 minutes until the fudge layer is firm.
- Second Ice Cream & Fudge Layers (10 minutes): Repeat steps 3 and 4, using the remaining ice cream and fudge. This builds up the delicious layers. Make sure each layer is firm before adding the next. If the ice cream becomes too soft, refreeze briefly – patience is key!
- Whipped Topping & Finish (5 minutes): Spread the thawed whipped topping evenly over the top fudge layer. Crush the remaining Oreos and sprinkle generously over the whipped topping for that classic finish.
- Freeze Until Solid (Minimum 4 hours): Cover loosely with plastic wrap and freeze the entire Oreo Ice Cream Cake until completely solid. For the very best results and easiest slicing, I recommend freezing it overnight.
When and How to Enjoy Your Oreo Ice Cream Cake
This fantastic Oreo Ice Cream Cake with Fudge Layers isn’t just for special occasions; it’s versatile enough for any moment! Here are some ideas for enjoying your creation.
- Perfect for Any Occasion
- Birthday celebrations: A guaranteed crowd-pleaser that delights all ages.
- Summer BBQs and potlucks: A refreshing, no-bake dessert that travels wonderfully.
- Weeknight treat: Easy enough to whip up for a special family dinner without the extra fuss.
- Holiday gatherings: A delicious, unexpected alternative to traditional pies and baked goods.
- Serving Ideas and Pairings
- Serve chilled straight from the freezer for the best texture.
- Pair with a warm cup of coffee, rich hot cocoa, or a classic cold glass of milk.
- Add a side of fresh berries (like strawberries or raspberries) to cut through the richness and add a pop of color.
- Storage & Reheating Guidance
- Fridge: Not recommended for long-term storage due to the ice cream melting. Only briefly for softening before serving.
- Freezer: Store leftovers tightly covered with plastic wrap or in an airtight container for up to 2-3 weeks. This helps prevent freezer burn and keeps it fresh.
- Serving from Frozen: For best slicing, let the Oreo Ice Cream Cake sit at room temperature for 10-15 minutes before cutting. Use a hot, sharp knife for clean, beautiful slices.
How It Supports Your Effortless Entertaining Goals
This dessert isn’t just delicious; it’s a strategic choice for anyone looking to simplify their entertaining while still impressing guests. The Oreo Ice Cream Cake with Fudge Layers truly makes life easier.
- No-Bake Wonder: Skip the oven entirely, freeing up your time and keeping your kitchen cool, especially on warm days.
- Make-Ahead Magic: Assemble days or even weeks in advance, reducing last-minute stress when you’re hosting. Just pull it out when you’re ready!
- Universal Appeal: A dessert that everyone loves, from kids to adults, simplifying your menu planning for any gathering.
- Budget-Friendly Indulgence: Uses common, affordable ingredients for a luxurious result without the gourmet price tag.
Tips, Adjustments, and Cautions for Your Oreo Ice Cream Cake
To ensure your Oreo Ice Cream Cake with Fudge Layers turns out absolutely perfect every time, here are some insider tips and things I keep an eye on.
- Technique Upgrades for the Best Cake
- Use a hot knife: Dip your knife in hot water and wipe dry before each slice for incredibly clean cuts. It makes all the difference!
- Patience with freezing: Each layer truly needs to firm up to prevent bleeding and maintain those beautiful, distinct layers. Don’t rush this part!
- Don’t over-soften ice cream: It should be spreadable but not soupy, to prevent an icy, freezer-burnt texture later.
- Seasoning Adjustments & Texture Control
- A pinch of sea salt in the melted butter for the crust can subtly enhance the chocolate flavor of the Oreos.
- For an extra thick fudge layer, consider using slightly more fudge sauce (up to a 16 oz jar). More fudge is rarely a bad thing!
- If your ice cream is too hard to spread, microwave it for 10-15 seconds at a time until just pliable. I find this much better than letting it sit out too long.
- Allergy & Dietary Notes
- Gluten-Free: Easily adapted by using gluten-free chocolate sandwich cookies and ensuring all other ingredients are certified GF.
- Dairy-Free: Opt for dairy-free ice cream, dairy-free chocolate sandwich cookies, and a dairy-free whipped topping. Always double-check your fudge sauce for hidden dairy.
- Always read ingredient labels carefully for hidden allergens to ensure everyone can enjoy a slice safely.
FAQs
Got questions about making your amazing Oreo Ice Cream Cake with Fudge Layers? Here are some common queries and my best answers!
Can I make this Oreo Ice Cream Cake ahead of time?
Yes, absolutely! This is a fantastic make-ahead dessert. You can prepare your Oreo Ice Cream Cake with Fudge Layers up to 2-3 weeks in advance and keep it tightly covered in the freezer.
What kind of ice cream works best for an Oreo Ice Cream Cake?
Vanilla is classic and allows the Oreo and fudge flavors to shine. However, chocolate, mint chip, or even coffee ice cream are delicious variations. Just ensure it’s a good quality, creamy ice cream for the best texture.
My fudge layer isn’t firming up, what should I do?
Ensure your fudge sauce was completely cooled before spreading. If it’s still too runny, place the cake back in the freezer for a longer period. Sometimes a thicker fudge sauce or slightly less runny ice cream helps.
How do I get clean slices of my Oreo Ice Cream Cake?
The trick is to use a hot knife! Dip a sharp knife in hot water, wipe it dry, then slice. Repeat for each cut. Letting the cake sit out for 10-15 minutes before slicing also makes a big difference.
Can I use homemade whipped cream instead of store-bought?
Yes, you can! Homemade whipped cream adds a lovely fresh touch. Just be aware it might not hold up as long in the freezer as stabilized whipped topping, so serve soon after taking it out.
Is it possible to make individual Oreo Ice Cream Cakes?
Absolutely! Assemble the layers in individual serving dishes, ramekins, or even muffin tins lined with paper for a fun, personalized treat. Adjust freezing times accordingly, as smaller portions will freeze faster.
What if I don’t have a food processor for the Oreos?
No worries at all! You can place the cookies in a zip-top bag and crush them with a rolling pin or the bottom of a heavy pan. It might take a bit more effort but works perfectly for making the crust for your delicious cake.
Conclusion
This Oreo Ice Cream Cake with Fudge Layers is truly the ultimate easy, impressive dessert that will delight everyone at your table. It’s proof that you don’t need to spend hours in the kitchen to create something spectacular.
Don’t forget to save this recipe to your favorite Pinterest board so you can whip it up whenever a craving strikes! I know this will become a cherished family favorite, just like it is in my home.
Print
Oreo Ice Cream Cake with Fudge Layers
- Total Time: 4 hours 30 minutes
- Yield: 12 servings 1x
- Diet: Vegetarian
Description
No-bake Oreo Ice Cream Cake with fudge layers and whipped topping. Creamy, family-friendly dessert that impresses with ease.
Ingredients
- 1 (14.3 oz) package Oreo cookies (approx. 40–45 cookies)
- 6 tbsp unsalted butter, melted (approx. 85g)
- 1.5 quarts vanilla ice cream, slightly softened (approx. 1.4 liters)
- 1 (12 oz) jar hot fudge sauce, cooled (approx. 340g)
- 1 (8 oz) tub whipped topping, thawed (approx. 225g)
Instructions
- Prep Your Pan: Line a 9×13 inch dish with parchment, leaving overhang for lifting.
- Make the Oreo Crust: Crush 3/4 of Oreos, mix with butter, press into pan, freeze 15 minutes.
- First Ice Cream Layer: Spread half the softened ice cream over crust, freeze 20–30 minutes.
- First Fudge Layer: Spread half the cooled fudge sauce, freeze 15–20 minutes.
- Second Layers: Repeat with remaining ice cream and fudge, freezing between additions.
- Whipped Topping & Finish: Spread whipped topping, sprinkle crushed Oreos.
- Freeze Until Solid: Cover and freeze at least 4 hours or overnight until firm.
Notes
- Substitutions: Use other ice cream flavors or cookies. Homemade fudge adds a personal touch.
- Storage: Freeze tightly covered up to 2–3 weeks. Soften briefly before slicing.
- Tips: Use a hot knife for clean slices. Ensure fudge is fully cooled before layering.
- Allergy/Dietary: Adapt with gluten-free or dairy-free alternatives as needed.
- Prep Time: 30 minutes
- Cook Time: 0 minutes
- Category: Desserts
- Method: No-Cook
- Cuisine: American
Nutrition
- Serving Size: 1 slice (1/12 cake)
- Calories: 420 kcal
- Sugar: 34g
- Sodium: 210mg
- Fat: 22g
- Saturated Fat: 12g
- Unsaturated Fat: 7g
- Trans Fat: 0g
- Carbohydrates: 48g
- Fiber: 1g
- Protein: 5g
- Cholesterol: 40mg
Keywords: Oreo Ice Cream Cake with Fudge Layers
FREE PRINTABLE RECIPE
Get the Printable Recipe PDF (Free)
Enter your email and we’ll send you the ingredients + step-by-step instructions as a clean PDF you can save to your phone.
- ✅ Printable PDF (ingredients + steps)
- ✅ Save it to your phone (no long scrolling)
- ✅ Includes cook time + servings
- ✅ Easy to follow
FAQ
Where’s the full recipe?
It’s delivered as a printable PDF so you can save it and cook without scrolling.
I didn’t get the email.
Check Spam/Promotions and search your inbox for your site name. Then click Confirm to receive the PDF.