Craving a satisfying, flavorful meal that’s quick enough for any night, I often turn to this easy paneer kathi roll recipe.
The vibrant aroma of spices, combined with the tender paneer and crisp veggies, makes these rolls an absolute delight. Perfect for busy parents, quick lunches, or a fun gathering, these hearty rolls solve the dilemma of wanting delicious homemade food without the fuss. It’s a dish that truly earns its place at our weeknight table, and my simplified version guarantees success every time.
What You’ll Need for Delicious Paneer Kathi Rolls (Ingredients & Their Roles)
Paneer: The star protein, firm and fresh for best texture.
You’ll need 250 g (8.8 oz) firm paneer, cut into 1.5 cm (0.6 inch) cubes. This Indian cheese provides a high-protein, satisfying base for your paneer kathi roll recipe.
Flour Tortillas or Indian Flatbreads: The trusty wrap, flexible and sturdy.
Grab 4-6 paratha flatbreads (store-bought or homemade). These are ideal for holding all the delicious filling; I often use whole wheat tortillas for a lighter, family-friendly option.
Onions & Bell Peppers: For crunch, sweetness, and vibrant color.
Use 1 medium red onion, thinly sliced, plus 1 medium green and 1 medium red bell pepper, thinly sliced. They add essential texture, natural sweetness, and a pop of color, making your paneer kathi roll visually appealing.
Ginger & Garlic: The aromatic flavor base that elevates everything.
Finely grated fresh ginger (1 tsp) and minced fresh garlic (1 tsp) are key. Along with ground ginger (1/2 tsp) and garlic powder (1/2 tsp) for the marinade, these aromatics build a rich, inviting flavor foundation.
Key Spices (Turmeric, Cumin, Coriander, Garam Masala): The heart of Indian flavor.
The soul of any paneer kathi roll lies in its spices: 1/4 tsp ground turmeric, 1/2 tsp ground cumin, 1/2 tsp ground coriander, and 1/4 tsp garam masala. These create the complex, warm Indian flavors we love.
Yogurt or Tomato Paste: For tanginess and binding the filling.
Add 2 tbsp (30 g) tomato paste for depth and to bind the filling (or a splash of plain yogurt if that’s what’s on hand for extra tang). It enriches the sauce for this paneer kathi roll recipe.
Flexible substitutions and budget-friendly swaps.
- Tofu or chickpeas work well in place of paneer for a different texture.
- Whole wheat tortillas or homemade rotis offer a healthier wrap option.
- Any seasonal vegetables like mushrooms or carrots integrate seamlessly into the filling.
Highlight healthier choices: organic, dairy-free, low-carb, protein-rich.
- Opt for low-fat paneer or a dairy-free yogurt alternative for your filling.
- Choose whole grain wraps to increase fiber content for healthy eating.
- Load up on extra vegetables for more vitamins and a fiber-rich paneer kathi roll.
Mention seasonal availability and storage quality.
- Fresh bell peppers taste best when they’re in season, bringing vibrant flavor.
- Firm paneer stores well in the refrigerator for up to a week, ensuring you’re ready for quick meals.
Cooking Your Paneer Kathi Rolls, Simplified
This section makes the paneer kathi roll recipe come to life. Before we cook the main filling, let’s get our delicious accompaniments ready. While the paneer marinates, prepare the Smoky Tomato-Mint Chutney by blending ingredients until smooth and vibrant. Make the Quick Sumac Pickled Red Onions by dissolving sugar and salt in vinegar with sumac, letting them sit for 15 minutes until pink and softened. Fry thinly sliced shallots in 120 ml (1/2 cup) vegetable oil at 170°C (340°F) for 5-7 minutes until golden brown and crispy; drain on paper towels.
- Prep Paneer (5 mins): Combine paneer cubes with lime juice, ground ginger, garlic powder, turmeric, red chili powder, and salt. Toss gently until coated and set aside to marinate for at least 15 minutes, allowing the paneer to absorb flavor.
- Sauté Aromatics (5 mins): Heat 1 tbsp (15 ml) vegetable oil in a large skillet over medium-high heat. Add the thinly sliced red onion and cook for 3-4 minutes until softened and fragrant.
- Cook Veggies & Spices (10-12 mins): Stir in green and red bell peppers, grated fresh ginger, and minced fresh garlic. Cook for another 3-4 minutes until the vegetables are tender-crisp and bright. Next, stir in ground cumin, ground coriander, and garam masala, cooking for 30 seconds until the spices become wonderfully fragrant. Add 2 tbsp (30 g) tomato paste, stirring constantly for 1 minute to deepen its flavor. Pour in 60 ml (1/4 cup) vegetable broth and bring it to a gentle simmer, scraping up any browned bits. If the mixture seems too dry, a tiny splash more broth can help maintain a rich sauce.
- Incorporate Paneer (5 mins): Return the cooked, lightly golden paneer to the skillet. Toss gently to coat the paneer and vegetables evenly with the flavorful sauce. Cook for 1-2 minutes until everything is heated through and the sauce slightly thickens, clinging to the paneer.
- Warm Wraps (2-3 mins per wrap): Heat each paratha flatbread on a dry griddle or pan over medium heat for 30-60 seconds per side. They should become warm and pliable. For an extra soft texture, lightly brush them with a tiny bit of vegetable oil until they puff slightly.
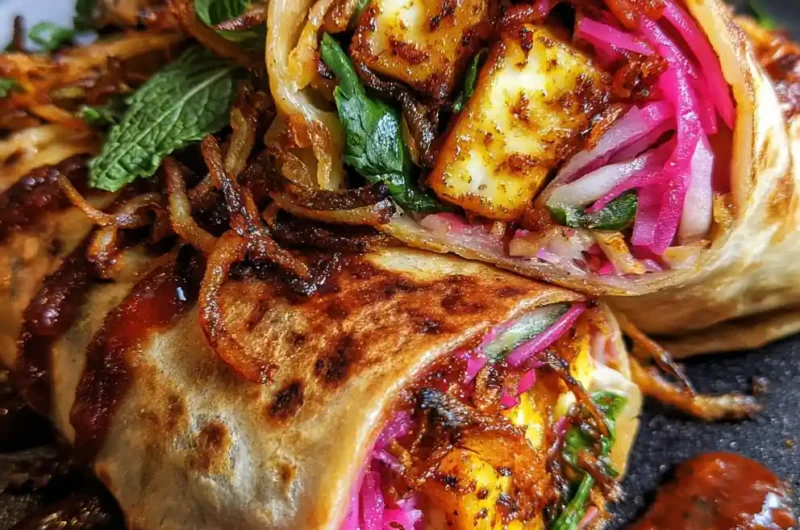
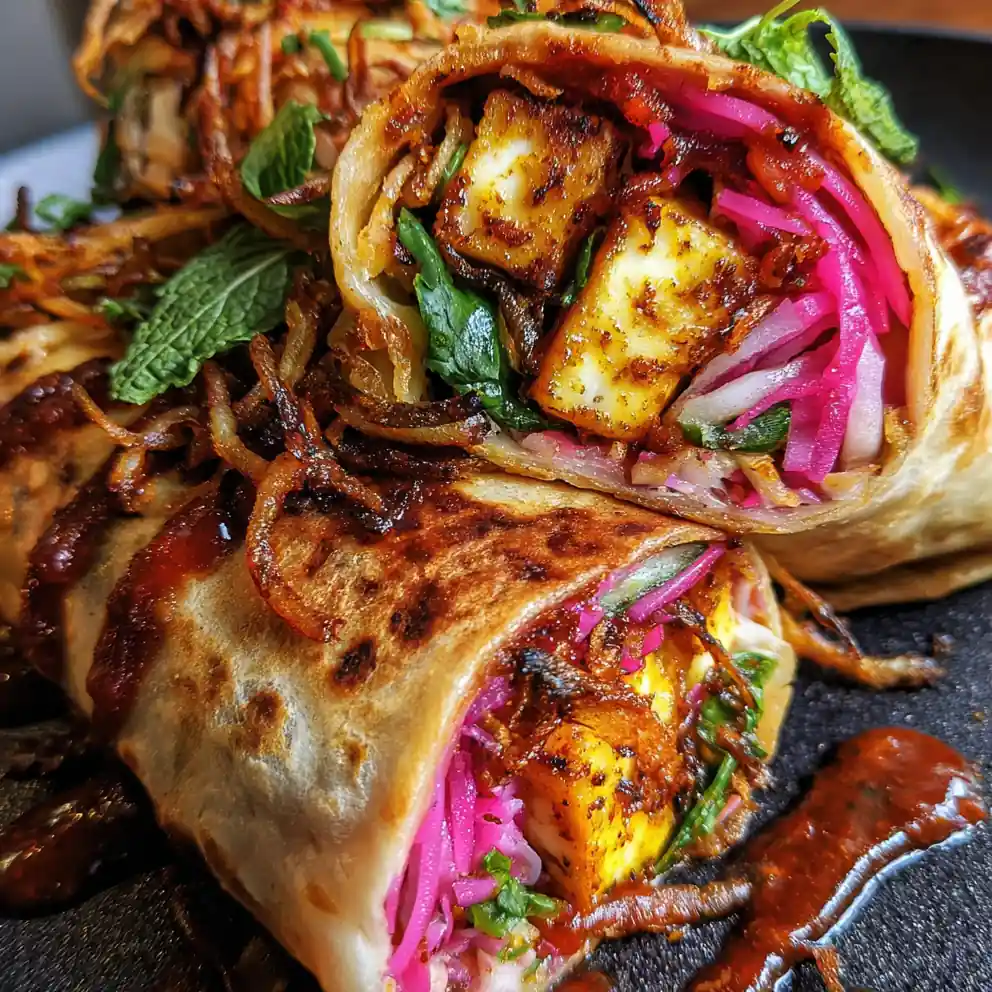
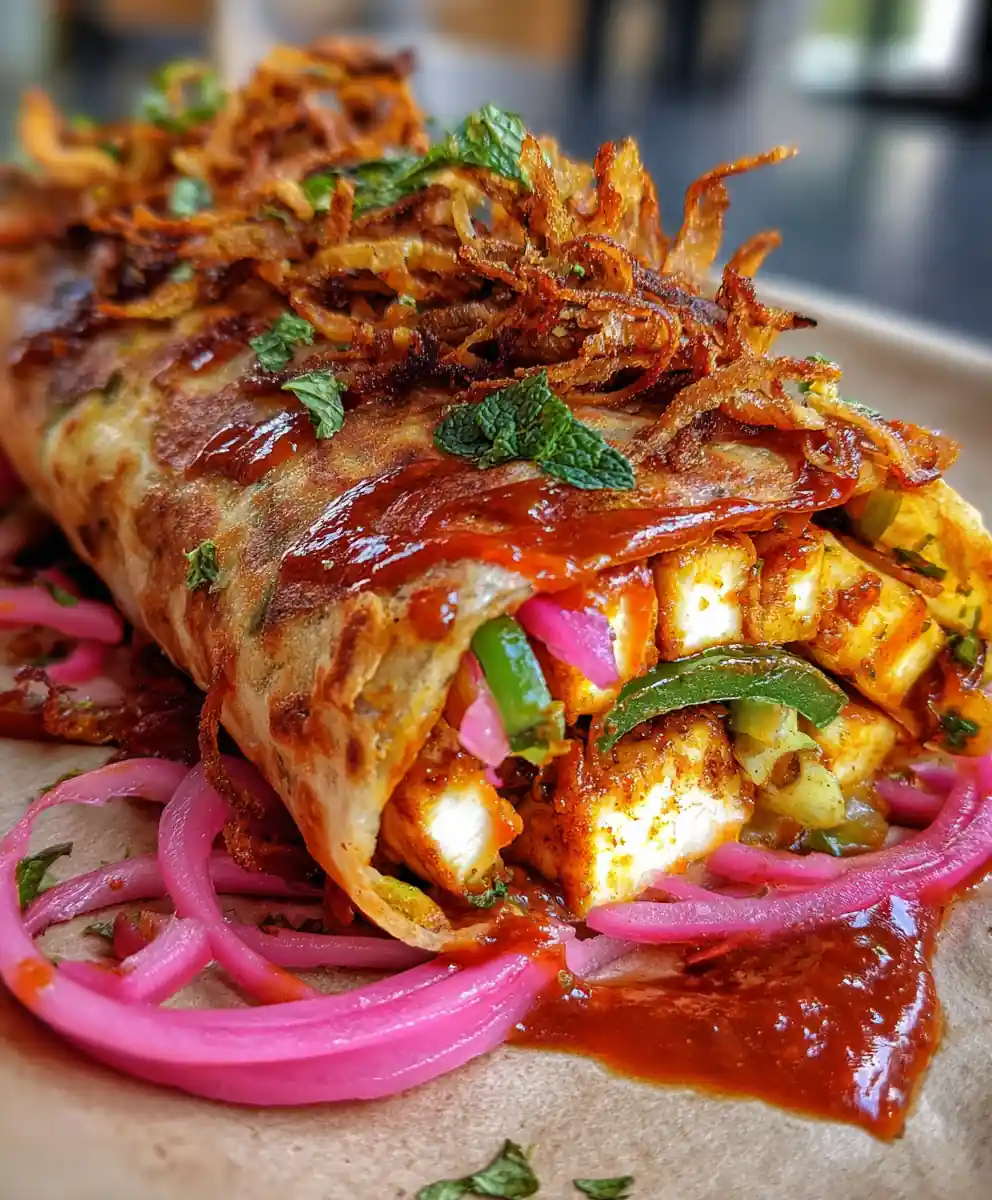
- Assemble (2 mins per roll): Lay a warm paratha flatbread on a clean surface. Spread 2-3 tbsp of the Smoky Tomato-Mint Chutney, leaving a small border. Spoon a portion of the paneer filling down the center. Top with pickled red onions and crispy fried shallots. Roll the paratha tightly from one end to the other, creating a delicious paneer kathi roll. Serve immediately!
Add inline shortcuts for busy cooks.
- Save time on weeknights by using pre-chopped onions and bell peppers.
- Prepare the entire paneer filling a day ahead; flavors meld beautifully for quick meals.
- Store-bought readymade paratha flatbreads are a lifesaver for easy dinner ideas.
Call out common mistakes and how to avoid them.
- Overcooking paneer: Cook it briefly, 3-4 minutes, to keep it soft and tender, not rubbery.
- Soggy wraps: Warm wraps just before serving and allow the paneer filling to cool slightly before assembling for the best texture.
- Lack of flavor: Don’t skimp on fresh ginger, garlic, and quality spices; they are the backbone of a great paneer kathi roll.
Perfect Moments to Serve a Paneer Kathi Roll
These versatile rolls fit many meal occasions, making them a fantastic addition to your family’s repertoire.
Family dinners, gatherings, holidays, weeknight meals.
- Quick family dinner, loved by all.
- Fun, interactive meal for casual gatherings.
- Excellent packed lunch for school or work.
Occasion-specific tweaks (kids’ lunchbox, festive table, meal prep).
- Mini rolls are perfect for kids’ lunchboxes.
- Garnish with fresh coriander for festive tables.
- Prepare the filling ahead for easy meal prep recipes.
Pairing ideas: sides, sauces, drinks.
- Serve with a cooling mint-yogurt chutney or spicy green chili sauce.
- A simple side salad or bowl of raita complements it well.
- Pair with iced tea or a refreshing fruit juice.
Nutrition and Wellness Benefits of Paneer Kathi Rolls
Enjoy the balanced nutrition packed into these delicious `paneer kathi rolls`.
Tie paneer kathi roll to balanced eating (protein, fiber, vitamins).
- Rich in protein from paneer, essential for muscle health.
- Good source of fiber from vegetables and whole wheat wraps.
- Contains vitamins and minerals from fresh ingredients.
3-5 short bullets linking it to popular diets (keto, vegan, gluten-free).
- A fantastic option for healthy family meals, focusing on protein.
- Can be adapted into low-carb options by using lettuce wraps.
- A versatile vegetarian meal prep recipe for the week.
Everyday Practical Benefits of this Paneer Kathi Roll Recipe
This `paneer kathi roll recipe` offers great convenience for modern lifestyles.
How paneer kathi roll helps with time savings, affordability, or convenience.
- Quick cooking: Active cooking time is under 30 minutes, ideal for busy evenings.
- Budget-friendly: Made with common, affordable ingredients from any grocery store.
- Convenient: A one-pan filling makes cleanup a breeze for quick meals.
2-4 points showing how it fits modern lifestyles (quick cooking, storage, portability).
- Excellent portability for on-the-go lunches and picnics.
- The filling can be made ahead and stored, saving time during the week. *I often make a big batch of the paneer filling on Sunday nights, which makes assembling fresh, high-protein snacks or a quick family dinner a breeze throughout the week.*
Expert Tips and Flavor Upgrades for Paneer Kathi Rolls
Enhance your `paneer kathi rolls` with these simple tweaks and ideas.
Techniques to improve taste, texture, or presentation.
- Marinate the paneer briefly in yogurt and spices for deeper flavor.
- Toast your wraps until slightly crispy for better texture.
- Add a squeeze of fresh lime juice just before serving for brightness.
Add seasoning or spice profiles for variety.
- A pinch of chaat masala sprinkled on top for a tangy kick.
- For heat, add finely chopped green chilies or a dash of red chili powder.
- Experiment with different spice blends for unique twists.
Dietary or allergy adjustments for safety and inclusivity.
- Use gluten-free wraps for those with gluten sensitivities.
- Ensure any sauces or chutneys are nut-free if allergies are a concern.
Common Questions Answered About Paneer Kathi Rolls
Is this paneer kathi roll recipe suitable for a low-carb diet?
Yes, you can easily make this `paneer kathi roll recipe` low-carb by wrapping the delicious paneer filling in large lettuce leaves instead of tortillas. It’s a fresh, crunchy alternative for a healthy option.
What’s the best way to store paneer kathi rolls for meal prep?
For the best results, store the paneer filling and the wraps separately. This prevents the wraps from becoming soggy. Reheat the filling and warm the wraps just before assembling for best texture.
Can I make the paneer filling ahead of time?
Absolutely! The paneer filling tastes even better the next day as the flavors meld. Prepare it a day or two in advance, storing it in an airtight container in the fridge, and you’ll have quick assembly.
What kind of paneer should I use for this recipe?
Use firm, good-quality block paneer that holds its shape when cut. Fresh paneer from an Indian grocery store or a reputable brand will give you the best texture and flavor for your rolls.
How do I prevent my wraps from getting soggy?
To avoid soggy wraps, make sure your paneer filling has cooled slightly before assembling. *I always make sure to slightly crisp my tortillas on a dry hot pan right before assembling; it makes a huge difference.* Toast your wraps thoroughly until pliable but slightly crisp.
Can I add other vegetables to my paneer kathi roll?
Definitely! This recipe is very versatile. Feel free to add finely chopped carrots, peas, or even spinach to the filling for extra nutrition and variety in your healthy eating and family dinners.
Conclusion
This `paneer kathi roll recipe` is your ticket to a quick, delicious, and satisfying meal. My family loves this easy, high-protein option for quick meals! Save this recipe on Pinterest for future easy family dinners.
Print
paneer kathi roll recipe
- Total Time: 60 minutes
- Yield: 4–6 rolls 1x
- Diet: Vegetarian
Description
This easy paneer kathi roll recipe creates a satisfying and flavorful meal, perfect for quick weeknight dinners or gatherings. It features tender paneer and crisp vegetables, all wrapped in a paratha flatbread for a delightful experience.
Ingredients
- 8.8 oz (250 g) firm paneer, cut into 0.6 inch (1.5 cm) cubes
- 4–6 paratha flatbreads
- 1 medium red onion, thinly sliced
- 1 medium green bell pepper, thinly sliced
- 1 medium red bell pepper, thinly sliced
- 1 tsp fresh ginger, finely grated
- 1 tsp fresh garlic, minced
- 0.5 tsp ground ginger
- 0.5 tsp garlic powder
- 0.25 tsp ground turmeric
- 0.5 tsp ground cumin
- 0.5 tsp ground coriander
- 0.25 tsp garam masala
- 2 tbsp tomato paste, or 30 g plain yogurt
- 1 tbsp lime juice
- 0.5 tsp red chili powder
- 0.5 tsp salt
- 0.6 cup (145 ml) vegetable oil
- 0.25 cup (60 ml) vegetable broth
- 0.5 cup Smoky Tomato-Mint Chutney
- 1 large shallot, thinly sliced
- 1 tbsp granulated sugar
- 0.5 cup white vinegar
- 1 tsp sumac
Instructions
- Prepare Chutney: Blend ingredients for Smoky Tomato-Mint Chutney until smooth and vibrant.
- Make Pickled Onions: Dissolve 1 tbsp granulated sugar and 0.5 tsp salt in 0.5 cup white vinegar with 1 tsp sumac. Add a portion of the thinly sliced red onion and let sit for 15 minutes until pink and softened.
- Fry Crispy Shallots: Heat 0.5 cup vegetable oil (from the total) to 340 degrees F (170 degrees C) in a pan. Fry 1 large thinly sliced shallot for 5-7 minutes until golden brown and crispy. Drain on paper towels.
- Prep Paneer Marinade: Combine 8.8 oz (250 g) paneer cubes with 1 tbsp lime juice, 0.5 tsp ground ginger, 0.5 tsp garlic powder, 0.25 tsp ground turmeric, 0.5 tsp red chili powder, and a pinch of salt. Toss gently until coated and set aside to marinate for at least 15 minutes.
- Sauté Aromatics: Heat 1 tbsp vegetable oil (from the total) in a large skillet over medium-high heat. Add the remaining thinly sliced red onion and cook for 3-4 minutes until softened and fragrant.
- Cook Veggies and Spices: Stir in green and red bell peppers, 1 tsp grated fresh ginger, and 1 tsp minced fresh garlic. Cook for 3-4 minutes until vegetables are tender-crisp. Stir in 0.5 tsp ground cumin, 0.5 tsp ground coriander, and 0.25 tsp garam masala, cooking for 30 seconds until fragrant.
- Develop Sauce: Add 2 tbsp tomato paste, stirring constantly for 1 minute to deepen flavor. Pour in 0.25 cup vegetable broth and bring to a gentle simmer, scraping up any browned bits. Add a tiny splash more broth if needed.
- Incorporate Paneer: Return the marinated paneer to the skillet. Toss gently to coat the paneer and vegetables evenly with the flavorful sauce. Cook for 1-2 minutes until everything is heated through and the sauce slightly thickens.
- Warm Wraps: Heat each paratha flatbread on a dry griddle or pan over medium heat for 30-60 seconds per side until warm and pliable. Lightly brush with 0.5 tsp vegetable oil (from the total) for extra soft texture, until they puff slightly.
- Assemble Kathi Rolls: Lay a warm paratha flatbread on a clean surface. Spread 2-3 tbsp of the prepared Smoky Tomato-Mint Chutney. Spoon a portion of the paneer filling down the center. Top with the Quick Sumac Pickled Red Onions and crispy fried shallots. Roll the paratha tightly from one end to the other and serve immediately.
Notes
Save time on weeknights by using pre-chopped onions and bell peppers. Prepare the paneer filling a day ahead for enhanced flavors. Store-bought paratha flatbreads simplify dinner. Avoid overcooking paneer to keep it soft and tender. Warm wraps just before serving and allow the filling to cool slightly to prevent sogginess. Don’t skimp on fresh ginger, garlic, and quality spices for the best flavor.
- Prep Time: 25 minutes
- Cook Time: 35 minutes
- Category: Main Course
- Method: Stovetop
- Cuisine: Indian
Nutrition
- Serving Size: 1 roll
- Calories: 380 calories
- Sugar: 5 g
- Sodium: 500 mg
- Fat: 20 g
- Saturated Fat: 10 g
- Unsaturated Fat: 8 g
- Trans Fat: 0 g
- Carbohydrates: 35 g
- Fiber: 4 g
- Protein: 18 g
- Cholesterol: 30 mg
Keywords: paneer kathi roll, Indian, vegetarian, quick dinner, easy recipe, weeknight meal, spicy, street food
FREE PRINTABLE RECIPE
Get the Printable Recipe PDF (Free)
Enter your email and we’ll send you the ingredients + step-by-step instructions as a clean PDF you can save to your phone.
- ✅ Printable PDF (ingredients + steps)
- ✅ Save it to your phone (no long scrolling)
- ✅ Includes cook time + servings
- ✅ Easy to follow
FAQ
Where’s the full recipe?
It’s delivered as a printable PDF so you can save it and cook without scrolling.
I didn’t get the email.
Check Spam/Promotions and search your inbox for your site name. Then click Confirm to receive the PDF.