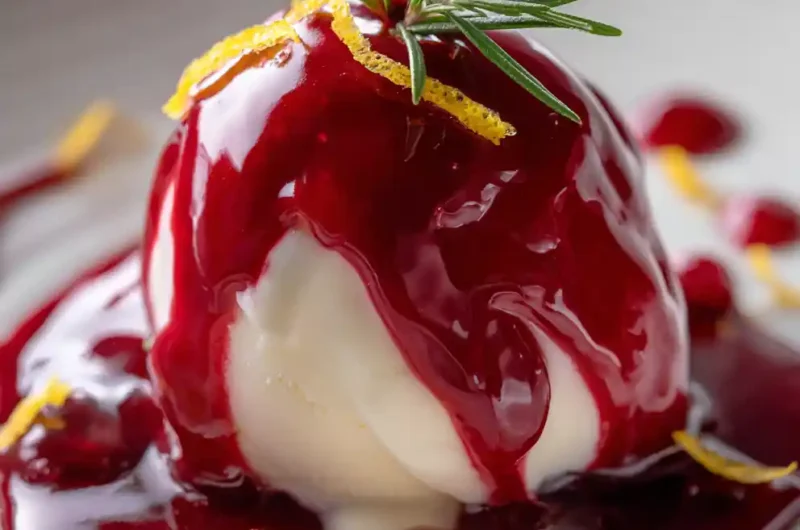
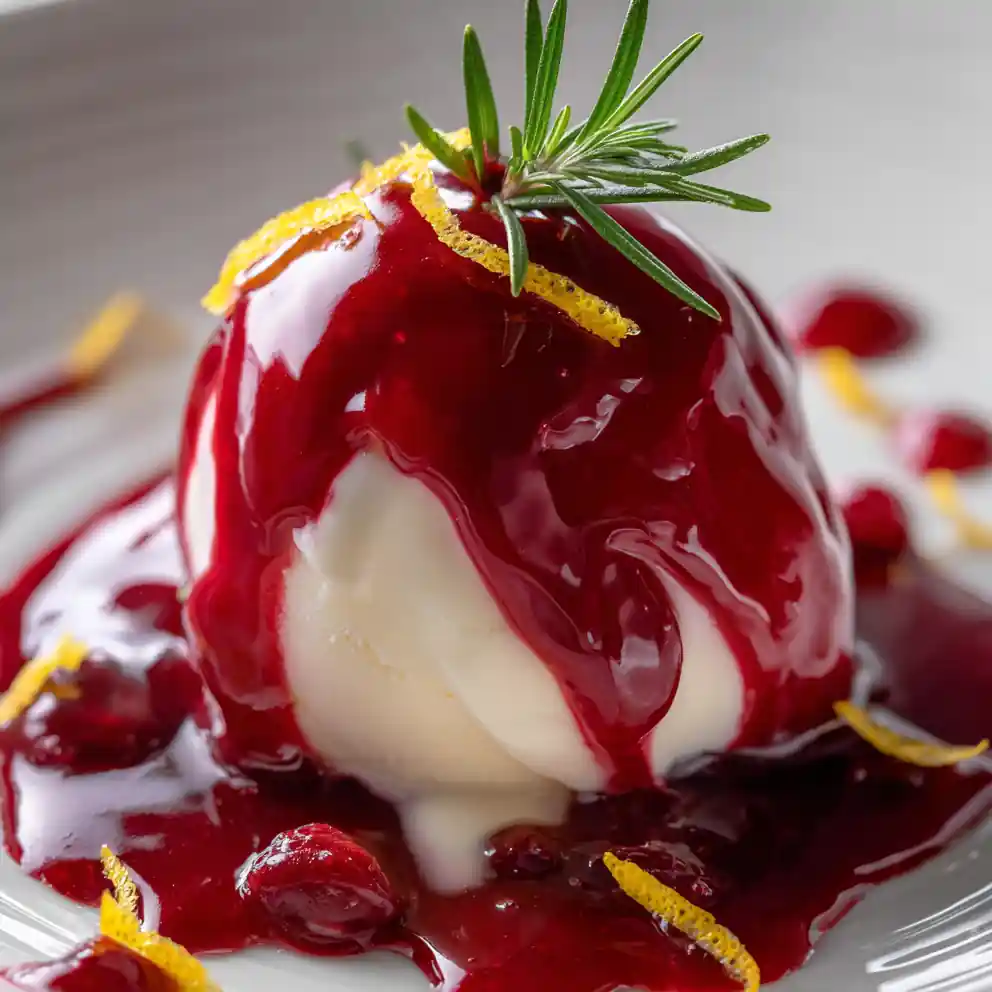
I absolutely adore discovering those simple recipes that deliver big on flavor and charm without hogging my whole afternoon. The aroma of simmering berries, brightened with a hint of lemon, fills my kitchen as this vibrant, ruby-red raspberry syrup recipe comes together. This easy homemade raspberry syrup is perfect for busy parents seeking family-friendly treats or any home cook craving fresh, adaptable flavors. I often whip up a batch on a lazy Sunday to enjoy throughout the week, ensuring we have a healthy and delicious topping ready for pancakes or yogurt. This simple raspberry syrup recipe is guaranteed to impress.
Key Ingredients and Flavor Foundations
Creating your own raspberry syrup recipe starts with understanding the role each ingredient plays in developing its luscious texture and bright taste.
- Fresh or Frozen Raspberries: 500 grams (1.1 pounds). The star of our raspberry syrup recipe, providing tartness and a beautiful ruby color.
No need to thaw frozen berries first!
- Granulated Sugar: 400 grams (2 cups). Balances the tartness and helps create the syrupy consistency (or use a natural sweetener like maple syrup for a slightly different flavor profile).
- Filtered Water: 240 milliliters (1 cup). Thins the syrup to the desired consistency.
- Fresh Lemon Juice (Optional): A small splash adds a bright, zesty note (or a little lemon zest if you prefer a milder citrus touch).
- Vanilla Extract (Optional): A few drops for a warm, comforting aroma to the homemade raspberry syrup.
Cooking Method Made Simple
Making this raspberry syrup recipe is truly straightforward, breaking down into just a few easy steps for a delicious outcome.
Step 1: Combine & Simmer.
In a medium saucepan, combine the fresh raspberries, granulated sugar, and filtered water. Bring the mixture to a gentle simmer over medium heat, stirring occasionally until the sugar dissolves. Once simmering, reduce the heat to low and continue to cook for 10-15 minutes, allowing the berries to soften and release their vibrant juices, creating a rich aroma. If the sugar isn’t dissolving well, increase the heat slightly for a moment, but keep stirring to prevent scorching. I find a sturdy wooden spoon works best here to gently encourage the berries to break down without over-mashing, which saves effort later.
Step 2: Strain & Smooth.
Carefully remove the saucepan from the heat. Place a fine-mesh sieve over a heatproof bowl. Pour the raspberry mixture through the sieve, using the back of a spoon or a flexible spatula to gently press the solids against the sieve to extract as much of the glossy liquid as possible. Discard the strained pulp, leaving a smooth, ruby-red raspberry syrup.
Step 3: Finish & Flavor.
If a thicker syrup is desired, return the strained liquid to the clean saucepan and simmer gently over low heat for another 5-10 minutes, or until it reaches your preferred consistency and coats the back of a spoon. Allow the finished raspberry syrup recipe to cool completely to room temperature before stirring in any optional lemon juice or vanilla extract, if using, for a bright or comforting lift.
Quick variations for dietary patterns (vegan, keto, paleo, high-protein).
- Lower Sugar Option: Reduce sugar by half, or use a sugar substitute like erythritol or stevia (adjusting to taste for a low-carb meal friendly option).
- Thicker Sauce: Simmer a bit longer, for another 5-10 minutes, for a more jam-like consistency, perfect as a raspberry dessert topping.
- Runnier Syrup: Add a tablespoon or two more filtered water if you prefer a thinner consistency for your fruit syrup for pancakes or quick meals.
Troubleshooting tips for common issues.
- Syrup too thin? Simmer for another 5-10 minutes over low heat to reduce and thicken, watching closely until it coats a spoon.
- Syrup too thick? Whisk in a tablespoon of hot water at a time until desired consistency is achieved, making it easier to pour.
- Seeds getting through? Strain again through a double layer of cheesecloth placed over the fine-mesh sieve for an ultra-smooth finish.
Ideal Serving Moments and Pairings
This homemade raspberry syrup is a staple for quick weeknight breakfasts, delightful for brunch gatherings, perfect for adding flair to meal prep lunches, and even elegant enough for holiday desserts.
- Breakfast & Brunch: Drizzle over pancakes, waffles, French toast, oatmeal, yogurt parfaits, or crepes.
- Beverages: Stir into sparkling water for a refreshing soda, mix into cocktails or mocktails (a fantastic raspberry cocktail syrup!), or swirl into iced tea.
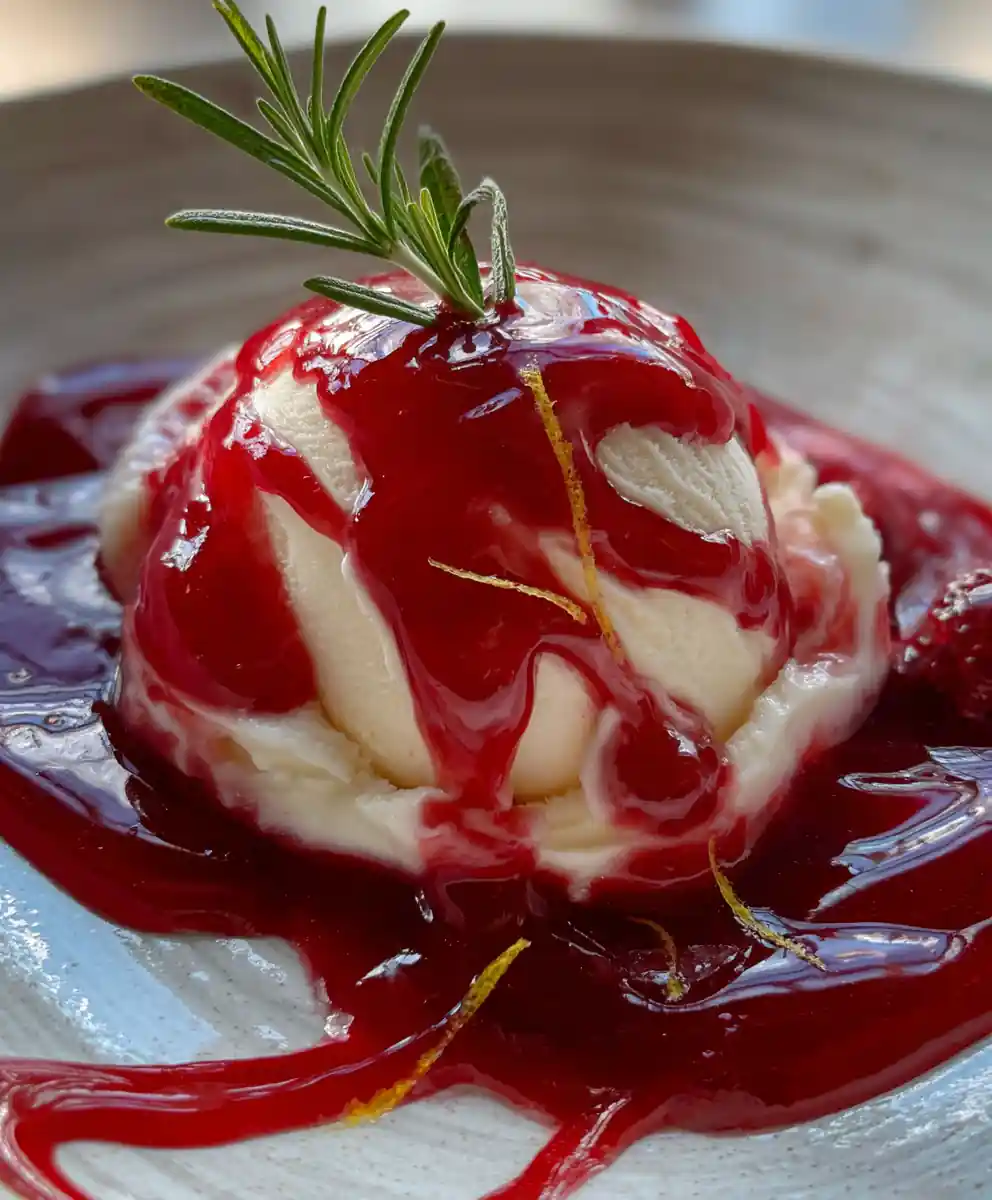
- Desserts: Serve as a vibrant raspberry dessert topping for ice cream, cheesecakes, panna cotta, brownies, or as a cake drizzle.
For storing your delicious raspberry syrup recipe, use an airtight jar or bottle. Glass is ideal for maintaining freshness and flavor.
- Fridge Timing: Keeps beautifully in the refrigerator for up to 2-3 weeks.
- Freezer Timing: Freeze for up to 3 months in freezer-safe containers. Thaw in the fridge overnight.
- Reheating Methods: Gently warm on the stovetop or in the microwave for a pourable consistency, or enjoy chilled.
Nutrition, Wellness & Everyday Benefits of Raspberry Syrup
Making this raspberry syrup recipe is a vibrant way to add fruit to your diet, rich in antioxidants from fresh raspberries. It supports healthy eating by offering a natural, sweet option.
- Healthy Weeknight Meals: Easily enhance simple meals with natural fruit flavor.
- Easy Meal Prep Ideas: Make a big batch of this raspberry syrup recipe for quick use all week long.
- Budget-Friendly Recipes: Significantly cheaper and tastier than store-bought fruit syrups.
- Plant-Based & Family-Friendly: A naturally vegan and gluten-free treat that kids and adults adore.
Recipe Advantages for Different Needs
This easy raspberry syrup recipe solves several common kitchen challenges, making homemade goodness accessible for everyone.
- Saving Money: Make your own high-quality raspberry syrup recipe for a fraction of the cost of gourmet brands.
- Eating Healthier: Control the amount of sugar and avoid artificial ingredients found in commercial syrups.
- Quick Prep: Ready in under 20 minutes, making it a perfect easy raspberry syrup for busy schedules.
- Versatility: Use it for sweetening, flavoring, or garnishing across countless dishes and drinks.
Expert Tips, Flavor Boosts, and Adaptations
Here are some tricks to elevate your homemade raspberry syrup.
- For an extra glossy finish, add a tiny pat of butter (1/2 tsp) to the warm syrup. Garnish with a few fresh raspberries or a mint sprig.
- Kid-Approved: Let kids help mash the berries (carefully!) or choose what to drizzle it on. I find my kids are always more excited to eat it if they had a hand in the making.
- Guest-Ready: Serve alongside a brunch spread with a variety of toppings, presenting a lovely homemade touch.
- Holiday-Special: Infuse with a cinnamon stick or a star anise during simmering for a festive twist.
- Sugar-Free: Use monk fruit, erythritol, or xylitol (check pet safety if applicable) for a low-carb syrup.
- Other Berries: This method works wonderfully for blueberry, strawberry, or mixed berry syrup.
Common Questions About Raspberry Syrup Recipe
Can I make raspberry syrup ahead for meal prep?
Absolutely! This homemade raspberry syrup is perfect for meal prep. Make a larger batch on the weekend and store it in the fridge for up to 2-3 weeks, or freeze for longer. Just thaw in the fridge when you’re ready to enjoy.
What’s the healthiest way to prepare raspberry syrup?
To make your raspberry syrup recipe healthier, reduce the amount of sugar by half or use a natural sugar substitute like maple syrup. This allows you to enjoy the natural sweetness and antioxidants of the berries with less added sugar.
Do I have to strain the seeds from my raspberry syrup?
No, you don’t have to! If you enjoy a rustic texture with a few seeds, feel free to skip the straining step. It’s purely a matter of personal preference for your simple fruit syrup, and it still tastes amazing.
Can I use other fruits with this raspberry syrup recipe method?
Yes, this method is very versatile for fruit syrups! You can easily swap raspberries for other berries like blueberries, strawberries, or even cherries to create different homemade fruit syrups with the same simple process.
How can I make my raspberry syrup thicker without adding more sugar?
To thicken your fruit syrup without extra sugar, simply simmer it for a longer period of time on the stovetop. This will naturally reduce the water content and concentrate the syrup, making it a wonderful fruit dessert topping. I often let mine bubble a bit longer for a richer texture.
Which stores or online shops carry quality raspberries for syrup?
You can find quality fresh raspberries at most grocery stores, farmers’ markets during summer, or online grocers. Frozen raspberries are available year-round in the freezer aisle and work perfectly for this raspberry syrup recipe, often being more budget-friendly too.
Embrace the joy of creating this vibrant, versatile syrup. It’s an easy, budget-friendly way to add homemade deliciousness to countless dishes and drinks, making quick meals feel special. Don’t forget to save this recipe to your Pinterest board for your next brunch, or share it with a friend for some sweet inspiration!
Print
raspberry syrup recipe
- Total Time: 30 minutes
- Yield: Approx 2 cups (16 servings) 1x
- Diet: Vegetarian
Description
This easy homemade raspberry syrup recipe delivers vibrant, ruby-red flavor perfect for topping pancakes or yogurt. It is a simple, adaptable, and family-friendly treat made with fresh or frozen raspberries, sugar, and water.
Ingredients
- 500 grams (1.1 pounds) fresh or frozen raspberries
- 400 grams (2 cups) granulated sugar
- 240 milliliters (1 cup) filtered water
- A small splash fresh lemon juice (optional)
- A few drops vanilla extract (optional)
Instructions
- Combine and Simmer Ingredients: In a medium saucepan, combine the fresh raspberries, granulated sugar, and filtered water. Bring the mixture to a gentle simmer over medium heat, stirring occasionally until the sugar dissolves. Once simmering, reduce the heat to low and continue to cook for 10-15 minutes, allowing the berries to soften and release their vibrant juices.
- Strain Raspberry Mixture: Carefully remove the saucepan from the heat. Place a fine-mesh sieve over a heatproof bowl. Pour the raspberry mixture through the sieve, using the back of a spoon to gently press the solids against the sieve to extract as much liquid as possible. Discard the strained pulp.
- Finish and Flavor Syrup: If a thicker syrup is desired, return the strained liquid to the clean saucepan and simmer gently over low heat for another 5-10 minutes, or until it reaches your preferred consistency and coats the back of a spoon. Allow the finished syrup to cool completely to room temperature before stirring in any optional lemon juice or vanilla extract, if using.
Notes
For a lower sugar option, reduce sugar by half or use a sugar substitute. For a thicker sauce, simmer longer for another 5-10 minutes. For a runnier syrup, add a tablespoon or two more filtered water. If syrup is too thin, simmer longer; if too thick, whisk in hot water. For an ultra-smooth finish, strain again through a double layer of cheesecloth.
- Prep Time: 10 minutes
- Cook Time: 20 minutes
- Category: Sauce
- Method: Stovetop
- Cuisine: General
Nutrition
- Serving Size: 2 tablespoons (30 mL)
- Calories: 120 calories
- Sugar: 28 g
- Sodium: 0 mg
- Fat: 0 g
- Saturated Fat: 0 g
- Unsaturated Fat: 0 g
- Trans Fat: 0 g
- Carbohydrates: 30 g
- Fiber: 0 g
- Protein: 0 g
- Cholesterol: 0 mg
Keywords: easy dessert, raspberry syrup, homemade, fruit syrup, pancake topping, yogurt topping, stovetop, quick recipe, versatile, breakfast
FREE PRINTABLE RECIPE
Get the Printable Recipe PDF (Free)
Enter your email and we’ll send you the ingredients + step-by-step instructions as a clean PDF you can save to your phone.
- ✅ Printable PDF (ingredients + steps)
- ✅ Save it to your phone (no long scrolling)
- ✅ Includes cook time + servings
- ✅ Easy to follow
FAQ
Where’s the full recipe?
It’s delivered as a printable PDF so you can save it and cook without scrolling.
I didn’t get the email.
Check Spam/Promotions and search your inbox for your site name. Then click Confirm to receive the PDF.