I’m always looking for that one special condiment that can truly elevate everyday meals. This creamy, vibrant garlic mayo recipe, with its punchy aroma and silky smooth texture, instantly became a family favorite in my home.
It’s perfect for busy parents, flavor seekers, or anyone wanting to make simple meals feel gourmet. I keep a batch in my fridge for quick weeknight dinners and to make school lunchboxes more exciting, fitting seamlessly into easy meal prep recipes!
Ingredient Guide with Flavor & Function
For this delicious garlic mayo recipe, we use large egg yolks for essential creaminess, fresh lemon juice for brightness, and plenty of fresh garlic as the star. A blend of grapeseed oil and extra virgin olive oil forms the rich base. Don’t forget ground sumac for a unique tartness and a beautiful hue. We also prepare a special crispy garlic garnish with extra oil and fresh parsley for an elevated touch. Opt for organic eggs and cold-pressed avocado oil for a healthier base.
Cooking Instructions Made Simple
Making a homemade garlic mayo recipe is easier than you think, especially when you follow these clear steps. For the best results, ensure all ingredients are at room temperature. I often grab my trusty immersion blender to make this; it’s a real time-saver on busy evenings.
- Prepare Your Base: In a medium-sized, non-reactive bowl, combine the egg yolks, fresh lemon juice, 2.5 mL (½ teaspoon) of the ground sumac, fine sea salt, freshly ground black pepper, and minced garlic. Whisk vigorously for 1-2 minutes until the mixture looks pale yellow and slightly thickened. This ensures a stable base for your garlic mayo.
- Slowly Emulsify: Begin slowly drizzling in the 180 mL (¾ cup) grapeseed oil, just a few drops at a time, while continuously whisking the egg yolk mixture. As the mixture emulsifies and thickens, you will see it transform into a creamy texture. You can then increase the oil flow to a very thin, steady stream. Continue whisking until all the grapeseed oil is incorporated and the mayo is thick and creamy to the eye. If it looks like your garlic mayo recipe is separating, stop adding oil. In a clean bowl, whisk a new egg yolk, then slowly drizzle the broken mayo mixture into it while whisking vigorously.
- Add Finishing Oil: Once the grapeseed oil is fully incorporated, gradually whisk in the 60 mL (¼ cup) extra virgin olive oil in a slow, steady stream until thoroughly combined. Your sumac garlic mayo will reach a smooth, consistent texture. Set it aside for now.
- Make Crispy Garlic Garnish: Heat the 30 mL (2 tablespoons) grapeseed oil in a small frying pan over low to medium-low heat. Add the thinly sliced garlic and fry gently, stirring occasionally, for 5-7 minutes. Watch for the garlic slices to turn golden brown and crisp, as they can burn quickly and become bitter.
- Drain and Cool Garnish: Immediately remove the crispy garlic from the pan with a slotted spoon. Spread them on a paper towel-lined plate to drain excess oil and cool completely. They will become even crispier as they cool, ready for the final presentation.
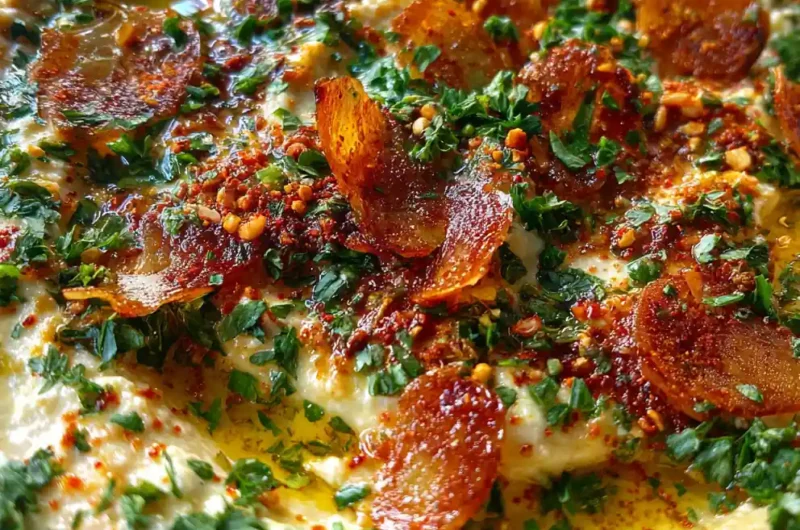
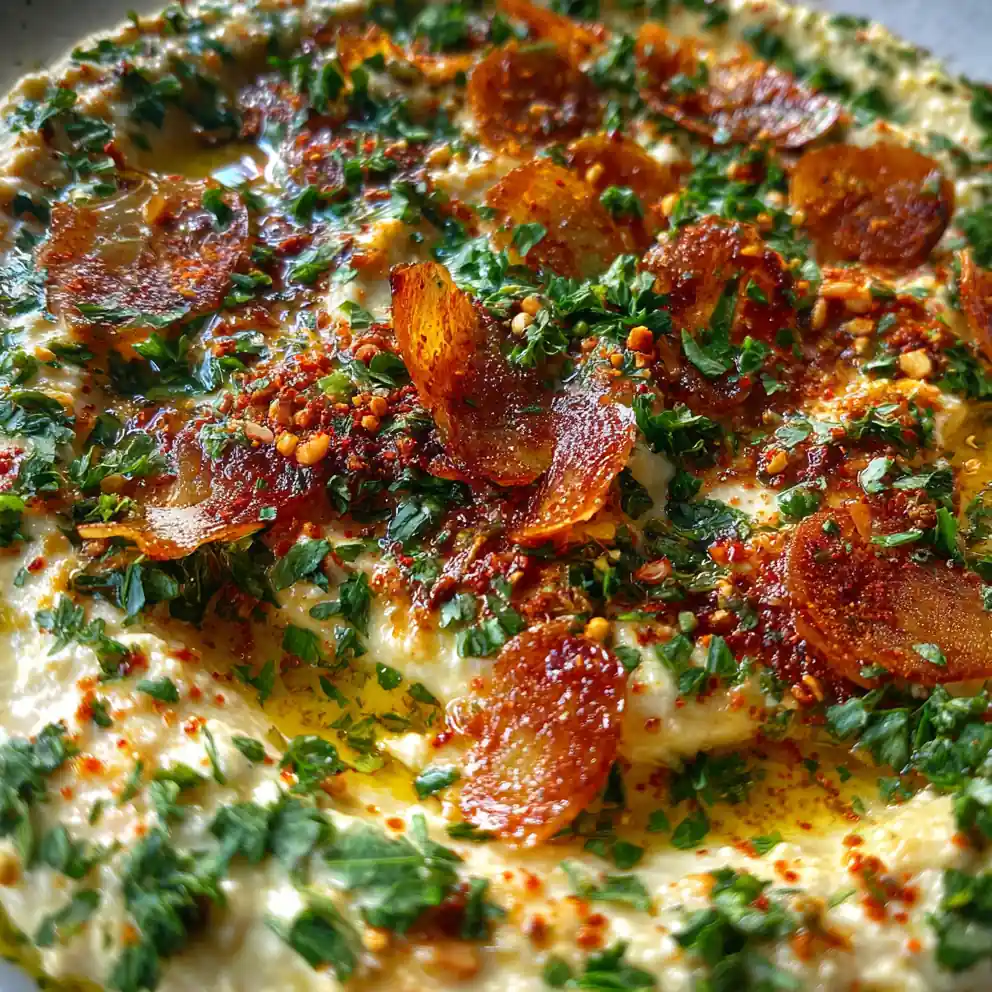
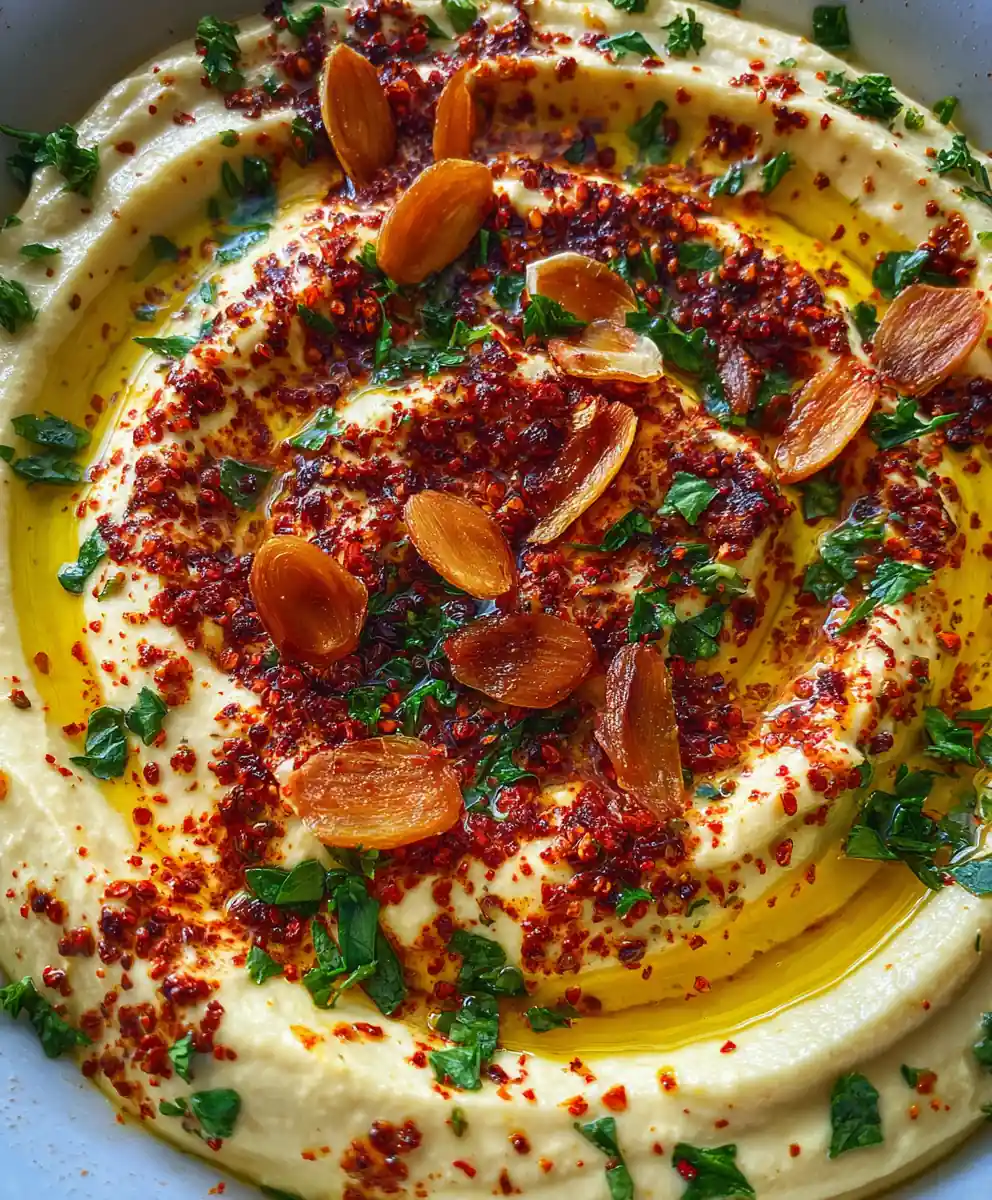
- Plate and Serve: Spoon your finished sumac garlic mayo into a small, light-colored ceramic bowl or ramekin. Create a slight swirl in the center, then sprinkle the remaining 2.5 mL (½ teaspoon) of ground sumac over the top for a vibrant color pop. Arrange the crispy garlic slices artfully around the center and scatter the finely chopped fresh flat-leaf parsley over and around them. Finish with a delicate drizzle of extra virgin olive oil in a circular pattern around the edge for a glossy sheen and enhanced aroma. This presentation elevates a simple condiment to a show-stopping healthy appetizer or side.
Inline Variations for Your Garlic Mayo:
- Spicier: Stir in a small pinch of cayenne pepper (¼ to ½ teaspoon) with the initial seasonings for a subtle kick.
- Herby: Fold in an extra tablespoon of fresh chopped chives or dill along with the parsley for an aromatic twist.
- Richer: For an even more luxurious texture, consider starting with an extra egg yolk in step one.
Perfect Moments to Serve Garlic Mayo
This versatile garlic mayo recipe brightens up so many meals, making it a true kitchen hero for family-friendly dining. It’s the ultimate condiment for adding a burst of flavor to everyday dishes and special occasions alike.
- Occasions: Enjoy it during casual weeknight dinners, for game day snacks, or at summer BBQs. It’s excellent for meal prep recipes, boosting flavor throughout the week, and makes a fantastic dip for lunchbox veggies and sandwiches.
- Pairings:
- Sides: Drizzle over crispy roasted potatoes, sweet potato fries, or fresh salads. It’s also perfect with crunchy veggie sticks.
- Main Dishes: Elevate grilled chicken, fish tacos, steak, or veggie burgers with a dollop.
- Toppings: Spread generously on wraps, sandwiches, and even deviled eggs.
- Make-Ahead Tips: Store your homemade garlic mayo in an airtight container in the fridge for 5-7 days. Freezing is not recommended as it tends to separate upon thawing. Serve chilled for the best texture and vibrant flavor. My kids love dipping their baked chicken nuggets in this, so I always make a bigger batch on Sundays for quick weekday lunches.
Nutrition & Wellness Spotlight
Choosing to make this garlic mayo recipe at home offers a healthier, more transparent alternative to many store-bought options, supporting your healthy eating goals. You control every ingredient, ensuring a premium condiment for your table.
- Healthy Fats: Using quality oils like avocado or grapeseed provides beneficial monounsaturated fats.
- Antioxidant Boost: Fresh garlic is packed with immune-supporting compounds that contribute to overall wellness.
- Sugar-Free: This recipe avoids the hidden sugars often found in commercial condiments, making it great for low-carb meals.
- Customizable: Easily control salt levels and choose organic ingredients for a truly wholesome spread.
- Quick Protein Meals: Pair this flavorful mayo with lean protein sources for easy dinner ideas that are both satisfying and nutritious.
Everyday Benefits Beyond the Plate
Beyond its delicious taste, mastering this garlic mayo recipe brings practical advantages to your kitchen and lifestyle.
- Time-Saving: Quick to whip up, it saves you trips to the store for specialty condiments, freeing up time for busy parents.
- Affordable: Making mayo at home is often more budget-friendly than purchasing gourmet store-bought varieties.
- Nourishing: Fresh ingredients mean no artificial preservatives or unwanted flavors, providing a wholesome choice for your family.
- Versatile: One incredible garlic mayo recipe elevates countless dishes, simplifying meal planning and making cooking easier and more enjoyable.
Expert Tips & Adaptations for Garlic Mayo
Refine your homemade garlic mayo recipe with these pro tips, ensuring perfect texture and flavor every time, or adapt it to suit various dietary needs.
- Techniques for Richer Flavor or Better Texture:
- An immersion blender makes for the easiest, most consistent emulsification, especially for larger batches.
- Using room temperature ingredients for the egg yolk and oil helps prevent splitting.
- Flavor Adjustments:
- Roasted Garlic: For a milder, sweeter garlic flavor, roast whole cloves before mincing and adding.
- Herbs & Spice Blends: Stir in fresh dill, chives, paprika, or smoked paprika for aromatic variety.
- Citrus Zest: A touch of lemon or lime zest can add an extra bright zing.
- Dietary Adaptations:
- Vegan: For a creamy vegan garlic mayo recipe, use aquafaba (the liquid from a can of chickpeas) or a commercial vegan egg replacer in place of the egg yolk.
- Keto-Friendly: Ensure you use avocado oil or a similar low-carb oil and confirm there are no added sugars in any optional ingredients.
Questions Readers Often Ask
Can this garlic mayo recipe be prepped ahead for busy weeks?
Absolutely! This homemade garlic mayo is a fantastic component for easy meal prep. Store it in an airtight container in the fridge for up to a week. Having it ready means quick flavor boosts for your daily meals, from sandwiches to roasted veggies.
What are the healthiest substitutes for oil in mayo?
While oil is essential for the classic mayo texture, focusing on high-quality options is key. Avocado oil or light olive oil are excellent choices for their beneficial fats. For a lower-fat spread, blending a portion of your homemade creamy mayo with Greek yogurt can work, but it will change the flavor and consistency.
My garlic mayo recipe separated, can I fix it?
Don’t despair! Mayo separating usually means the oil was added too quickly. To fix it, whisk a new egg yolk (or a teaspoon of mustard or water) in a clean bowl. Then, very slowly, drizzle and whisk the broken mayo mixture into the new base until it emulsifies again.
How long does homemade garlic mayo last?
Due to the fresh egg yolk, your homemade garlic mayo recipe will last up to 7 days when stored properly in an airtight container in the refrigerator. Always give it a quick sniff and visual check for freshness before serving to ensure safety.
Can I use jarred garlic instead of fresh?
While jarred garlic can be used in a pinch, I find that fresh garlic is highly recommended for the best, most vibrant flavor in this creamy condiment. Jarred garlic often has a milder, sometimes slightly acidic taste that won’t give you that potent, delicious kick. For premium results, always go fresh!
Is this garlic mayo recipe good for dipping fries?
Without a doubt! This creamy, flavorful dip is absolutely fantastic for fries, sweet potato fries, or even as a delightful accompaniment to crispy veggie sticks. It’s a definite upgrade from plain ketchup and makes any snack feel a bit more special.
Where can I order quality ingredients online for this recipe?
For high-quality ingredients like organic eggs and premium avocado or grapeseed oils, consider popular online grocers or specialty food stores. Many offer convenient delivery services that can help you source the best components for your homemade garlic mayo recipe.
Conclusion
This homemade garlic mayo truly is a game-changer for quick, delicious, and healthy meals, adding incredible flavor to so many dishes. Make it a staple in your kitchen; I promise you’ll find endless ways to enjoy it!
Pin this recipe now on Pinterest to keep it handy for your next family dinner!
Print
garlic mayo recipe
- Total Time: 35 minutes
- Yield: 1.25 cups (20 servings) 1x
- Diet: Vegetarian, Gluten-Free
Description
This is a vibrant, creamy garlic mayo recipe made with egg yolks, lemon juice, garlic, grapeseed and olive oils, and a touch of sumac, finished with crispy garlic garnish and fresh parsley. It’s designed to elevate everyday meals and is suitable for easy meal prep.
Ingredients
- 2 large egg yolks
- 2 teaspoons fresh lemon juice
- 1 teaspoon ground sumac
- to taste fine sea salt
- to taste freshly ground black pepper
- 3 cloves garlic, minced (for mayo base)
- 0.75 cup grapeseed oil
- 0.25 cup extra virgin olive oil
- 2 tablespoons grapeseed oil (for crispy garlic garnish)
- 2 cloves garlic, thinly sliced (for crispy garlic garnish)
- 1 tablespoon fresh flat-leaf parsley, finely chopped
- drizzle extra virgin olive oil (for garnish)
Instructions
- Prepare Base: In a medium-sized, non-reactive bowl, combine the egg yolks, fresh lemon juice, 0.5 teaspoon of the ground sumac, fine sea salt, freshly ground black pepper, and minced garlic. Whisk vigorously for 1-2 minutes until the mixture looks pale yellow and slightly thickened.
- Slowly Emulsify: Begin slowly drizzling in the 0.75 cup grapeseed oil, just a few drops at a time, while continuously whisking the egg yolk mixture. As it thickens, you can increase the oil flow to a very thin, steady stream. Continue whisking until all the grapeseed oil is incorporated and the mayo is thick and creamy.
- Add Finishing Oil: Gradually whisk in the 0.25 cup extra virgin olive oil in a slow, steady stream until thoroughly combined and smooth. Set the sumac garlic mayo aside.
- Make Crispy Garlic Garnish: Heat the 2 tablespoons grapeseed oil in a small frying pan over low to medium-low heat. Add the thinly sliced garlic and fry gently, stirring occasionally, for 5-7 minutes until golden brown and crisp.
- Drain and Cool Garnish: Immediately remove the crispy garlic from the pan with a slotted spoon. Spread them on a paper towel-lined plate to drain excess oil and cool completely.
- Plate and Serve: Spoon your finished sumac garlic mayo into a small serving bowl. Create a slight swirl, then sprinkle the remaining 0.5 teaspoon of ground sumac over the top. Arrange the crispy garlic slices around the center and scatter the finely chopped fresh flat-leaf parsley. Finish with a delicate drizzle of extra virgin olive oil around the edge.
Notes
Ensure all ingredients are at room temperature for best results. An immersion blender can save time. If your mayo separates, whisk a new egg yolk in a clean bowl, then slowly drizzle the broken mayo mixture into it while whisking vigorously. For variations, stir in 0.25 to 0.5 teaspoon cayenne pepper for spice, 1 tablespoon chopped chives or dill for an aromatic twist, or use an extra egg yolk for a richer texture. Store in an airtight container in the refrigerator for up to 5 days.
- Prep Time: 25 minutes
- Cook Time: 7 minutes
- Category: Condiment
- Method: Emulsifying
- Cuisine: Mediterranean
Nutrition
- Serving Size: 1 tablespoon (15 g)
- Calories: 100 calories
- Sugar: 0 g
- Sodium: 90 mg
- Fat: 11 g
- Saturated Fat: 1.5 g
- Unsaturated Fat: 9.5 g
- Trans Fat: 0 g
- Carbohydrates: 0 g
- Fiber: 0 g
- Protein: 0.5 g
- Cholesterol: 8 mg
Keywords: creamy garlic mayo, homemade aioli, sumac condiment, crispy garlic, easy meal prep, healthy appetizer, flavor enhancer, Mediterranean-inspired, dipping sauce, gourmet sauce
FREE PRINTABLE RECIPE
Get the Printable Recipe PDF (Free)
Enter your email and we’ll send you the ingredients + step-by-step instructions as a clean PDF you can save to your phone.
- ✅ Printable PDF (ingredients + steps)
- ✅ Save it to your phone (no long scrolling)
- ✅ Includes cook time + servings
- ✅ Easy to follow
FAQ
Where’s the full recipe?
It’s delivered as a printable PDF so you can save it and cook without scrolling.
I didn’t get the email.
Check Spam/Promotions and search your inbox for your site name. Then click Confirm to receive the PDF.