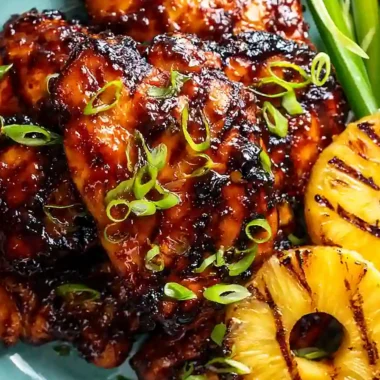
These oven-baked chicken thighs are exceptionally juicy and flavorful, making them a reliable choice for a quick weeknight dinner. By using a high-temperature roasting method, you achieve a perfectly crisp skin and tender dark meat with minimal effort.

List of ingredients
- 8 bone-in, skin-on chicken thighs (approximately 4 pounds) – bone-in meat stays juicier during high-heat roasting.
- ½ cup olive oil – acts as a binder for spices and helps render the skin.
- 4 teaspoons kosher salt – essential for drawing out moisture and seasoning the meat deeply.
- 2 teaspoons dried Italian seasoning – provides a balanced blend of savory herbs.
- 1 teaspoon paprika (smoked or sweet) – adds a rich color and a subtle earthiness.
- 1 teaspoon garlic powder – delivers a concentrated savory aroma.
- 1 teaspoon onion powder – adds a mild, sweet depth to the rub.
- 1 teaspoon black pepper – provides a light, spicy contrast.
- 1 tablespoon chopped parsley – used for a fresh, colorful garnish.
- 8 lemon wedges – provides a bright, acidic finish to cut through the richness.
step-by-step instructions
- Prepare the oven: Set the oven rack to the middle position and preheat to 425ºF (218ºC). Line a rimmed baking sheet with aluminum foil, place a wire rack on top, and lightly grease the rack with olive oil or cooking spray to ensure the chicken does not stick.
- Prep the chicken: Use kitchen shears or a sharp knife to trim away any excessive skin or hanging fat from the edges. Use paper towels to pat every piece of chicken completely dry to ensure the skin browns and crisps rather than steams.
- Apply the seasoning: In a large mixing bowl, whisk together the olive oil, kosher salt, Italian seasoning, paprika, garlic powder, onion powder, and black pepper. Add the chicken thighs to the bowl and toss thoroughly until each piece is evenly coated with the oil and spice mixture.
- Bake the thighs: Arrange the seasoned chicken pieces on the wire rack, ensuring there is enough space between them for air to circulate. Bake for 35 to 40 minutes until the skin is golden brown and a meat thermometer reads 175ºF (79ºC) at the thickest part.
- Rest and serve: Remove the pan from the oven and let the chicken rest for 5 minutes to allow the juices to redistribute. Garnish the pieces with chopped parsley and fresh lemon wedges before transferring them to a serving platter.
Advanced Roasting Techniques for Maximum Crispiness
Using a Wire Cooling Rack for Airflow
Elevating the chicken on a wire rack allows hot air to circulate around the entire piece of meat, including the bottom. This prevents the chicken from sitting in its own rendered fat, which would otherwise result in soggy skin. This method ensures an even roast and a consistent crunch on all sides.
Removing Surface Moisture Before Seasoning
Moisture is the enemy of browning because the oven must first evaporate the water before the Maillard reaction can begin. Patting the skin dry with paper towels removes this barrier, allowing the skin to sear and crisp immediately upon hitting the heat. This simple step significantly reduces the time needed to achieve a golden-brown finish.
Maintaining High Oven Temperatures
Baking at 425ºF (218ºC) is critical for rendering the subcutaneous fat in chicken thighs. Lower temperatures often result in rubbery skin because the fat does not melt away quickly enough. High heat forces the fat to render, leaving behind a thin, crispy layer of skin that locks in the juices.
Using the Broiler for a Final Sear
If the chicken has reached the safe internal temperature but the skin lacks the desired color, turn on the oven broiler for 2 to 3 minutes. Keep the oven door slightly ajar and watch the chicken closely to prevent the spices from burning. This intense top-down heat creates a professional, deep-brown crust.
Flavor Customization and Seasoning Variations
Adding Spicy Heat with Chili Peppers
To create a spicy version of this dish, incorporate ¼ teaspoon of cayenne pepper or chipotle powder into the seasoning rub. For a more complex heat, you can use a Cajun seasoning blend, replacing the Italian seasoning. Adjust the amount of pepper based on your preference for mild or intense heat.
Applying a Honey Mustard Glaze
Combine equal parts honey and Dijon mustard in a small bowl to create a sweet and tangy glaze. Brush this mixture onto the chicken during the last 10 minutes of baking to allow it to caramelize without burning. The sugar in the honey creates a sticky, glossy finish that pairs well with the savory rub.
Incorporating Teriyaki Flavors
For an Asian-inspired twist, replace the oil and dry spices with a thick teriyaki marinade. You can marinate the thighs for several hours before baking or simply brush the sauce on the meat during the final stages of roasting. Be mindful that the high sugar content in teriyaki sauce can cause it to burn faster than the oil rub.
Using Fresh Chimichurri Sauce
Chimichurri, a blend of fresh parsley, garlic, vinegar, and red pepper flakes, adds a vibrant acidity to the dish. You can use this as a marinade before baking or drizzle it over the rested chicken just before serving. The vinegar in the sauce helps break down the fibers in the meat for additional tenderness.
Swapping for Lemon Pepper Seasoning
Replace the Italian seasoning and paprika with a generous amount of cracked black pepper and fresh lemon zest. This creates a bright, zesty profile that is particularly refreshing during warmer months. The addition of zest provides an aromatic quality that complements the lemon wedges served on the side.
Essential Tools for Perfect Chicken
The Importance of a Digital Meat Thermometer
Relying on visual cues alone can lead to overcooked or undercooked meat. A digital thermometer allows you to track the internal temperature accurately, ensuring you hit the 175ºF target for dark meat. This precision prevents the chicken from drying out while ensuring it is safe for consumption.
Choosing the Right Rimmed Baking Sheet
A rimmed baking sheet is essential for containing the rendered chicken fat and preventing it from dripping into the bottom of your oven. The rims act as a barrier, making the pan easier to move in and out of the oven without spills. Using a large sheet also ensures that the pieces are not crowded, which is vital for airflow.
Efficient Trimming with Kitchen Shears
Kitchen shears are often more effective than knives for trimming excess skin and fat from chicken thighs. They allow for more control and precision when removing overhangs without damaging the meat. This ensures a uniform shape, which helps the chicken cook evenly across the entire tray.
Using a Large Mixing Bowl for Coating
A wide mixing bowl provides ample space to toss the chicken thighs without knocking off the seasonings. This ensures that every nook and cranny of the meat is coated in oil and spices. A thorough coating is necessary to prevent dry spots and to ensure a consistent flavor in every bite.
Storage and Food Safety Guidelines
Storing Cooked Chicken in the Refrigerator
Place leftover chicken thighs in an airtight container once they have cooled to room temperature. They can be stored in the refrigerator for up to 5 days without losing significant quality. Keeping them sealed prevents the meat from absorbing other odors and keeps the moisture locked in.
Freezing and Thawing Process
Cooked chicken thighs can be frozen for up to three months if wrapped tightly in foil or placed in a freezer-safe bag. To thaw, move the chicken to the refrigerator 24 hours before you plan to eat it. This slow thawing process preserves the texture of the meat better than rapid thawing methods.
Best Methods for Reheating
To maintain the texture of the skin, reheat the chicken in an oven or air fryer at 350ºF until heated through. If using a microwave, heat in 30-second increments and cover the dish to prevent the meat from becoming rubbery. Avoid overcooking during the reheating process to prevent the meat from drying out.
Preventing Cross-Contamination
Always use a dedicated cutting board for raw poultry and wash your hands thoroughly with soap after handling. Avoid washing raw chicken in the sink, as this can splash bacteria onto surrounding surfaces. The high heat of the oven is sufficient to kill any harmful bacteria present on the meat.
Recommended Side Dish Pairings
Pairing with Creamy Mashed Potatoes
The richness of mashed potatoes complements the savory flavor of the baked chicken. The potatoes can soak up any extra juices from the platter, creating a cohesive meal. Adding a bit of garlic or chive to the potatoes mirrors the aromatic notes in the chicken rub.
Serving with Sautéed Green Beans
Sautéed green beans provide a crisp, fresh contrast to the heavy, roasted meat. Cooking them quickly with a bit of butter and lemon juice matches the citrus garnish of the chicken. This adds a necessary vegetable component and a pop of color to the plate.
Adding Roasted Root Vegetables
Carrots, parsnips, and sweet potatoes can be roasted on a separate tray at the same temperature as the chicken. The natural sugars in root vegetables caramelize beautifully at 425ºF. This creates a hearty, one-oven meal that is visually appealing and nutritionally balanced.
Complementing with a Fresh Garden Salad
A light salad with a vinaigrette dressing helps balance the fat content of the chicken thighs. Use mixed greens, cucumbers, and cherry tomatoes to add a refreshing crunch. The acidity of the dressing mirrors the lemon wedges served with the main course.
Common Troubleshooting and Solutions
What to Do If the Skin is Not Crispy
If the skin remains soft, it is likely due to excess moisture or crowding on the pan. Try patting the chicken drier next time and ensure there is at least an inch of space between each piece. You can also finish the chicken under the broiler for 2 minutes to force the skin to crisp up.
Solving the Problem of Dry Meat
Dry chicken is usually a result of overcooking or using a thermometer that is not calibrated. Ensure you remove the thighs from the oven exactly when they hit 175ºF. Resting the meat for 5 minutes is also crucial, as it allows the internal juices to settle back into the fibers.
Adjusting for Overly Salty Seasoning
If the dish tastes too salty, it may be due to the type of salt used; table salt is finer and saltier by volume than kosher salt. Next time, ensure you are using a coarse kosher salt as specified. You can balance existing saltiness by serving the chicken with a squeeze of extra lemon juice.
Addressing Uneven Cooking Times
Uneven cooking often happens when thighs are of significantly different sizes or are crowded together. Arrange the largest pieces toward the back of the oven where the heat is often more intense. Using a wire rack helps mitigate this by ensuring the heat reaches the bottom of every piece.
Frequently Asked Questions
Should I wash chicken thighs before cooking?
No, you should not wash poultry. Washing chicken can spread bacteria across your sink and countertops through water droplets. The high cooking temperature of 425ºF effectively kills all harmful bacteria.
Do I need to cover the chicken with foil while baking?
Do not cover the chicken, as this traps steam and prevents the skin from becoming crispy. If you notice the skin is browning too quickly before the meat is done, you can loosely tent the pan with foil, but this should be a last resort.
How long do boneless chicken thighs take to bake?
Boneless thighs cook faster because they lack the insulating bone. Check them for doneness starting at 25 minutes. They are ready when the internal temperature reaches approximately 170-175ºF.
Why cook dark meat to a higher temperature than white meat?
Chicken thighs contain more connective tissue and collagen than breasts. Cooking them to 175ºF or higher allows this collagen to break down into gelatin, resulting in a much more tender and juicy texture compared to cooking them to the standard 165ºF.
Print
Crispy Oven Baked Chicken Thighs
- Total Time: 50 minutes
- Yield: 8 servings 1x
- Diet: General
Description
Delicious oven baked chicken thighs that are super juicy, tender, and flavorful. Plus, they require very little prep time and are a great weeknight dinner option for busy days.
Ingredients
- 8 bone-in chicken thighs (with skin on, about 4 pounds)
- ½ cup olive oil
- 4 teaspoons kosher salt
- 2 teaspoons dried Italian seasoning
- 1 teaspoon paprika (smoked or sweet)
- 1 teaspoon garlic powder
- 1 teaspoon onion powder
- 1 teaspoon black pepper
- 1 tablespoon chopped parsley
- 8 lemon wedges
Instructions
- Preheat the Oven: Adjust the oven rack to the middle position. Heat to 425ºF (218ºC). Line a rimmed baking sheet with foil. Place a wire rack on top, and grease with olive oil or cooking spray to prevent sticking.
- Prepare the Pieces: Trim off any excess skin and fat from the edges of the chicken. Thoroughly dry each piece with a paper towel to remove moisture from the surface.
- Season the Pieces: In a large bowl, combine olive oil, salt, Italian seasoning, paprika, garlic powder, onion powder, and black pepper. Add the chicken to the seasoning mix. Turn to coat evenly.
- Bake the Chicken: Evenly space the pieces on the baking sheet. Bake until the skin is golden brown and crispy, about 35 to 40 minutes. The internal temperature should reach about 175ºF (79ºC) on a meat thermometer.
- To Serve: Rest for 5 minutes before serving. Garnish with parsley and lemons and transfer to a serving platter.
Notes
For crispier skin, broil for a few extra minutes at the end of baking. Store in an airtight container in the refrigerator for up to 5 days. Reheat in the microwave on high in 15 to 30-second increments. If baking without a wire rack, check for doneness a few minutes earlier as the pan will be hotter.
- Prep Time: 10 minutes
- Cook Time: 40 minutes
- Category: Entree
- Method: Baking
- Cuisine: American
Nutrition
- Serving Size: 1 chicken thigh
- Calories: 327 kcal
- Sugar: 1 g
- Sodium: 1275 mg
- Fat: 24 g
- Saturated Fat: 6 g
- Unsaturated Fat: 15 g
- Trans Fat: 0.1 g
- Carbohydrates: 3 g
- Fiber: 1 g
- Protein: 24 g
- Cholesterol: 142 mg
Keywords: baked chicken thighs, crispy chicken skin, easy dinner, American cuisine