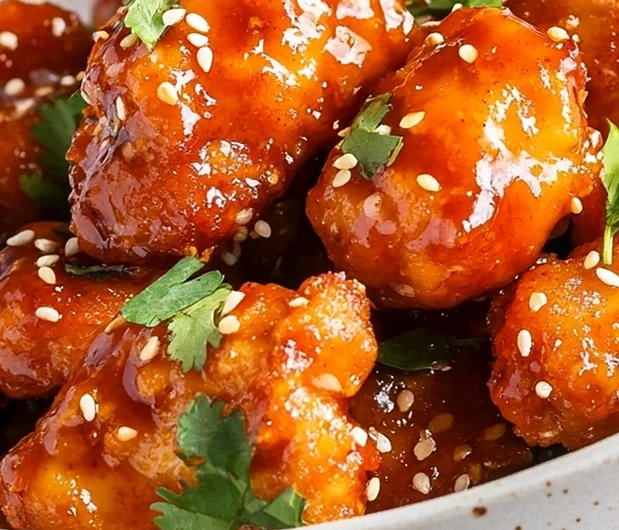
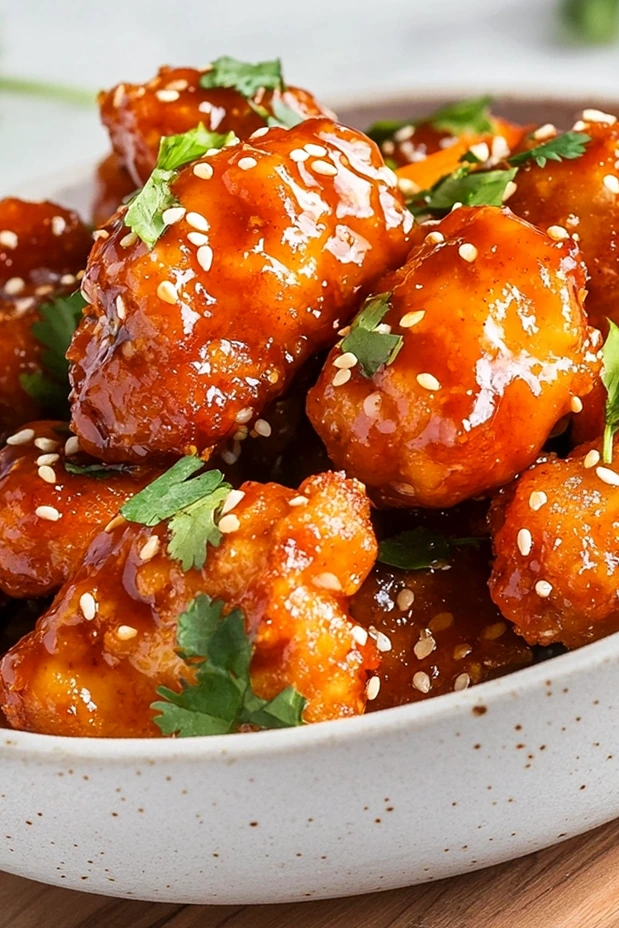
These Thai chicken bites are a perfect blend of sweet, salty, and spicy flavors with a satisfying crunch. This quick appetizer takes only 20 minutes to prepare and is ideal for parties or a fast snack.
List of ingredients
- 1 large boneless skinless chicken breast – cut into bite-sized pieces.
- 1/2 cup all-purpose flour – for the primary dredging layer.
- 1/2 tsp garlic powder – adds savory depth to the breading.
- Salt and black pepper to taste – used for seasoning both the flour and egg mixtures.
- 1 large egg – acts as the binder for the coating.
- 2 tbsp milk – thins the egg wash for even coverage.
- Canola oil or peanut oil – chosen for their high smoke points during frying.
- 1/3 cup sweet chili sauce – for the final sweet and spicy glaze.
- 1 carrot, julienned – used for fresh garnish.
- Fresh cilantro, chopped – adds a bright, herbal finish.
- Sesame seeds – used for a nutty garnish.
step-by-step instructions
- Prepare the oil: Pour 1-2 inches of oil into a deep skillet. Heat over medium heat until it reaches 350°F. While the oil heats, cut the chicken breast into uniform bite-sized pieces and set them aside.
- Create the dredging stations: In a shallow dish, combine the flour, garlic powder, salt, and black pepper. In a second shallow dish, whisk together the egg, milk, salt, and black pepper until smooth.
- Coat the chicken: Take each piece of chicken and coat it first in the dry flour mixture. Dip it into the egg mixture, and then return it to the flour mixture for a final coating.
- Fry the pieces: Carefully place the coated chicken into the hot oil. Fry for approximately 3-4 minutes per side until they are golden brown. Remove the chicken and drain them on paper towels, then sprinkle with a small amount of salt.
- Glaze and garnish: Transfer the fried chicken to a large bowl and toss thoroughly with the sweet chili sauce. Garnish with sesame seeds, julienned carrots, and chopped cilantro. Serve the dish while warm.
Expert Techniques for Maximum Crunch
Maintaining a Constant Oil Temperature
Use a digital thermometer to ensure your oil stays at 350°F throughout the process. If the oil drops too low, the breading will absorb excess fat and become greasy. If the oil is too hot, the outside will burn before the chicken is cooked through.
Executing the Double Dredging Process
The sequence of flour, egg, and flour again creates a thicker, more durable crust. This reinforced layer provides the structural integrity needed to stay crispy even after being tossed in sauce. It ensures a professional texture that resists sogginess.
Preventing Pan Overcrowding
Fry the chicken in small batches to avoid dropping the temperature of the oil. Adding too many pieces at once cools the fat rapidly, which prevents the immediate searing of the exterior. This often leads to a heavy, oil-soaked coating.
Efficient Oil Drainage
Immediately place the fried chicken on a wire rack or a layer of paper towels. This allows excess oil to drip away rather than pooling at the bottom of the chicken piece. Shaking the bites gently upon removal helps eliminate surface oil for a cleaner flavor.
Ingredient Alternatives and Swaps
Using Chicken Thighs for More Moisture
Substitute chicken breast with boneless, skinless chicken thighs for a juicier result. Thighs have a higher fat content, which makes them more forgiving during the frying process. This prevents the meat from drying out if cooked slightly too long.
Rice Flour for a Lighter Texture
Replace all-purpose flour with rice flour to achieve a thinner, crispier shell. Rice flour contains no gluten, which prevents the coating from becoming tough. This is a common technique in authentic Asian frying for a glass-like crunch.
Buttermilk as a Tangy Binder
Use buttermilk instead of regular milk in the egg wash to add a subtle tang. The acidity in buttermilk helps tenderize the chicken proteins, resulting in a softer interior. It also helps the flour adhere more effectively to the meat.
Honey Chili Sauce for Increased Sweetness
If you prefer a sweeter profile, swap the sweet chili sauce for a honey-based chili glaze. Combine honey, a splash of vinegar, and red chili flakes to create a custom version. This provides a thicker, stickier coating that clings well to the chicken.
Serving and Presentation Strategies
Pairing with Fresh Asian Slaws
Serve these bites alongside a chilled cucumber salad with rice vinegar and sesame oil. The acidity of the salad cuts through the richness of the fried chicken. A shredded cabbage slaw with lime juice also provides a refreshing contrast.
Platter Arrangement for Entertaining
Pile the chicken bites high on a platter lined with large, crisp lettuce leaves. Scatter the julienned carrots and cilantro across the top for a vibrant color contrast. Drizzle a small amount of extra chili sauce over the pile for a professional look.
Integrating into a Complete Meal
Turn this appetizer into a full dinner by serving the bites over a bed of steamed jasmine rice. Add a side of steamed bok choy or broccoli to balance the meal. The rice absorbs the excess chili sauce, making the most of the flavor.
Adding Citrus Accents
Place fresh lime wedges on the side of the serving plate. Squeezing fresh lime juice over the hot chicken adds a bright, acidic lift that enhances the sweetness of the chili sauce. This helps balance the overall flavor profile of the dish.
Storage and Reheating Guidelines
Refrigeration and Airtight Storage
Store leftover chicken bites in an airtight container in the refrigerator for up to two days. Ensure the chicken is completely cooled before sealing the lid to prevent steam from creating moisture. This helps maintain the integrity of the coating for as long as possible.
Air Fryer Reheating Method
The best way to restore crispiness is using an air fryer at 350°F for 3-5 minutes. This evaporates surface moisture and recrisps the flour coating without adding more oil. It is far superior to other methods for maintaining texture.
Oven Reheating for Larger Batches
Place leftovers on a wire rack set over a baking sheet and heat at 375°F for about 10 minutes. The wire rack allows hot air to circulate around the entire piece of chicken. This prevents the bottom from becoming soggy against the pan.
Avoiding Microwave Sogginess
Avoid reheating these bites in the microwave if possible. Microwaves heat the water molecules inside the breading, which turns the crisp crust soft and rubbery. If you must use one, heat in short bursts and serve immediately.
Troubleshooting Common Cooking Issues
Fixing a Greasy Coating
If your chicken comes out oily, it is likely that the oil temperature was too low or the pan was overcrowded. To fix this in future batches, wait for the oil to return to 350°F before adding more pieces. You can also pat the finished bites more firmly with paper towels.
Preventing Coating Separation
If the breading peels away from the chicken, ensure the meat is patted dry before the first flour dip. Moisture on the surface of the chicken prevents the flour from adhering. Let the coated pieces rest for a few minutes before frying to set the bond.
Managing Overcooked Dry Chicken
If the interior is dry, reduce the frying time or cut the chicken into slightly larger pieces. Ensure the chicken is not frozen when you start the process, as this leads to uneven cooking. Using a meat thermometer to check for an internal temperature of 165°F is the most reliable method.
Adjusting Sauce Consistency
If the sweet chili sauce is too thick to toss, warm it slightly in a small pan or microwave. This reduces the viscosity and allows for a thinner, more even coat. If it is too runny, simmer it for a few minutes to reduce the liquid.
Frequently Asked Questions
Can I air fry instead of deep frying?
Yes, you can air fry these bites by spraying the coated chicken lightly with oil. Cook them at 400°F for about 10-12 minutes, shaking the basket halfway through. Note that the texture will be less indulgent than deep frying.
How do I know the chicken is cooked through?
The chicken is done when the exterior is golden brown and the interior reaches an internal temperature of 165°F. The meat should appear opaque white throughout with no pink remaining.
Can I make this gluten-free?
Yes, you can substitute the all-purpose flour with a high-quality gluten-free flour blend or rice flour. Ensure that the sweet chili sauce used is also certified gluten-free, as some brands use thickeners containing wheat.
What oil is best for frying?
Neutral oils with high smoke points are best, such as canola, peanut, or vegetable oil. These oils can handle the heat of frying without burning or adding unwanted flavors to the chicken.
Is sweet chili sauce very spicy?
Most commercial sweet chili sauces are mild with a gentle heat balanced by a high sugar content. If you prefer more spice, you can stir in a teaspoon of sriracha or red chili flakes before tossing.
Can I prepare the coating ahead of time?
You can prepare the dry and wet mixtures in advance and keep them refrigerated. However, do not dredge the chicken until you are ready to fry, as the coating can become soggy if it sits too long.
How do I keep bites crispy longer?
The key is to toss the fried chicken in the sauce immediately before serving. If the chicken sits in the sauce for too long, the moisture will penetrate the crust and soften it.
What herbs pair best?
Cilantro and Thai basil are the most traditional pairings for this flavor profile. Both provide a fresh, aromatic contrast to the fried chicken and sweet glaze.
Can I use chicken tenders?
Yes, chicken tenders are an excellent substitute for breast meat. Simply cut them into bite-sized pieces to ensure they cook quickly and evenly in the oil.
What sides go well?
Light and acidic sides work best, such as a vinegary slaw, steamed jasmine rice, or a simple cucumber salad. These help cut through the richness of the fried chicken coating.
Print
Crispy Thai Chicken Bites with Sweet Chili Glaze
- Total Time: 20 minutes
- Yield: 2 servings 1x
- Diet: General
Description
These Thai Chicken Bites are everything you crave in a Thai recipe—crispy, salty, and sweet nuggets of pure joy! They’re quick and easy to make, coming together in under 20 minutes. Perfectly crunchy on the outside and tender on the inside, these bites are sure to become a favorite.
Ingredients
- 1 large boneless skinless chicken breast
- 1/2 cup all-purpose flour
- 1/2 tsp garlic powder
- Salt and black pepper to taste
- 1 large egg
- 2 tbsp milk
- Canola oil or peanut oil for frying
- 1/3 cup sweet chili sauce
- 1 carrot, julienned
- Fresh cilantro, chopped
- Sesame seeds
Instructions
- Step: Pour 1-2 inches of oil into a deep skillet. Heat over medium heat until it reaches 350°F. Cut the chicken breast into bite-sized pieces. Set aside.
- Step: In a shallow dish, mix flour, garlic powder, salt, and black pepper. In another shallow dish, whisk together egg, milk, salt, and black pepper. Coat each piece of chicken first in the dry flour mixture, then in the egg mixture, and back in the flour mixture.
- Step: Carefully place the coated chicken pieces into the hot oil. Fry until golden brown, about 3-4 minutes per side. Remove and drain on paper towels. Sprinkle with a bit of salt.
- Step: Transfer the fried chicken to a large bowl and toss with sweet chili sauce. Garnish with sesame seeds, julienned carrot, and chopped cilantro. Serve warm.
Notes
For extra crispiness, double coat the chicken by dipping it in the flour mixture, then egg mixture, and flour mixture again before frying. Ensure the oil is at 350°F for best results.
- Prep Time: 10 minutes
- Cook Time: 10 minutes
- Category: Appetizer
- Method: Frying
- Cuisine: Thai
Nutrition
- Serving Size: 1 serving
- Calories: 395 kcal
- Sugar: 20 g
- Sodium: 850 mg
- Fat: 5 g
- Saturated Fat: 1.5 g
- Unsaturated Fat: 3.5 g
- Trans Fat: 0 g
- Carbohydrates: 45 g
- Fiber: 2 g
- Protein: 33 g
- Cholesterol: 167 mg
Keywords: Thai chicken bites, crispy chicken, sweet chili sauce, appetizer, quick snacks