Experience the ultimate comfort food with this classic, from-scratch chicken pot pie. Featuring a buttery, flaky buttermilk crust and a rich, creamy filling packed with tender chicken and aromatic vegetables, this dish is a perfect weekend project. Every bite offers a satisfying crunch from the pastry paired with a savory, herb-infused center that warms the soul.
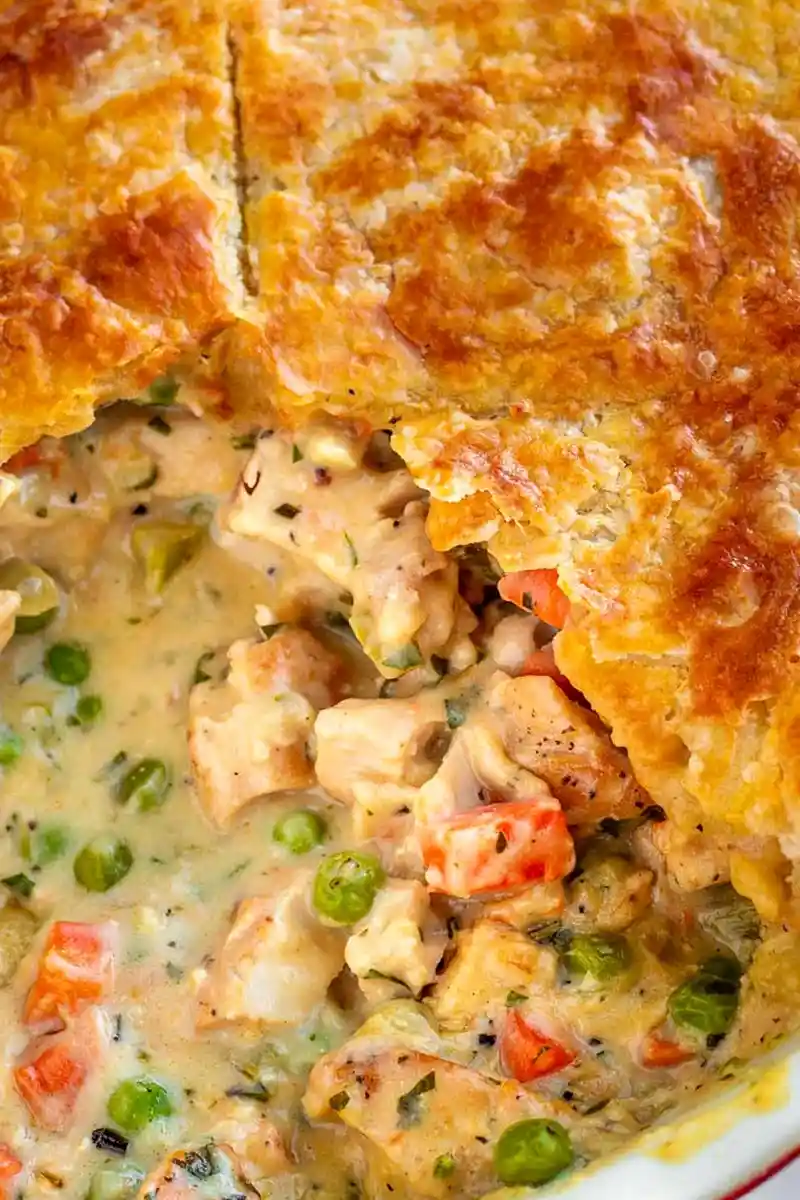
List of ingredients
- 1 double buttermilk pie crust (makes 2 disks)
- 1 large egg
- 2 teaspoons heavy cream
- 2 large skinless chicken breasts
- ½ teaspoon garlic powder
- ½ teaspoon fresh thyme leaves
- Salt and pepper to taste
- 2 tablespoons olive oil
- 2 tablespoons unsalted butter
- 1 small onion, small diced
- 3 medium carrots, peeled and diced
- 2 stalks celery, diced
- 3 to 4 cloves garlic, minced
- ⅓ cup all-purpose flour
- 2 cups chicken broth
- ½ cup heavy cream
- 1 teaspoon fresh thyme leaves
- ½ teaspoon minced fresh rosemary
- ¼ cup chopped fresh parsley
- ¾ cup frozen peas
step-by-step instructions
- Step: Make the buttermilk double pie crust according to your preferred method and chill for at least 2 hours or overnight.
- Step: Preheat oven to 400°F. Pound chicken breasts to ½-inch thickness and season with garlic powder, thyme, salt, and pepper. Drizzle with olive oil and let sit for 15 minutes.
- Step: Heat 1-2 tablespoons of olive oil in a large deep skillet over medium heat. Cook chicken for 6-8 minutes per side until fully cooked. Let rest for 10 minutes, then cube.
- Step: In the same skillet, melt butter over medium heat. Add onions, carrots, celery, and garlic. Cook for 8 minutes until tender.
- Step: Stir in flour and cook for 30 seconds. Gradually whisk in chicken broth and heavy cream. Add thyme, rosemary, salt, and pepper. Simmer for 6-7 minutes until thickened.
- Step: Stir in cubed chicken, parsley, and frozen peas. Simmer for 1-2 minutes and remove from heat to cool slightly.
- Step: Roll out dough into two 12-inch circles. Place one in a 9-inch pie pan, add filling, and top with the second crust. Tuck and crimp edges to seal. Cut ventilation slits.
- Step: Whisk egg with 1 teaspoon heavy cream for the egg wash. Brush over the top and edges of the crust.
- Step: Place on a large aluminum sheet pan and bake for 35 minutes. Cover edges with a pie crust shield or foil after 15 minutes to prevent over-browning.
- Step: Cool for 20-30 minutes before slicing to allow the filling to set.
Refining Your Pie Technique
The Importance of Temperature Control
Maintaining a cold environment for your pie dough is the single most important factor in achieving a flaky texture. When butter remains in solid bits rather than melting into the flour, it creates steam pockets during baking, resulting in those desirable, delicate layers. Always keep your butter in the refrigerator until the exact moment you are ready to incorporate it into your dry ingredients.
Achieving the Perfect Golden Crust
Using a high-quality egg wash is essential for professional-looking results. The combination of an egg and a splash of heavy cream creates a Maillard reaction that results in a deep, glossy, golden-brown finish. Be careful to brush the wash evenly across the surface and edges, ensuring you do not let too much liquid pool in the crimped areas, which can cause them to become dark too quickly.
Managing Filling Consistency
To avoid a runny filling, always allow the chicken and vegetable sauce to cool for at least ten minutes before pouring it into the bottom crust. If the filling is steaming hot when it hits the dough, the fat in the crust will begin to melt prematurely, which can lead to a soggy bottom. Additionally, ensure your roux—the mixture of butter, flour, and liquid—is fully thickened on the stovetop before moving to the assembly phase.
Effective Ingredient Handling
Customizing Your Vegetable Blend
While the mirepoix of carrots, onions, and celery is traditional, you can easily adapt the vegetable content to suit your personal preferences. If you decide to add potatoes, make sure to use small-diced, par-cooked pieces so they reach the perfect tenderness within the short baking window of the pie. Similarly, hearty vegetables like parsnips or sweet potatoes can offer a unique sweetness that complements the savory broth.
Selecting the Best Chicken Cuts
Using skinless chicken breasts provides a lean protein that absorbs the flavor of the herbs well, but you can also experiment with chicken thighs for a richer, more succulent filling. If you choose to use thighs, you may want to trim excess fat before cubing. Always ensure that the chicken is fully cooked before it enters the crust, as the oven time is primarily focused on browning the dough rather than cooking the raw meat.
Enhancing Herb Profiles
Fresh herbs are vastly superior to dried ones in this recipe, especially regarding the parsley and thyme. If you find yourself in a situation where you only have dried herbs, remember that their flavor is much more concentrated than fresh; use one-third of the recommended amount to avoid overpowering the delicate balance of the creamy sauce. You can also experiment with other fresh additions like chives or tarragon for a slightly different aromatic profile.
Addressing Common Concerns
Preventing Soggy Bottom Crusts
The secret to a crisp bottom crust lies in heat transfer. Placing your pie dish on a preheated metal sheet pan helps conduct heat directly into the base of the pastry, jumpstarting the baking process. By ensuring the oven is fully preheated to 400°F before the pie enters, you create a powerful burst of heat that sets the bottom crust structure before the moisture from the filling can affect it.
Handling Leftovers Safely
If you have leftover pie, store it in an airtight container within the refrigerator for up to three days. When you are ready to eat, avoid the microwave, which will soften the crust significantly. Instead, reheat the slices in a conventional oven or toaster oven at 350°F until the center is warm and the crust has regained some of its original crunch.
Baking From a Frozen State
If you have frozen an unbaked pie, you do not need to thaw it before baking. Simply keep the pie covered with foil for the first thirty-five minutes at 400°F to ensure the middle cooks through without burning the top. Remove the foil, brush with your egg wash, and continue baking for an additional thirty minutes or until the crust is beautifully golden brown and the filling is bubbling at the edges.
Managing Crust Edges
It is very common for the decorative edges of a pie to brown faster than the center due to their thinness and proximity to the heat. If you do not have a dedicated silicone crust shield, you can create one by cutting a circle of aluminum foil, folding it into quarters, and cutting out the center to leave a ring. Place this foil ring gently over the edges of the pie halfway through the cooking time to protect the dough.
FAQ Section
Can I use store-bought pastry for this recipe?
Yes, you can substitute the homemade buttermilk crust with a high-quality store-bought version if you are short on time. Ensure the store-bought dough is properly thawed according to the package instructions before you begin rolling it out for your nine-inch pan.
What should I do if my filling looks too thin?
If the filling appears thin while cooking on the stovetop, continue simmering it for a few extra minutes while stirring constantly. As the flour continues to hydrate and the liquid evaporates, the sauce will naturally reach a thicker, gravy-like consistency that is ideal for holding the chicken and vegetables together inside the pie.
Can this recipe be prepared in individual ramekins?
Absolutely, you can turn this into individual chicken pot pies by using smaller oven-safe vessels. Simply roll out your dough and cut it into circles that fit the diameter of your ramekins, following the same baking temperature, though you will likely need to reduce the baking time by ten to fifteen minutes since the individual portions are smaller.
Is it necessary to use heavy cream?
Heavy cream is highly recommended because its high fat content provides the rich mouthfeel and necessary thickness that makes this recipe stand out. While you could technically use milk or half-and-half, the resulting sauce would be significantly thinner and may not hold up as well within the crust, potentially leading to a soupier pie interior.
Print
Homemade Chicken Pot Pie (with Flaky Buttermilk Crust!)
- Total Time: PT80M
- Yield: 8 servings 1x
- Diet: Non-vegetarian
Description
This homemade chicken pot pie is a nostalgic classic! The buttermilk pie crust is extra flaky, buttery, and sturdy to hold the delicious chicken pot pie filling made with tender chicken and veggies in a creamy, herb infused filling.
Ingredients
- 1 double buttermilk pie crust (makes 2 disks)
- 1 large egg
- 2 teaspoons heavy cream
- 2 large skinless chicken breasts
- ½ teaspoon garlic powder
- ½ teaspoon fresh thyme leaves
- Salt and pepper to taste
- 2 tablespoons olive oil
- 2 tablespoons unsalted butter
- 1 small onion, small diced
- 3 medium carrots, peeled and diced
- 2 stalks celery, diced
- 3 to 4 cloves garlic, minced
- ⅓ cup all-purpose flour
- 2 cups chicken broth
- ½ cup heavy cream
- 1 teaspoon fresh thyme leaves
- ½ teaspoon minced fresh rosemary
- ¼ cup chopped fresh parsley
- ¾ cup frozen peas
Instructions
- Step: Make the buttermilk double pie crust according to your preferred method and chill for at least 2 hours or overnight.
- Step: Preheat oven to 400°F. Pound chicken breasts to ½-inch thickness and season with garlic powder, thyme, salt, and pepper. Drizzle with olive oil and let sit for 15 minutes.
- Step: Heat 1-2 tablespoons of olive oil in a large deep skillet over medium heat. Cook chicken for 6-8 minutes per side until fully cooked. Let rest for 10 minutes, then cube.
- Step: In the same skillet, melt butter over medium heat. Add onions, carrots, celery, and garlic. Cook for 8 minutes until tender.
- Step: Stir in flour and cook for 30 seconds. Gradually whisk in chicken broth and heavy cream. Add thyme, rosemary, salt, and pepper. Simmer for 6-7 minutes until thickened.
- Step: Stir in cubed chicken, parsley, and frozen peas. Simmer for 1-2 minutes and remove from heat to cool slightly.
- Step: Roll out dough into two 12-inch circles. Place one in a 9-inch pie pan, add filling, and top with the second crust. Tuck and crimp edges to seal. Cut ventilation slits.
- Step: Whisk egg with 1 teaspoon heavy cream for the egg wash. Brush over the top and edges of the crust.
- Step: Place on a large aluminum sheet pan and bake for 35 minutes. Cover edges with a pie crust shield or foil after 15 minutes to prevent over-browning.
- Step: Cool for 20-30 minutes before slicing to allow the filling to set.
Notes
Ensure chicken and vegetables are chopped to uniform sizes. Use cold butter for the crust to ensure flakiness. The resting period after baking is crucial for a clean slice.
- Prep Time: PT40M
- Cook Time: PT40M
- Category: Main Course
- Method: Stovetop and Oven-baked
- Cuisine: American
Nutrition
- Serving Size: 1 slice
- Calories: 1031 kcal
- Sugar: 3 g
- Sodium: 482 mg
- Fat: 60 g
- Saturated Fat: 20 g
- Unsaturated Fat: 34 g
- Trans Fat: 1 g
- Carbohydrates: 11 g
- Fiber: 2 g
- Protein: 65 g
- Cholesterol: 300 mg
Keywords: chicken pot pie, homemade, savory pie, comfort food, buttermilk crust