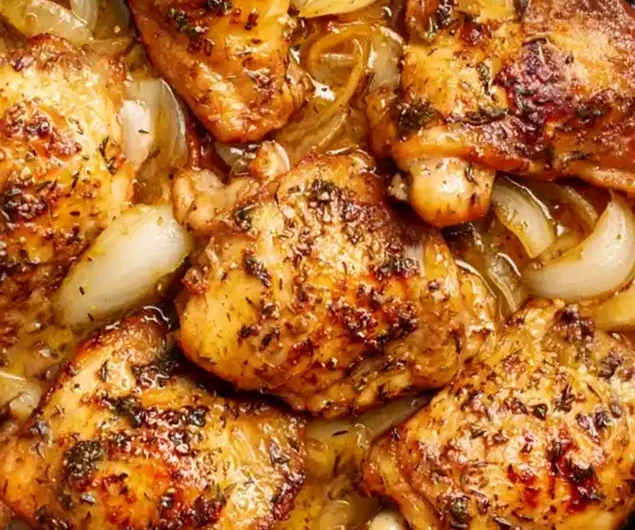
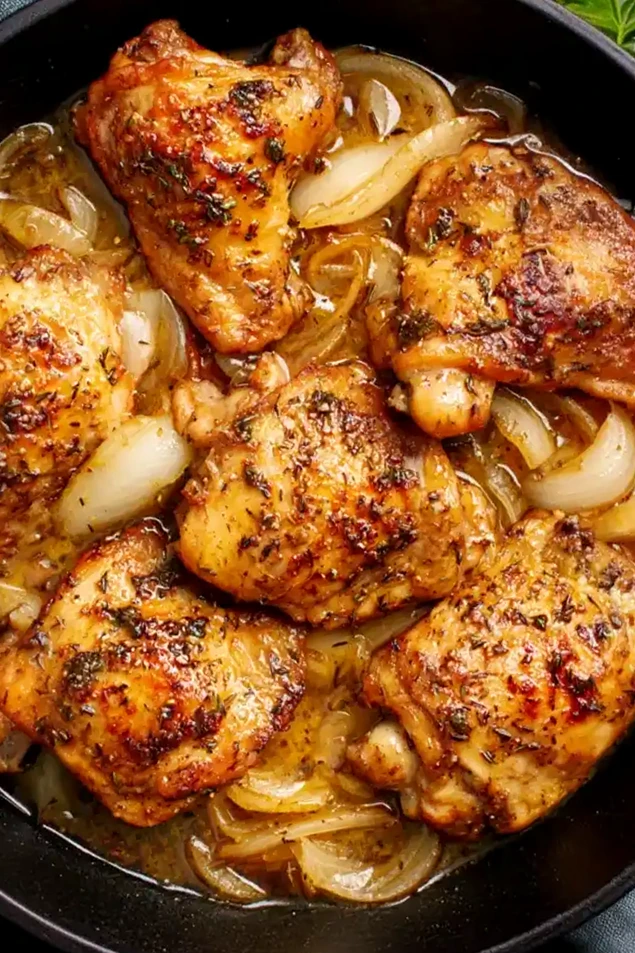
This one-pot meal uses the acidity of apple cider vinegar to create a tender, flavorful chicken dish. It is a practical choice for home cooks seeking a rich, savory dinner with minimal preparation time.
List of ingredients
- 6 bone-in, skin-on chicken thighs or drumsticks – keeps the meat moist during the slow simmer.
- 1/3 cup apple cider vinegar (preferably raw and unfiltered) – provides the primary tang and tenderizes the chicken.
- 1 large onion, thinly sliced – adds a sweet, aromatic base to the sauce.
- 4 cloves garlic, minced – enhances the savory profile of the braising liquid.
- 1 1/2 cups low-sodium chicken broth – forms the body of the sauce.
- 2 tablespoons Dijon or whole grain mustard (optional) – adds depth and a slight piquant flavor.
- 2 teaspoons fresh thyme (or 1/2 tsp dried) – introduces a woody, earthy aroma.
- 1 tablespoon olive oil – used for searing the skin to a golden brown.
- Salt and freshly ground black pepper – essential for seasoning the chicken.
- 1 teaspoon honey or maple syrup (optional) – balances the sharpness of the vinegar.
step-by-step instructions
- Sear the Chicken: Pat the chicken dry with paper towels and season with salt and pepper. Heat olive oil in a Dutch oven or large skillet over medium-high heat, sear skin-side down for 5–6 minutes until golden, flip and cook for 2–3 more minutes, then remove and set aside.
- Sauté Aromatics: In the same pan, add the sliced onions and cook until they are softened, which takes about 4–5 minutes. Stir in the minced garlic and cook for 30 seconds until fragrant.
- Deglaze the Pan: Pour in the apple cider vinegar and use a wooden spoon to scrape up all the browned bits from the bottom. Simmer the liquid for 1–2 minutes to reduce the intensity of the vinegar.
- Build the Braise: Stir in the chicken broth, optional mustard, thyme, and honey or maple syrup. Return the chicken to the pan skin-side up, ensuring the liquid reaches about halfway up the sides of the meat.
- Simmer Gently: Cover the pan and reduce the heat to low. Let it simmer for 30–40 minutes until the chicken is fully cooked and tender; you may uncover for the last 10 minutes to thicken the sauce.
- Optional Oven Finish: For a more concentrated flavor and crispier skin, transfer the uncovered pan to a 375°F oven for the final 15 minutes of cooking.
Professional Searing Techniques
Dry the Skin Thoroughly
Moisture on the surface of the chicken creates steam, which prevents the skin from browning properly. Use paper towels to pat the skin completely dry before adding salt and pepper. This ensures a crisp, golden exterior and better flavor development.
Maintain High Heat
The pan must be hot enough that the oil shimmers before the chicken is added. If the heat is too low, the chicken will stick to the pan and the skin will be rubbery instead of crisp. Avoid adding too much oil, as the chicken skin will release its own fat.
Avoid Crowding the Pan
If the chicken thighs are packed too tightly, the temperature of the pan drops rapidly. This causes the meat to release juices and boil rather than sear. Work in batches if necessary to leave space between each piece of chicken.
Optimizing the Braising Liquid
Selecting Raw Apple Cider Vinegar
Raw, unfiltered apple cider vinegar contains ‘the mother,’ which offers a more complex and robust flavor. This variety provides a deeper acidity that penetrates the meat more effectively during the braising process. Distilled white vinegars are too sharp and lack the fruity undertones of ACV.
Balancing Acidity with Sweeteners
The inclusion of honey or maple syrup is not for sweetness, but for balance. A small amount of sugar neutralizes the harsh edge of the vinegar, creating a rounded sauce. This ensures the tanginess enhances the dish without overpowering the chicken.
Using Low-Sodium Broth
Braising involves reduction, which concentrates all the flavors, including salt. Using low-sodium chicken broth prevents the final sauce from becoming overly salty as it simmers. You can always add more salt at the end if the taste is too mild.
Incorporating Different Mustards
Dijon mustard adds a smooth, sharp heat that emulsifies well into the sauce. Whole grain mustard provides a rustic texture and a more mellow, seed-forward flavor. Both options help thicken the liquid and add a layer of complexity to the braise.
Best Side Dish Pairings
Creamy Mashed Potatoes
Mashed potatoes are an ideal companion because they absorb the vinegar-based sauce efficiently. The creaminess of the potatoes contrasts well with the acidity of the braise. Use butter and cream for a richer side that complements the lean chicken.
Buttered Egg Noodles
Wide egg noodles provide a neutral base that allows the flavors of the chicken and thyme to stand out. Tossing them in butter and parsley adds a fresh element to the plate. These noodles are excellent for soaking up the reduced pan sauce.
Roasted Root Vegetables
Carrots, parsnips, and rutabagas pair well with the apple cider profile of this dish. Roasting them in the oven with olive oil and salt mirrors the sweetness of the braised onions. These vegetables add color and nutritional balance to the meal.
Steamed Leafy Greens
Sautéed spinach, kale, or Swiss chard provides a bitter contrast to the rich chicken sauce. Steam them quickly and finish with a squeeze of lemon juice. The freshness of the greens cuts through the richness of the bone-in thighs.
Crusty Sourdough Bread
A toasted slice of artisan sourdough is perfect for mopping up the remaining sauce from the plate. The slight sourness of the bread complements the apple cider vinegar. Brush the bread with garlic butter before toasting for extra flavor.
Recipe Variations and Swaps
Using Boneless Chicken Thighs
Boneless, skinless thighs cook faster and are more convenient for meal prep. However, you should reduce the simmering time by 10 to 15 minutes to prevent the meat from overcooking. Be aware that you will lose the richness provided by the bone and skin.
Adding Fresh Apple Slices
Adding thinly sliced Granny Smith or Honeycrisp apples to the pan during the sauté stage enhances the fruitiness. The apples soften into the sauce, adding natural sweetness and texture. This variation makes the dish feel more seasonal and rustic.
Incorporating a Creamy Finish
For a richer, silkier sauce, stir in two tablespoons of cold butter or a splash of heavy cream at the very end. Remove the chicken from the pan and whisk the cream in over low heat. This creates a velvety glaze that clings to the meat.
Adding Red Pepper Flakes
A pinch of crushed red pepper flakes added during the garlic sauté provides a gentle heat. This spicy element balances the sweetness of the honey and the tartness of the vinegar. It is a simple way to add a modern twist to a classic braise.
Storage and Reheating Guidelines
Proper Refrigeration
Store leftover chicken and sauce in an airtight glass container. Ensure the chicken is fully submerged in the sauce to prevent the meat from drying out in the fridge. The dish will stay fresh and safe to eat for up to three days.
Reheating on the Stovetop
Gently reheat the chicken in a skillet over medium-low heat. Add a tablespoon of water or broth if the sauce has thickened too much during storage. Cover the pan to trap steam, which keeps the chicken moist.
Oven Reheating for Crispy Skin
To restore the crispness of the skin, reheat the chicken in a 350°F oven. Place the chicken on a wire rack over a baking sheet and heat for 10 to 15 minutes. Warm the sauce separately in a pan before pouring it around the chicken.
Freezing Instructions
This dish freezes well if you store the sauce and chicken together. Place them in a freezer-safe bag, removing as much air as possible to avoid freezer burn. Thaw in the refrigerator overnight before reheating on the stovetop.
Make-Ahead Strategies
Prepping Aromatics
You can slice the onions and mince the garlic up to 24 hours in advance. Store them in a small container or airtight bag in the refrigerator. This reduces the active prep time on the day of cooking.
Marinating the Chicken
While not required, soaking the chicken in a mixture of vinegar and herbs for two hours can deepen the flavor. Pat the chicken dry before searing to ensure you still get a good crust. Store the marinade in the fridge during this process.
Cooking in Advance
Braised dishes often taste better the next day as the flavors have more time to meld. Cook the recipe fully, cool it down, and refrigerate it. Gently reheat it when you are ready to serve for a more developed flavor profile.
Troubleshooting Common Issues
Sauce is Too Thin
If the sauce is too watery, remove the chicken and simmer the liquid on high heat for 5 to 10 minutes. This reduces the volume and concentrates the flavors. Alternatively, whisk in a small cornstarch slurry for a quick thickening.
Sauce is Too Tart
If the vinegar is too dominant, add another teaspoon of honey or maple syrup. A small amount of butter can also mellow out the acidity. Stir these in slowly and taste as you go until the balance is correct.
Chicken is Still Tough
Tough chicken usually means it hasn’t simmered long enough or the heat was too high. Ensure the heat is on low and the pan is covered to trap moisture. Simmer for an additional 10 to 15 minutes until the meat pulls away easily from the bone.
Skin is Not Crispy
If the skin became soggy during braising, use the oven finish method. Place the chicken under a broiler for 2 to 3 minutes, watching closely to prevent burning. This re-crisps the surface without overcooking the interior.
Frequently Asked Questions
Can I use drumsticks instead of thighs?
Yes, drumsticks work perfectly in this recipe. They may require an additional 5 to 10 minutes of simmering time depending on their size. Ensure they are fully cooked to an internal temperature of 165°F.
Can this be made in a slow cooker?
Yes, but you must sear the chicken and sauté the aromatics in a pan first. Transfer everything to the slow cooker and cook on low for 4 to 5 hours or high for 2 to 3 hours. The oven finish is recommended after the slow cooker for better skin texture.
Is honey essential for the recipe?
Honey is optional but highly recommended for balancing the vinegar. If you avoid honey, you can use maple syrup or a pinch of brown sugar. If you prefer a very sharp sauce, you can omit the sweetener entirely.
What is the best pot for braising?
An enameled cast-iron Dutch oven is the best choice because it distributes heat evenly and holds moisture. A heavy-bottomed stainless steel skillet with a tight-fitting lid also works well. Avoid thin pans that may burn the sauce during the long simmer.
Print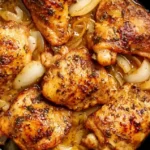
Apple Cider Vinegar Braised Chicken
- Total Time: 60 minutes
- Yield: 4 servings 1x
- Diet: General
Description
Apple Cider Vinegar Braised Chicken is a cozy, one-pot main dish made with bone-in chicken thighs slowly simmered in a tangy, aromatic sauce of apple cider vinegar, onions, garlic, broth, and herbs.
Ingredients
- 6 bone-in skin-on chicken thighs (or drumsticks)
- 1/3 cup apple cider vinegar (preferably raw and unfiltered)
- 1 large onion, thinly sliced
- 4 cloves garlic, minced
- 1 1/2 cups low-sodium chicken broth
- 2 tablespoons Dijon or whole grain mustard (optional)
- 2 teaspoons fresh thyme (or 1/2 tsp dried)
- 1 tablespoon olive oil
- Salt and freshly ground black pepper
- 1 teaspoon honey or maple syrup (optional)
Instructions
- Sear the Chicken: Pat the chicken dry and season with salt and pepper. Heat olive oil in a Dutch oven or large skillet over medium-high heat. Sear the chicken skin-side down for 5–6 minutes, until golden brown. Flip and cook another 2–3 minutes. Remove and set aside.
- Sauté Aromatics: In the same pan, add sliced onions and cook until softened, about 4–5 minutes. Stir in garlic and cook for 30 seconds until fragrant.
- Deglaze the Pan: Add apple cider vinegar and scrape up any browned bits from the bottom of the pan. Simmer for 1–2 minutes to reduce slightly.
- Build the Braise: Add chicken broth, mustard (if using), thyme, and a touch of honey or maple syrup. Return the chicken to the pan, skin-side up. The liquid should come halfway up the chicken.
- Simmer Gently: Cover and reduce heat to low. Let it simmer for 30–40 minutes until the chicken is cooked through and tender. Optionally, uncover for the last 10 minutes to reduce the sauce further.
- Optional Oven Finish: For deeper flavor, transfer the uncovered pan to a 375°F oven for the final 15 minutes of cooking.
Notes
Choose bone-in, skin-on chicken for moisture. Searing thoroughly builds foundational flavor. Use raw, unfiltered apple cider vinegar for the best taste. Let the chicken rest for 5–10 minutes before serving to keep it juicy.
- Prep Time: 15 minutes
- Cook Time: 45 minutes
- Category: Main Course
- Method: Braising
- Cuisine: American
Nutrition
- Serving Size: 1 serving
- Calories: 400 kcal
- Sugar: 8 g
- Sodium: 620 mg
- Fat: 22 g
- Saturated Fat: 7 g
- Unsaturated Fat: 15 g
- Trans Fat: 0 g
- Carbohydrates: 15 g
- Fiber: 2 g
- Protein: 31 g
- Cholesterol: 125 mg
Keywords: Apple Cider Vinegar Braised Chicken, one-pot