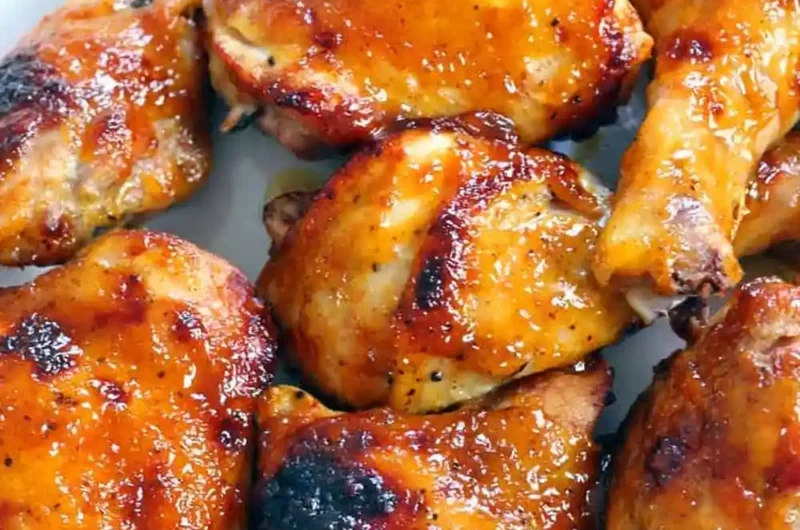
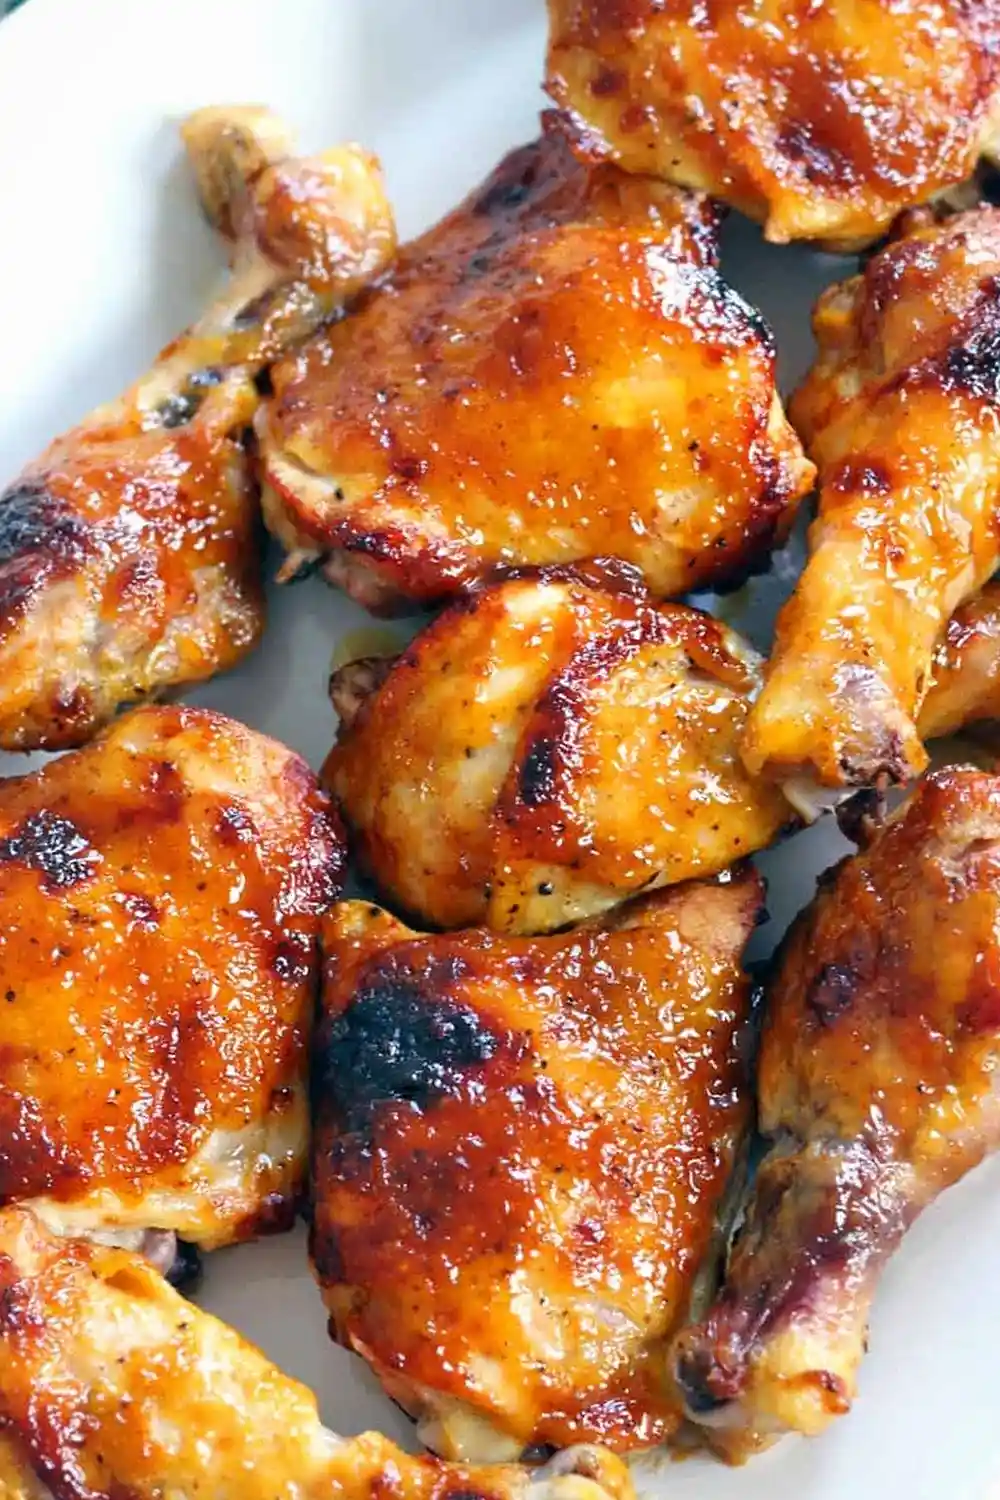
This effortless recipe creates a sticky, caramelized glaze and tender meat with minimal preparation. It is an ideal weeknight meal that delivers a professional barbecue result without needing a grill.
List of ingredients
- 8-10 chicken thighs and/or drumsticks (bone-in, skin on) – bone-in dark meat ensures the juiciest results.
- 2 cups of your favorite bbq sauce – choose a brand with good sugar content for better caramelization.
- 2 tablespoons extra-virgin olive oil or canola oil – used to coat the skin for a crispier finish.
- Salt and pepper – used for basic seasoning to enhance the natural flavor of the meat.
step-by-step instructions
- Preheat: Set your oven to 400 degrees F.
- Season: Coat the chicken pieces on all sides with olive oil, then season generously with salt and pepper.
- Initial Bake: Place the chicken skin side down on a rimmed baking sheet and bake for 25 minutes.
- Adjust Temperature: Remove the chicken from the oven and increase the oven temperature to 425 degrees F. Be sure to close the oven door quickly to maintain the internal heat.
- First Basting: Use a basting brush to coat the top of the chicken with barbecue sauce. Use a spatula to carefully flip the chicken over without tearing the skin, baste the other side, and return to the oven for 7 minutes.
- Second Basting: Remove the chicken from the oven, baste the top again with more barbecue sauce, and bake for another 7 minutes.
- Final Basting: Remove the chicken a third time, apply a final layer of barbecue sauce, and bake for a final 7 minutes. The total cooking time will be approximately 46 minutes.
- Check Temperature: Use a meat thermometer to ensure the thickest part of the meat has reached at least 165 degrees F. For dark meat, a temperature of 180-190 degrees F is recommended for the best texture.
- Optional Crisp: If the chicken is not as browned as you prefer, move the oven rack to the top position and broil for 3-5 minutes.
- Rest: Let the chicken sit for 5 minutes before serving to allow the juices to redistribute.
Selecting the Ideal Chicken Cuts
Bone-In Skin-On Dark Meat for Maximum Juiciness
Using chicken thighs and drumsticks is highly recommended because dark meat contains more fat and connective tissue. This makes it far more forgiving during the roasting process and less likely to dry out compared to white meat. Dark meat also tastes richer and remains tender even when cooked to higher internal temperatures.
Adjusting the Method for Chicken Breasts
If you prefer using chicken breasts, ensure they are bone-in and skin-on to prevent them from becoming tough. If using boneless, skinless breasts, reduce the initial baking time from 25 minutes to 10 minutes. Continue the basting process as directed, but check the internal temperature frequently as they cook much faster.
Preparing Chicken Wings for the Oven
Chicken wings can be prepared using the exact same temperature and timing as the drumsticks and thighs. Because wings are smaller, they often crisp up faster, but the triple-basting technique still works perfectly. They make for an excellent appetizer or a lighter main course using this method.
Secrets to a Thick Sticky Glaze
The Triple-Basting Technique
Applying the sauce in three separate layers allows the sugar in the barbecue sauce to caramelize and thicken with each trip to the oven. This process builds a dense, sticky crust that clings to the meat rather than sliding off. The repeated exposure to high heat creates a concentrated glaze that mimics a professional grill.
The Role of Sugar in Caramelization
Most store-bought barbecue sauces contain a significant amount of sugar or molasses, which is essential for this recipe. When the sugar is heated at 425 degrees F, it undergoes a chemical reaction that creates a charred, sweet exterior. If using a low-sugar sauce, you may find the glaze is thinner and less sticky.
Using a Silicone Basting Brush
A high-quality basting brush allows you to distribute the sauce evenly across every crevice of the chicken. This ensures there are no bald spots and that the seasoning is consistent across the entire batch. Silicone brushes are particularly useful as they are heat-resistant and easy to clean after handling sticky sauces.
Achieving Perfectly Crispy Skin
The Logic of Skin-Side Down Roasting
Starting the chicken skin-side down allows the fat under the skin to render out more efficiently. This rendered fat then helps fry the meat slightly and prepares the skin to become crisp once it is flipped. It also ensures that the bottom of the chicken is well-cooked before the glaze is applied.
Using a Baking Rack for Better Airflow
For those who want maximum crispiness on all sides, place a wire cooling rack inside the rimmed baking sheet. Elevating the chicken allows hot air to circulate under the meat, preventing it from sitting in its own juices. If using a rack, you can keep the chicken skin-side up for the entire duration and skip the flipping step.
The Final Broiler Finish
The broiler provides intense, direct heat from the top of the oven, which is perfect for adding those dark, charred spots. This step should only be done for a few minutes at the very end of the process. Keep a close eye on the chicken, as the sugar in the sauce can go from caramelized to burnt very quickly.
Preparing Your Chicken for Best Results
The Importance of Patting Skin Dry
Moisture is the enemy of crispiness. Using paper towels to pat the chicken completely dry before applying oil and seasoning prevents the meat from steaming in the oven. Dry skin allows the oil to adhere better and ensures the skin crisps up immediately upon contact with the heat.
Dry Brining Water-Chilled Chicken
Water-chilled chicken often contains excess moisture that can lead to soggy skin. To fix this, place the chicken on a rack and rub it with salt for 2 to 12 hours in the refrigerator uncovered. This draws out excess water and seasons the meat deeply, resulting in a better texture and flavor.
Ensuring the Meat is Fully Defrosted
Cooking chicken that is partially frozen will lead to uneven results, where the outside is burnt and the inside remains raw. Always thaw chicken completely in the refrigerator before starting this recipe. This ensures the internal temperature rises consistently across all pieces during the roasting process.
Equipment Recommendations
Using a Heavy-Duty Rimmed Baking Sheet
A sturdy, professional-grade aluminum baking sheet is ideal because it conducts heat evenly and does not warp at high temperatures. The rimmed edges are crucial for containing the rendered fat and any sauce that drips during the basting process. This prevents messy spills in the bottom of your oven.
The Role of a Digital Meat Thermometer
Relying on visual cues or clear juices is not an accurate way to determine if chicken is safe to eat. A digital meat thermometer allows you to check the exact temperature of the thickest part of the meat without hitting the bone. This is the only way to guarantee the chicken is cooked to 165 degrees F.
Selecting the Right Spatula for Flipping
A thin, sturdy metal spatula is the best tool for flipping the chicken without tearing the skin. Using a sharp, quick sliding motion helps separate the meat from the pan effectively. This preserves the integrity of the skin, which is essential for the final presentation and texture.
Storage and Reheating Guide
Refrigerating Leftovers Safely
Store cooked barbecue chicken in an airtight container or a foil-covered baking dish in the refrigerator. It will remain fresh and safe to eat for 1 to 2 days. Ensure the chicken is cooled slightly before sealing the container to prevent excess condensation from making the skin soggy.
Reheating in the Oven for Quality
To reheat, place the chicken in a baking dish and cover it tightly with foil to lock in the moisture. Bake at 350 degrees F for approximately 30 minutes, or until the internal temperature reaches 165 degrees F. This method is superior to microwaving, which often makes the meat rubbery.
Restoring the Glaze Crispiness
Since reheating in the oven often softens the skin, you can finish the chicken under the broiler for 2 to 3 minutes. This quickly re-caramelizes the sugars in the barbecue sauce and restores some of the original crispiness. Be careful not to overcook the meat during this final step.
Serving Suggestions
Pairing with Southern Style Green Beans
The sweetness of the BBQ glaze pairs perfectly with the savory, slightly salty flavor of slow-cooked green beans. Sautéing them with garlic and a touch of butter provides a balanced contrast to the richness of the chicken. This creates a classic comfort food platter.
Adding a Creamy Potato Salad
A cold, creamy potato salad with a dill or buttermilk dressing helps cut through the intensity of the barbecue sauce. The coolness of the salad provides a refreshing temperature contrast to the hot, roasted chicken. It is a traditional accompaniment that fills the plate and adds variety.
Serving with a Zesty Slaw
A spicy jalapeño cilantro slaw or a traditional vinegar-based coleslaw adds a necessary acidic element to the meal. The acidity helps break down the richness of the dark meat and the sweetness of the glaze. This keeps the palate refreshed between bites of the savory chicken.
Troubleshooting and FAQs
Why is my chicken not fully cooked after 46 minutes?
This can happen if the chicken pieces are exceptionally large or if they were not fully defrosted before cooking. Always measure the temperature in the thickest part of the meat, avoiding the bone. If it is under 165 degrees F, simply return it to the oven for another 5 to 10 minutes.
Can I use a different oil for roasting?
Yes, any oil with a high smoke point will work well for this recipe. Canola oil, vegetable oil, or grapeseed oil are excellent alternatives to extra-virgin olive oil. The primary goal is to provide a fat layer that helps the skin crisp and prevents sticking.
Is it normal for the meat to look pink near the bone?
Yes, it is common for organic or young chicken to exhibit a pink or reddish hue near the bone due to hemoglobin reactions. As long as the internal temperature has reached 165 degrees F, the meat is safe to consume. Do not rely on the color of the meat to judge doneness.
How do I prevent the oven from getting messy?
If you find that the sauce splatters during the high-heat phase, you can loosely tent the chicken with aluminum foil. This catches the drips while still allowing heat to circulate. Additionally, using a rimmed baking sheet is the first line of defense against oven spills.
Print
Crispy Oven Baked BBQ Chicken with Sticky Glaze
- Total Time: 55 minutes
- Yield: 8 pieces 1x
- Diet: Gluten Free, Dairy Free
Description
This recipe uses only TWO INGREDIENTS – barbecue sauce and chicken (plus a little olive oil, salt, and pepper) – to make the crispiest, most perfectly glazed, sweet, sticky, and tender barbecue baked chicken you will ever have.
Ingredients
- 8–10 chicken thighs and/or drumsticks (bone-in, skin on)
- 2 cups barbecue sauce
- 2 tablespoons extra-virgin olive oil or canola oil
- Salt, to taste
- Pepper, to taste
Instructions
- Step 1: Preheat oven to 400 degrees F.
- Step 2: Coat the chicken on all sides with olive oil and season with salt and pepper.
- Step 3: Place the chicken skin side down on a rimmed baking sheet. Bake for 25 minutes.
- Step 4: Remove chicken from oven and turn the temperature of the oven up to 425 degrees.
- Step 5: Coat the top of the chicken with barbecue sauce using a basting brush. Use a spatula to flip the chicken over, being careful not to tear the skin. Baste the other side of the chicken, and place back in the oven for 7 minutes.
- Step 6: Remove from oven, baste top with barbecue sauce, and place back in oven for 7 more minutes.
- Step 7: Remove from the oven again and baste again, for a total of three times, and place back in oven for 7 more minutes.
- Step 8: If the chicken hasn’t crisped and browned to your liking, move the oven rack up and broil the chicken for 3-5 minutes, until it’s more crispy.
- Step 9: I recommend letting the chicken sit for 5 minutes or so after cooking before serving so the juices redistribute.
Notes
For extra crispy skin, pat the chicken dry before cooking or use a baking rack to elevate the meat. If using boneless, skinless chicken breasts, reduce the initial bake time to 10 minutes.
- Prep Time: 5 minutes
- Cook Time: 50 minutes
- Category: Chicken
- Method: Baking
- Cuisine: American
Nutrition
- Serving Size: 2 pieces
- Calories: 402 kcal
- Sugar: 23 g
- Sodium: 815 mg
- Fat: 21 g
- Saturated Fat: 5 g
- Unsaturated Fat: 16 g
- Trans Fat: 0 g
- Carbohydrates: 29 g
- Fiber: 1 g
- Protein: 22 g
- Cholesterol: 86 mg
Keywords: oven baked bbq chicken, crispy chicken thighs, easy bbq chicken, 2 ingredient chicken