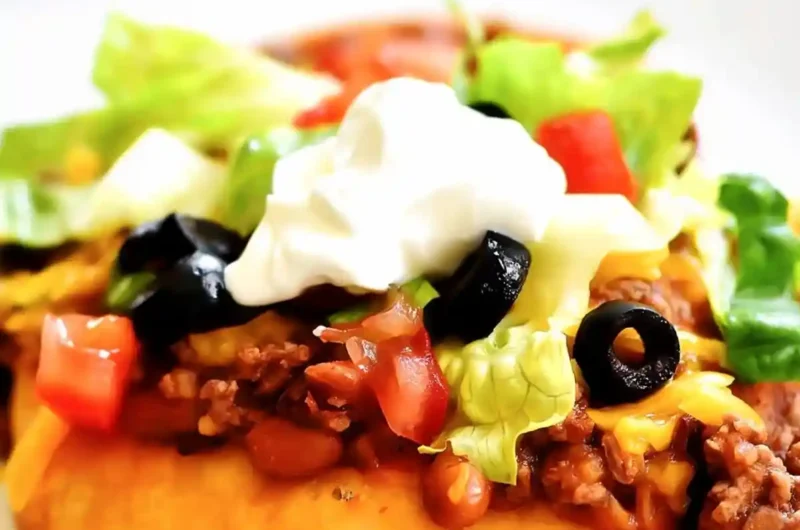
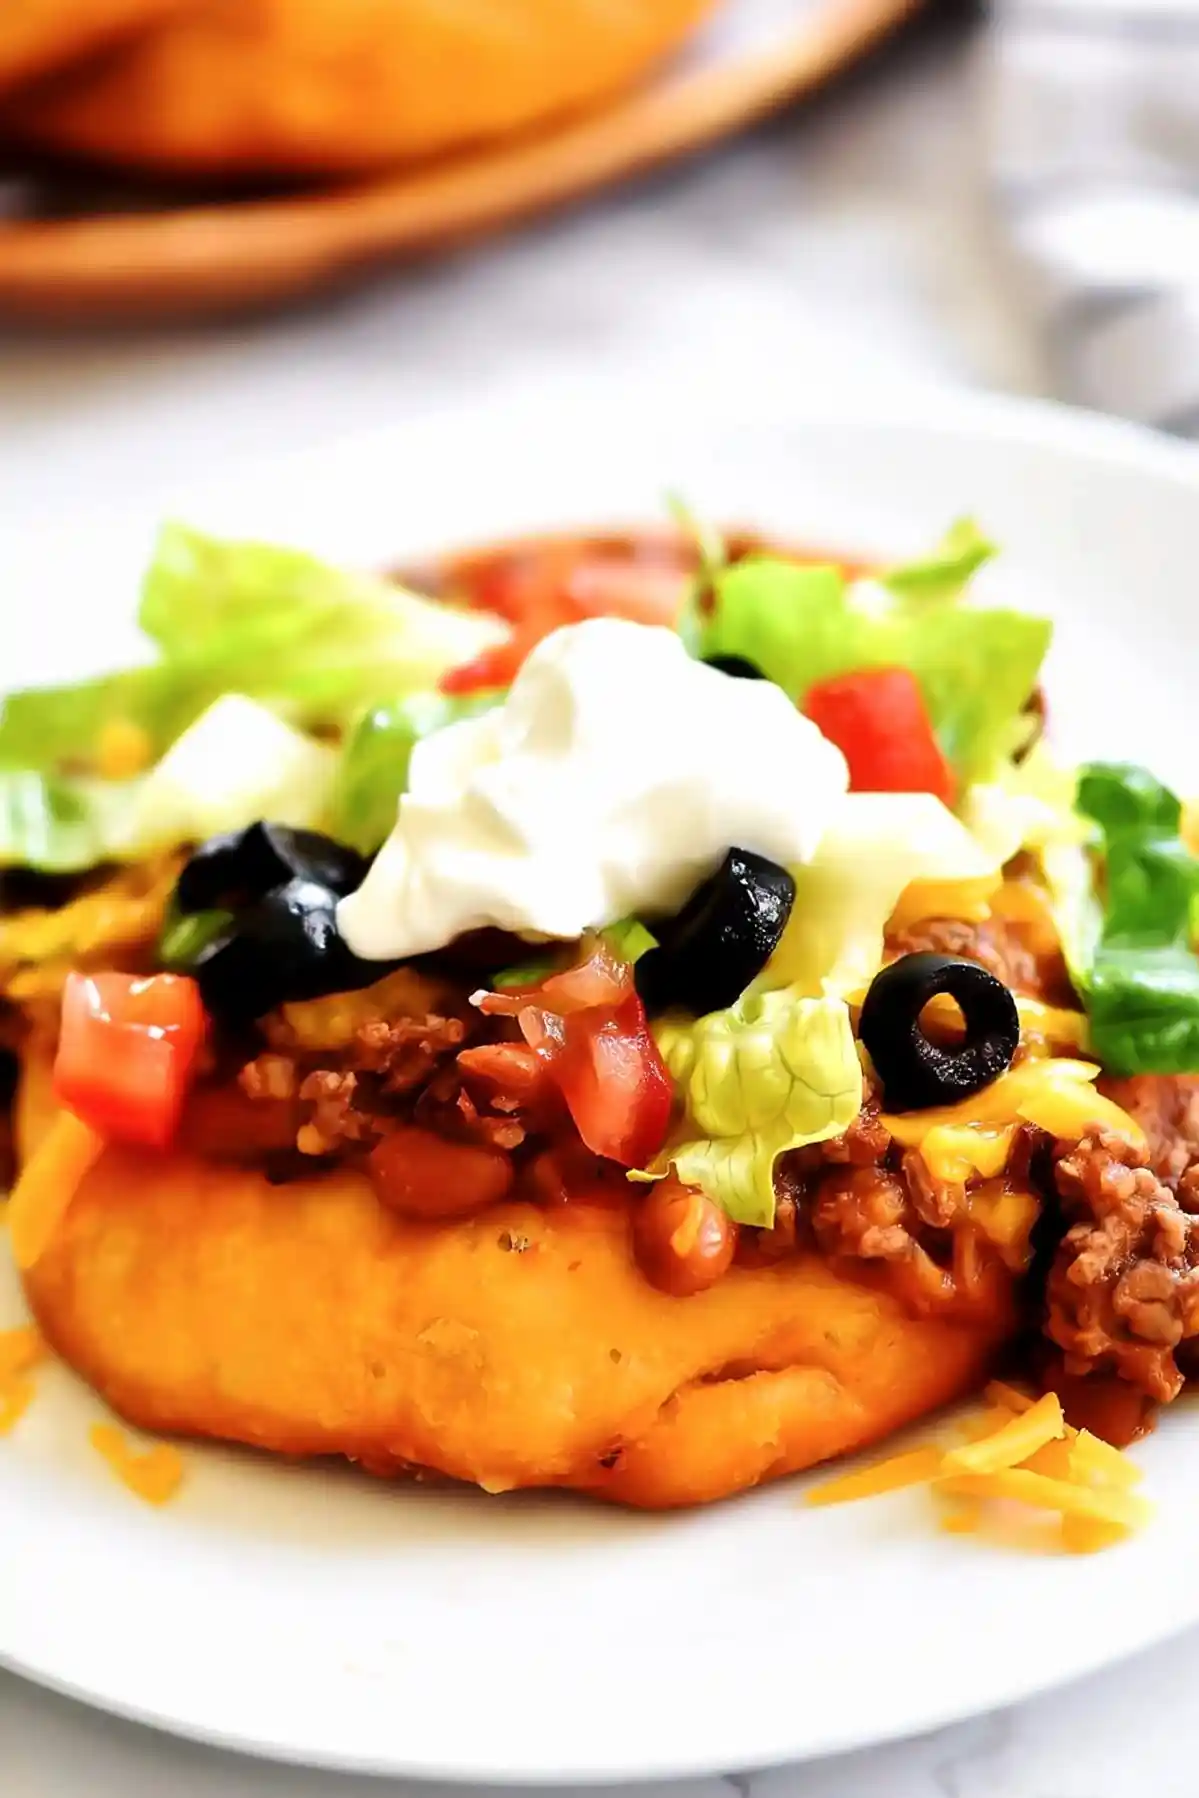
These Navajo-style tacos feature golden-brown fry bread topped with a rich, savory beef and bean chili. They provide a satisfying blend of textures and bold flavors, making them an excellent choice for a filling family dinner.
List of ingredients
- 1 pound lean ground beef – provides the protein base for the chili.
- 1 can (28 ounces) diced tomatoes, undrained – adds moisture and acidity.
- 1/4 cup light brown sugar – balances the savory spices.
- 2 Roma tomatoes, diced – adds fresh texture.
- 1 teaspoon onion powder – provides a savory aromatic layer.
- 1 packet (1 ounce) chili seasoning – offers a concentrated blend of spices.
- 1 can (6 ounces) tomato paste – thickens the chili sauce.
- 1 teaspoon ground cumin – adds an earthy, warm flavor.
- 2 teaspoons chili powder – enhances the deep red color and spice.
- 1 can (15 ounces) black beans, drained then rinsed – adds heartiness and fiber.
- 1 can (15 ounces) pinto beans, drained then rinsed – complements the black beans for variety.
- Vegetable or Avocado Oil – used for frying the dough.
- 1 can (16.3 ounces) refrigerated jumbo biscuit dough (or 16 frozen roll doughs, fully thawed) – the base for the fry bread.
- Lettuce – for a fresh, crunchy topping.
- Cheese – shredded for richness.
- Sour cream – adds a cool, creamy element.
- Salsa – for extra zest and heat.
- Guacamole – provides a creamy, buttery finish.
- Sliced olives – adds a salty, briny accent.
step-by-step instructions
- Prepare the Chili Base: Cook and crumble the lean ground beef in a large saucepan over medium-high heat. Once the meat is fully browned, carefully drain the excess grease from the pan.
- Simmer the Chili: Stir in the undrained diced tomatoes, brown sugar, diced Roma tomatoes, onion powder, chili seasoning, tomato paste, ground cumin, chili powder, black beans, and pinto beans. Bring the mixture to a boil, then reduce the heat to low and simmer for 1 hour to allow flavors to meld.
- Heat the Frying Oil: Pour vegetable or avocado oil into a large skillet until it is about half full. Set the heat to medium-low and heat the oil until it reaches 350 degrees Fahrenheit.
- Shape the Dough: Remove the biscuit dough from the can and press each piece into a flat circle. If using frozen roll dough, ensure they are fully thawed and press two rolls together to form a flat circle.
- Fry the Bread: Carefully place the flattened dough into the hot oil. Fry for 2 minutes on each side, or until the bread is golden-brown and puffed.
- Drain the Bread: Remove the fry bread from the oil using a slotted spoon and place it on a paper towel-lined plate to absorb excess grease. Repeat this process for all dough pieces.
- Assemble the Tacos: Place one piece of fry bread on a plate and top it with 1/2 cup of the prepared chili. Garnish with lettuce, cheese, sour cream, salsa, guacamole, and sliced olives.
Expert Tips for Perfect Fry Bread
Maintaining Constant Oil Temperature
Using a kitchen thermometer is the best way to ensure the oil stays at 350 degrees Fahrenheit. If the oil is too cold, the dough will absorb too much fat and become greasy. If it is too hot, the outside will burn before the center is cooked through.
Achieving Uniform Dough Thickness
Press the biscuit dough evenly from the center outward to create a consistent circle. Avoid leaving a thick lump in the middle, as this creates uneven cooking times. Consistent thickness ensures the bread puffs up evenly on both sides.
Efficient Grease Removal
Always use a paper towel-lined plate or a wire cooling rack to drain the fry bread immediately after removing it from the oil. This prevents the bottom of the bread from becoming soggy. Let them rest for a minute before adding heavy toppings.
Identifying the Ideal Doneness
The fry bread is ready when it has reached a deep golden-brown color and has puffed up significantly. If the bread is pale, it may be doughy inside. A light tap on the surface should feel slightly firm and airy.
Maximizing Chili Flavor
The Benefits of Slow Simmering
Simmering the chili for a full hour is crucial for developing a complex flavor profile. This time allows the brown sugar to caramelize slightly and the dried spices to fully hydrate. The result is a thicker, more cohesive sauce that clings to the bread.
Proper Grease Management
Draining the beef thoroughly after browning prevents an oily film from forming on top of the chili. This keeps the flavor clean and prevents the dish from feeling overly heavy. It also allows the tomato paste and spices to blend more effectively.
Balancing Sweetness and Acidity
The light brown sugar is a key ingredient that offsets the natural acidity of the tomato paste and canned tomatoes. This balance creates a rounded taste that mimics traditional Southwest styles. Adjust the amount slightly if you prefer a more savory profile.
Optimizing Bean Texture
Rinsing the black and pinto beans removes the metallic taste of the canning liquid and reduces excess sodium. Adding them toward the end of the prep but simmering them for the full hour ensures they are tender but not mushy. This provides a pleasant contrast to the soft beef.
Customizing Your Taco Toppings
Adding Fresh Vegetable Crunch
While iceberg lettuce is traditional, shredded romaine or a cabbage slaw can provide a more robust crunch. Freshly diced white onions or radishes also add a sharp contrast to the rich chili. These additions keep the dish feeling fresh and balanced.
Selecting High-Quality Cheeses
A sharp cheddar provides a bold tang, while Monterey Jack offers a milder, creamier melt. For a more authentic feel, use a Mexican blend or crumbled queso fresco. Adding the cheese immediately after the hot chili helps it melt perfectly.
Incorporating Zesty Elements
Freshly squeezed lime juice over the assembled taco can brighten all the flavors. Pickled jalapeños or pickled red onions add a vinegary punch that cuts through the richness of the fried bread. These acids help cleanse the palate between bites.
Layering Creamy Components
Adding a dollop of sour cream or a generous scoop of guacamole provides a cooling effect against the spices. You can also try a drizzle of lime-infused crema for a more refined presentation. These fats help carry the flavors of the cumin and chili powder.
Storage and Reheating Guidelines
Preserving Leftover Chili
Store the cooled chili in an airtight container in the refrigerator for up to four days. For longer storage, the chili freezes exceptionally well for up to three months. Ensure the container has some headspace to allow for expansion during freezing.
Keeping Fry Bread Fresh
Store unused or leftover fry bread in an airtight container at room temperature for up to two days. To prevent it from getting stale, keep it away from moisture. You can also freeze the bread for up to one month, though it may lose some of its initial fluffiness.
Restoring Bread Crispness
Do not use a microwave to reheat fry bread, as this makes it chewy and soft. Instead, place the bread in a 350 degree Fahrenheit oven or a dry skillet over medium heat. Heat for a few minutes until the exterior becomes crisp again.
Reheating the Chili Component
Warm the chili on the stovetop over low heat, stirring occasionally to prevent sticking. If the chili has thickened too much in the fridge, stir in a tablespoon of water or beef broth. This restores the original consistency without altering the taste.
Common Troubleshooting Solutions
Addressing Greasy Bread
If your fry bread is too oily, it is usually a sign that the oil temperature dropped too low. Ensure you are not overcrowding the pan, which cools the oil rapidly. Let the oil return to 350 degrees between each batch of dough.
Fixing Under-cooked Centers
If the bread is brown on the outside but raw inside, the oil was likely too hot. Lower the temperature and give the bread more time to cook through at a slower pace. Using a slightly thinner dough circle can also help the center cook faster.
Correcting a Thin Chili Consistency
If the chili is too watery, simmer it with the lid off for an additional 20 to 30 minutes. This allows more moisture to evaporate, concentrating the flavors and thickening the sauce. Alternatively, stir in a small amount of extra tomato paste.
Managing Overly Thick Chili
When a chili becomes too thick, it can become pasty rather than saucy. Stir in small amounts of water or low-sodium beef broth until the desired consistency is reached. Do this slowly to avoid watering down the flavor.
Ingredient Substitutions
Plant-Based Protein Options
For a vegetarian version, replace the ground beef with cooked brown lentils or a plant-based meat crumble. These alternatives absorb the chili seasoning and tomato base just as well as beef. Increase the amount of beans to ensure the dish remains filling.
Alternative Dough Bases
If refrigerated biscuit dough is unavailable, you can use pre-made pizza dough or a simple flour-and-water dough. Gluten-free biscuit or pizza doughs also work well, though they may require more gentle handling during the shaping process. Always ensure the dough is flat before frying.
Swapping Bean Varieties
While black and pinto beans are standard, kidney beans or cannellini beans can be used instead. Kidney beans provide a firmer texture, while cannellini beans offer a creamier profile. Mix and match based on your preference for color and texture.
Tomato Base Alternatives
If you prefer a less acidic taste, replace some of the diced tomatoes with crushed tomatoes or a mild tomato puree. Adding a teaspoon of smoked paprika can replace some of the depth lost by changing the tomato type. Always keep the tomato paste to ensure the chili has body.
Serving and Presentation Ideas
Setting Up a Taco Bar
Arrange the fried bread on a large platter and place the chili in a slow cooker to keep it warm. Put all the toppings in individual bowls around the main components. This allows guests to customize their tacos and prevents the bread from getting soggy too quickly.
Complementary Side Dishes
Serve these tacos with a side of Spanish rice or fried hominy for a complete meal. A simple side salad with a lime-vinaigrette also balances the richness of the fried components. Corn on the cob with chili-lime butter is another excellent pairing.
Plating for Visual Appeal
Start with the golden bread, then add a centered scoop of dark red chili. Layer the toppings in contrasting colors, starting with green lettuce, followed by yellow cheese and white sour cream. Finishing with a sprinkle of green onions adds a professional touch.
Portioning for Large Groups
When cooking for a crowd, fry the bread in batches and keep them warm in a low-temperature oven. Prepare the chili the day before to save time and allow the flavors to deepen. This ensures you can focus on the frying process while guests are arriving.
Frequently Asked Questions
Can I make the chili in advance?
Yes, the chili can be prepared one to two days ahead of time. Store it in the refrigerator and reheat it on the stovetop just before assembling the tacos. This often improves the flavor as the spices continue to blend.
How do I know when the fry bread is done?
The fry bread is done when it is golden brown on both sides and has puffed up significantly. It should feel light and airy rather than dense. Ensure you fry both sides for approximately 2 minutes.
Can I bake the fry bread instead of frying it?
You can bake the dough, but the texture will be more like a traditional biscuit than fry bread. Frying is necessary to achieve the characteristic crispy exterior and soft, puffy interior. Baking will result in a denser, less airy product.
How can I make the recipe gluten-free?
Swap the refrigerated biscuit dough for a certified gluten-free biscuit or pizza dough. Ensure your chili seasoning packet is also labeled gluten-free. The rest of the ingredients, including the beef and beans, are naturally gluten-free.
Print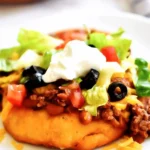
Hearty Navajo Tacos with Savory Beef Chili
- Total Time: 90 minutes
- Yield: 8 servings 1x
- Diet: General
Description
Fry bread topped with chili, cheese and all your favorite taco fixings. These tacos are popular in the Southwest region of the country and are absolutely delicious!
Ingredients
- 1 pound lean ground beef
- 1 can (28 ounces) diced tomatoes (undrained)
- 1/4 cup light brown sugar
- 2 Roma tomatoes (diced)
- 1 teaspoon onion powder
- 1 packet (1 ounce) chili seasoning
- 1 can (6 ounces) tomato paste
- 1 teaspoon ground cumin
- 2 teaspoons chili powder
- 1 can (15 ounces) black beans (drained then rinsed)
- 1 can (15 ounces) pinto beans (drained then rinsed)
- Vegetable or Avocado Oil (for frying)
- 1 can (16.3 ounces) refrigerated jumbo biscuit dough
- lettuce
- cheese
- sour cream
- salsa
- guacamole
- sliced olives
Instructions
- Brown beef: Cook and crumble ground beef in a large saucepan over medium-high heat.
- Drain grease: Once browned, drain grease.
- Simmer chili: Add all other chili ingredients, bring to a boil, reduce heat to low and simmer for 1 hour.
- Heat oil: Heat oil in a large skillet to 350 degrees F over medium-low heat.
- Shape dough: Press biscuit dough into flat circles.
- Fry dough: Fry dough for 2 minutes on each side, or until golden-brown.
- Drain dough: Remove from oil and lay fried dough onto a paper towel-lined plate.
- Assemble: Place one fry bread onto a plate, top with 1/2 cup of chili and favorite taco toppings.
Notes
Store cooled fry bread in an airtight container at room temperature for up to 2 days or freeze for 1 month. Store leftover chili in the refrigerator for up to 4 days or freeze for 3 months.
- Prep Time: 15 minutes
- Cook Time: 75 minutes
- Category: Main Course
- Method: Frying
- Cuisine: American Southwest
Nutrition
- Serving Size: 1 taco
- Calories: 680 kcal
- Sugar: 14 g
- Sodium: 1250 mg
- Fat: 34 g
- Saturated Fat: 11 g
- Unsaturated Fat: 23 g
- Trans Fat: 0 g
- Carbohydrates: 62 g
- Fiber: 11 g
- Protein: 31 g
- Cholesterol: 85 mg
Keywords: Navajo Tacos, fry bread, Southwest cuisine, easy tacos, comfort food