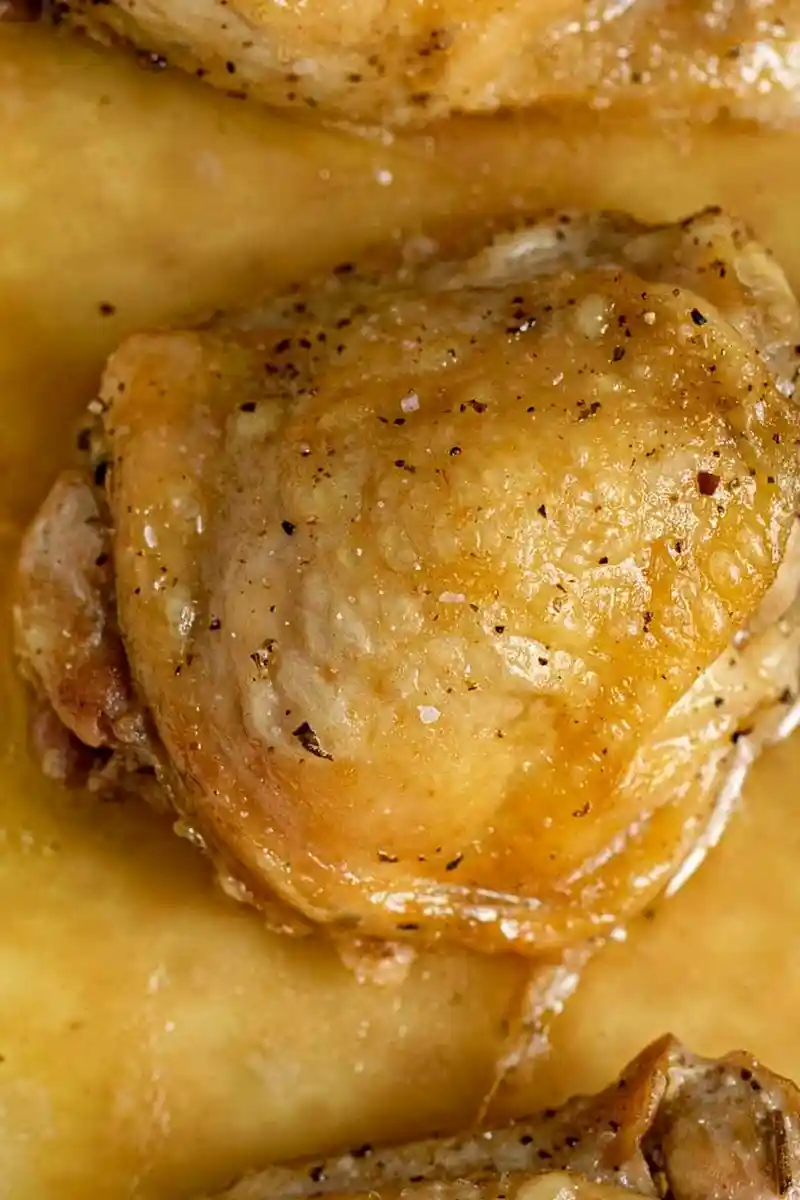
Experience a bold and zesty flavor profile with this oven-baked chicken dish that mimics the taste of favorite salt and vinegar snacks. These skin-on thighs are marinated for maximum tanginess and roasted until the skin is perfectly crisp.
List of ingredients
- 8 chicken thighs, skin-on and bone-in – provides the best flavor and juiciness.
- 1 cup apple cider vinegar – creates the signature tangy base.
- 1/4 cup vegetable oil – helps the skin crisp up and prevents sticking.
- 1 tablespoon Kosher salt – enhances all the flavors.
- 1/2 teaspoon coarse ground black pepper – adds a subtle earthy heat.
step-by-step instructions
- Prepare the marinade: Place the chicken thighs, apple cider vinegar, vegetable oil, salt, and black pepper into a large mixing bowl. Stir to ensure every piece is thoroughly coated and then cover the bowl tightly.
- Marinate the meat: Refrigerate the chicken for at least 4 hours to allow the flavors to penetrate. For the best results, leave the chicken to marinate overnight.
- Heat the oven: Preheat your oven to 375 degrees Fahrenheit to ensure a consistent cooking temperature.
- Arrange the pan: Place the marinated chicken thighs in a baking dish in a single layer. Ensure the skin side is facing up to maximize crispiness during roasting.
- Bake the chicken: Cook for 40-45 minutes. The chicken is ready when the skin is golden-brown and crispy, and the internal temperature reaches a safe level.
Optimizing the Marination Process
Marinating Overnight for Depth
Allowing the chicken to soak in the vinegar mixture overnight provides the most intense flavor. The acid in the vinegar has more time to break down the proteins, resulting in a more tender piece of meat. This ensures the salt and tang are evenly distributed from the skin to the bone.
Using Airtight Storage
Use a heavy-duty zip-top bag or a glass container with a tight lid to prevent the vinegar scent from permeating your refrigerator. A sealed bag is particularly effective as it forces the marinade to stay in direct contact with all surfaces of the chicken. This eliminates the need to flip the chicken frequently during the marinating phase.
Maintaining Proper Temperature
Always keep the chicken refrigerated during the marination process to maintain food safety. Cold temperatures help the meat retain its structure while the acid works on the flavor. Avoid marinating at room temperature, as this can lead to bacterial growth and an overly mushy texture.
Techniques for Maximum Crispiness
Positioning the Skin Side Up
Placing the chicken skin-side up allows the heat to hit the fat layer directly from above. This causes the fat to render and bubble, which creates a crunchy texture similar to frying. If the chicken is flipped, the skin will steam instead of crisp, leading to a rubbery result.
Ensuring Full Oven Preheating
Wait until the oven fully reaches 375 degrees before sliding in the baking dish. Putting chicken into a cold oven slows down the rendering of the skin fat, which prevents that desired crunch. A hot environment immediately starts the searing process on the skin.
Preventing Pan Overcrowding
Leave space between each chicken thigh in the baking dish to allow air to circulate. When thighs are packed too tightly, they release moisture that creates steam around the meat. This steam prevents the skin from browning and can lead to pale, soft edges.
Vinegar Alternatives and Substitutions
Using White Distilled Vinegar
White distilled vinegar offers a sharper and more aggressive tang than apple cider vinegar. This is the closest match to the flavor found in commercial salt and vinegar potato chips. Use this option if you prefer a high-contrast, pungent acidity.
Switching to Malt Vinegar
Malt vinegar provides a deeper, slightly sweeter, and more rounded flavor profile. It is a traditional choice for fish and chips and works exceptionally well with poultry. It adds a rich color to the finished chicken skin.
Incorporating Red Wine Vinegar
Red wine vinegar introduces a fruity undertone and a more complex acidity to the marinade. While less sharp than white vinegar, it pairs well with the natural richness of chicken thighs. This variation is ideal for those who want a more sophisticated flavor.
Adjusting the Cut of Meat
Preparing Chicken Wings
You can use this same marinade for chicken wings by reducing the marinade quantity by half. To achieve extra crunch, toss the wings in a small amount of baking powder before placing them on the tray. After baking, toss them in the remaining marinade for a fresh burst of flavor.
Using Boneless Thighs
Boneless thighs cook faster than bone-in versions and are more convenient for meal prep. Reduce the baking time by about 10-15 minutes to prevent the meat from drying out. Ensure you still use skin-on thighs to maintain the texture of the dish.
Baking Chicken Breasts
Chicken breasts are leaner and can dry out quickly if marinated in acid for too long. Limit the marination time to 2-4 hours rather than overnight. Keep a close eye on the internal temperature to ensure they remain juicy.
Adding Extra Flavor Profiles
Introducing Garlic Powder
Whisking one teaspoon of garlic powder into the marinade adds a savory depth that complements the acidity. Garlic provides an aromatic quality that rounds out the sharp edges of the vinegar. It creates a more balanced, savory-tangy experience.
Adding Fresh Herbs
Chopped parsley or fresh thyme added to the marinade adds a bright, earthy note. You can also sprinkle fresh herbs over the chicken immediately after it comes out of the oven. This adds a pop of color and a fresh contrast to the salty flavors.
Adding a Hint of Sweetness
Sprinkle a small amount of brown sugar on top of the chicken before baking. The sugar caramelizes under the heat, creating a sweet-and-salty crust. This balances the high acidity of the vinegar and adds a beautiful mahogany glaze.
Serving Suggestions and Side Dishes
Pairing with Root Vegetables
Roasted carrots, parsnips, or sweet potatoes complement the tanginess of the chicken. You can roast these vegetables on the same tray if you have enough space. The vinegar drippings from the chicken will season the vegetables during the cooking process.
Serving with Creamy Mashed Potatoes
The richness of butter-laden mashed potatoes helps neutralize the sharp acidity of the vinegar. The contrast between the creamy potatoes and the crispy, salty chicken creates a satisfying balance. Add a bit of garlic to the potatoes to mirror the savory notes.
Adding a Fresh Green Salad
A crisp garden salad with a light lemon vinaigrette provides a refreshing counterpoint to the heavy flavors. Use mixed greens, cucumber, and radishes for added crunch. The freshness of the vegetables cleanses the palate between bites of tangy chicken.
Creating a Complementary Dipping Sauce
Mixing Yogurt and Vinegar
Combine half a cup of plain yogurt with two teaspoons of white wine vinegar and a pinch of salt. This creates a cooling base that cuts through the intensity of the salt and vinegar marinade. The creamy texture adheres well to the crispy chicken skin.
Adding Tangy Cheeses
Fold in crumbled feta, goat cheese, or blue cheese into the yogurt mixture for extra depth. These cheeses provide a salty, creamy punch that enhances the overall flavor profile. Blue cheese is particularly effective for those who enjoy a bold, pungent sauce.
Incorporating Fresh Aromatics
Mince a fresh garlic clove and fold it into your dipping sauce for a sharp kick. Adding a pinch of granulated sugar can also help balance the acidity of the yogurt and vinegar. Whisk until smooth and chill in the fridge before serving.
Storage and Preservation
Refrigerating Leftovers
Allow the chicken to cool completely before transferring it to an airtight container. Store it in the refrigerator for up to 3-4 days. Ensure the container is sealed tightly to keep the chicken from absorbing other fridge odors.
Freezing Cooked Chicken
Place cooled chicken in a freezer-safe bag, removing as much air as possible to prevent freezer burn. The chicken will maintain its quality for up to 6 months in the freezer. This is an excellent way to preserve bulk batches for future meals.
Proper Thawing Procedures
Thaw frozen chicken slowly in the refrigerator overnight before reheating. Avoid thawing on the counter to prevent the meat from entering the danger zone for bacterial growth. This method preserves the texture of the meat more effectively.
Effective Reheating Methods
Using the Oven for Texture
Reheat the chicken in a 350-degree oven for 10-15 minutes. This is the best method to restore the crispiness of the skin. Place the pieces on a wire rack over a baking sheet to allow air to circulate around the meat.
Quick Microwave Heating
Microwaving is the fastest option but will result in soft, rubbery skin. Heat on medium power in short bursts to avoid overcooking the center. Use this method only if time is a priority over texture.
Air Fryer Reheating
An air fryer is an ideal tool for restoring the crunch of the skin. Heat at 375 degrees for 3-5 minutes until the skin sizzles. This method provides results nearly identical to the original baking process.
Troubleshooting Common Issues
Skin Not Getting Crispy
This usually happens if the oven wasn’t preheated or the pan was overcrowded. Ensure there is plenty of space between the thighs to allow steam to escape. Also, check that the skin was completely dry before adding the oil to the marinade.
Chicken Tasting Too Tart
If the vinegar flavor is overwhelming, you can balance it by serving the chicken with a creamy side or sauce. Adding a pinch of brown sugar before baking can also mitigate excessive acidity. Next time, reduce the marination time slightly.
Undercooked Center
Bone-in thighs take longer to cook than boneless cuts. Use a meat thermometer to ensure the thickest part of the thigh reaches 165 degrees Fahrenheit. If the skin is browning too fast, cover the pan loosely with foil and continue baking.
Frequently Asked Questions
Can I use a different oil?
Yes, any neutral oil with a high smoke point will work, such as canola or grapeseed oil. Avoid using extra virgin olive oil for high-heat roasting as it may smoke and change the flavor profile.
How do I know when the chicken is done?
The juices should run clear when the thickest part of the meat is pierced. For precision, use a digital meat thermometer to confirm an internal temperature of 165 degrees Fahrenheit.
Is this recipe gluten-free?
Yes, this recipe is naturally gluten-free as it uses no flour or breading. All ingredients are naturally free of gluten, making it safe for those with gluten sensitivities.
Print
Tangy Baked Salt and Vinegar Chicken
- Total Time: 4 hours 40 minutes
- Yield: 8 servings 1x
- Diet: Gluten-free
Description
Salt and Vinegar Chicken delivers crave-worthy crispiness and that classic chip-inspired tang, all baked to perfection in just 40 minutes.
Ingredients
- 8 chicken thighs, skin-on and bone-in
- 1 cup apple cider vinegar
- 1/4 cup vegetable oil
- 1 tablespoon Kosher salt
- 1/2 teaspoon coarse ground black pepper
Instructions
- Step 1: Add chicken, vinegar, oil, salt and pepper to a large bowl and cover.
- Step 2: Marinate for at least 4 hours, preferably overnight.
- Step 3: Preheat oven to 375 degrees.
- Step 4: Add chicken, skin side up to a baking dish.
- Step 5: Bake for 40-45 minutes until skin is crispy and chicken is cooked through.
Notes
For best results, marinate the chicken overnight in the refrigerator. Ensure chicken is placed skin-side up in the baking dish for maximum crispiness.
- Prep Time: 4 hours
- Cook Time: 40 minutes
- Category: Dinner
- Method: Baking
- Cuisine: American
Nutrition
- Serving Size: 1 serving
- Calories: 382 kcal
- Sugar: 1 g
- Sodium: 985 mg
- Fat: 31 g
- Saturated Fat: 12 g
- Unsaturated Fat: 19 g
- Trans Fat: 0 g
- Carbohydrates: 1 g
- Fiber: 1 g
- Protein: 23 g
- Cholesterol: 142 mg
Keywords: salt and vinegar chicken, crispy chicken thighs, oven baked chicken, gluten-free dinner